429 Too Many Requests

429 Too Many Requests


nginx

Restoring a young patient’s smile with composite

Case by Dr. Onur Alp Yünük 


COMBINING HIGH-PERFORMANCE TOOLS AND MATERIALS FOR A PREDICTABLE OUTCOME

Direct composite restorations are a high-quality treatment option even when large amounts of tooth structure need to be replaced. This is due to recent advancements in resin composite materials and adhesive technology. By selecting appropriate materials and layering techniques combined with modern digital tools for colour difference evaluation, it is possible to predictably produce highly aesthetic outcomes, as demonstrated in the following case example.


The challenge

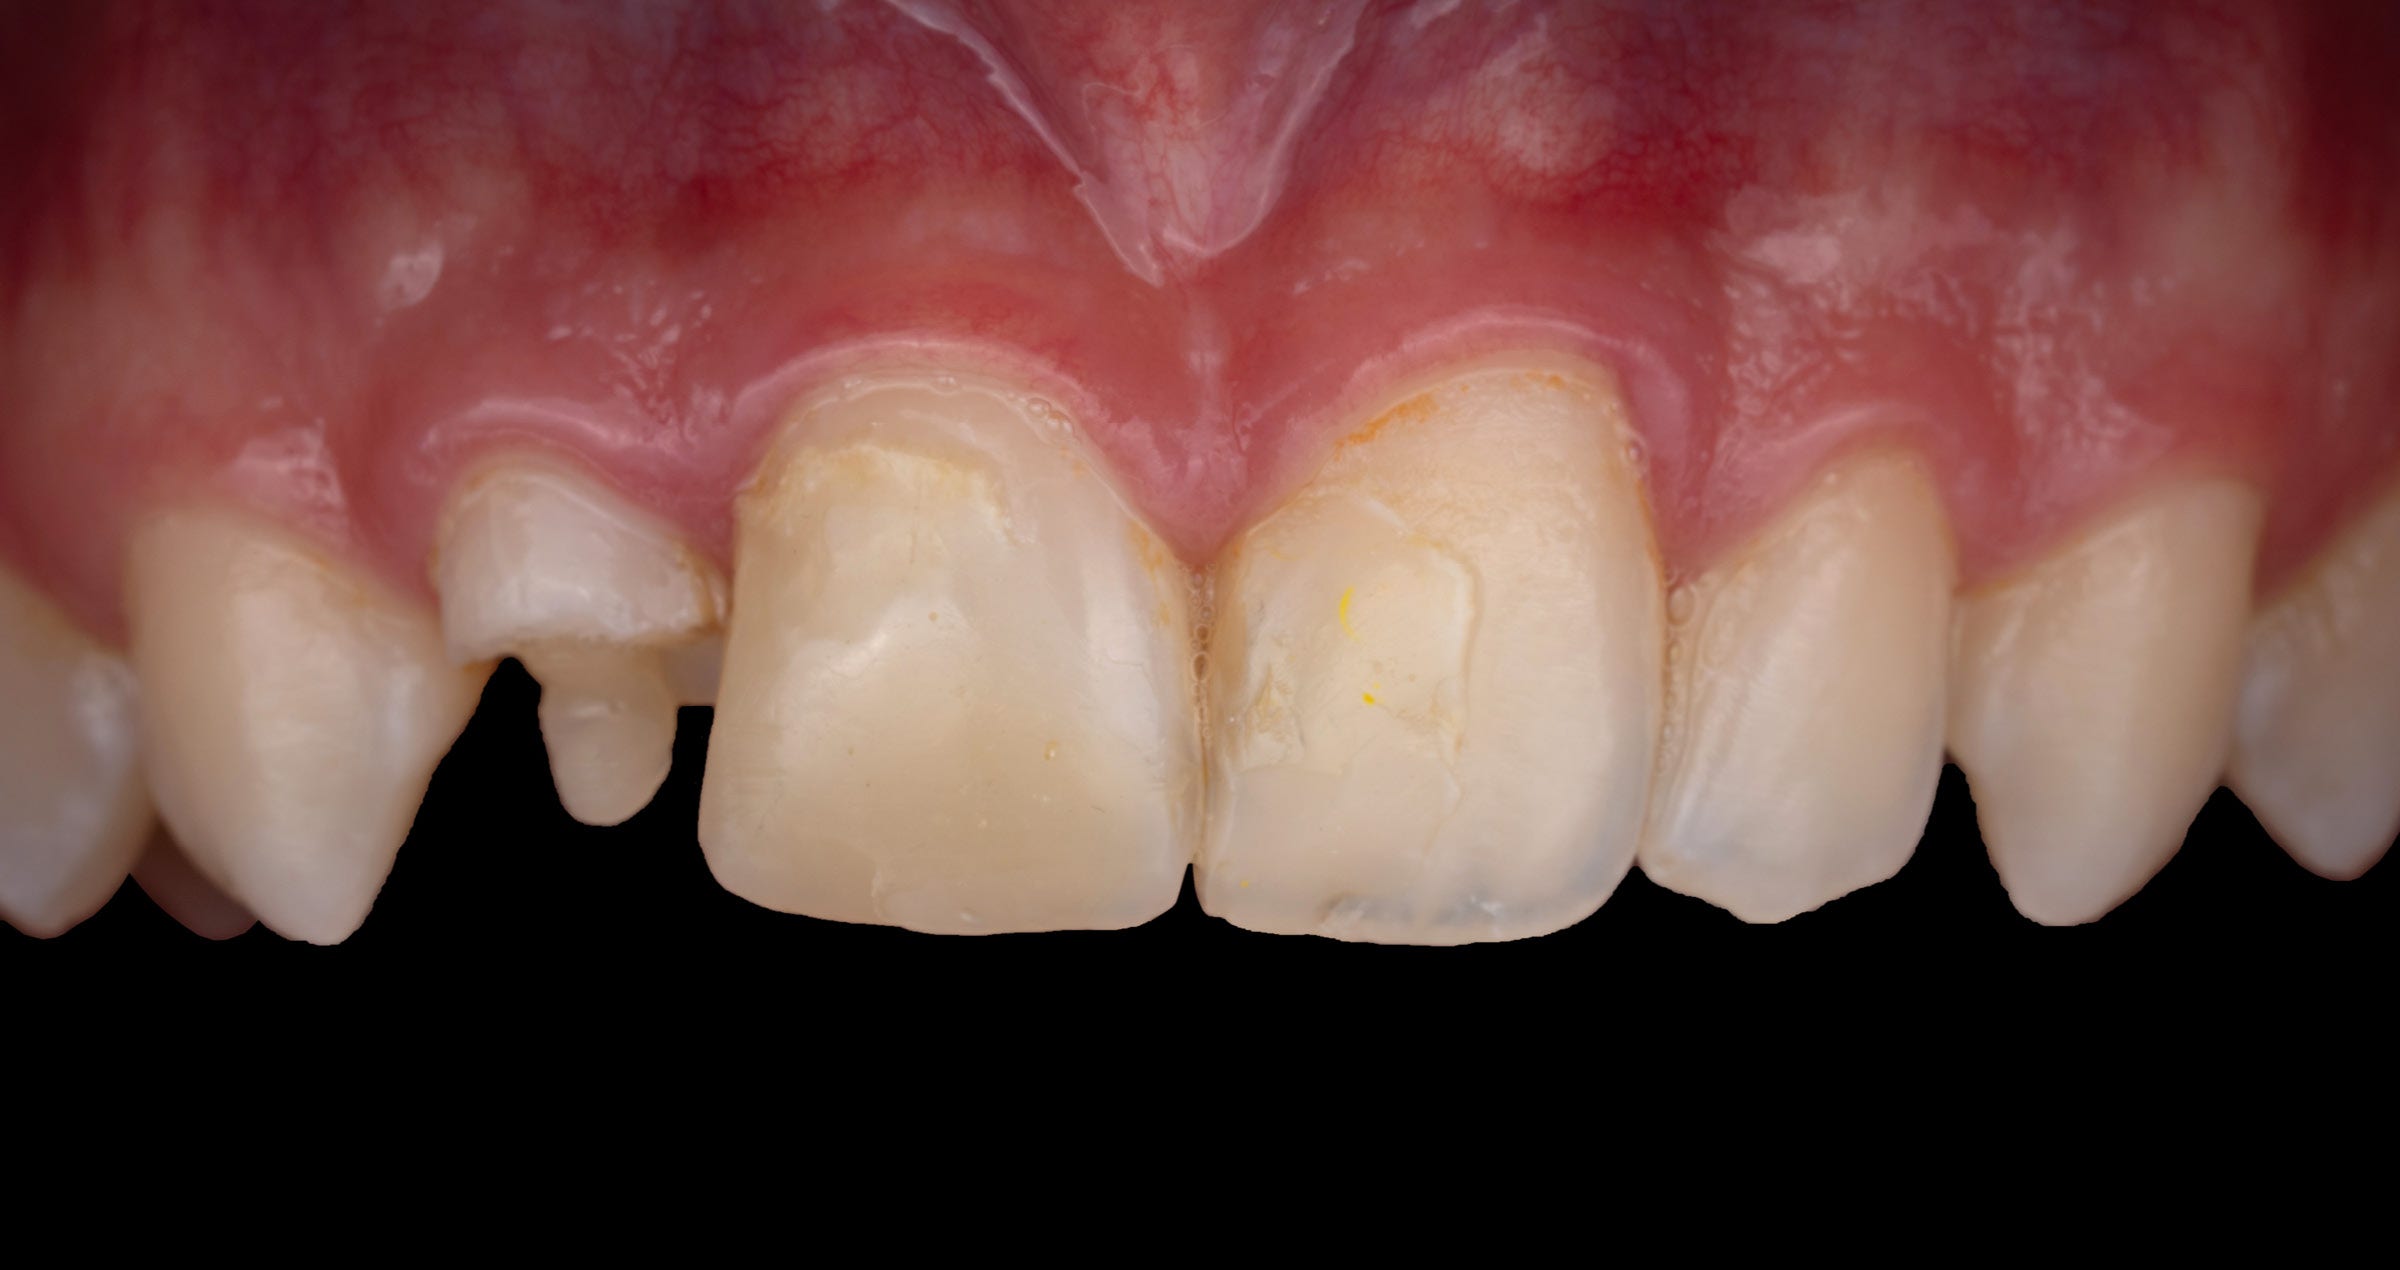
A young male patient presented to our clinic requesting the replacement of his existing composite restorations on his maxillary incisors (teeth #12 and #11 according to the FDI notation). Clinical examination revealed extensive restoration loss on the lateral incisor. Furthermore, anatomical irregularities, discolouration, and loss of surface gloss were observed on tooth #11. The adjacent central incisor exhibited similar issues regarding colour and surface polish.


In consultation with the patient, it was decided to replace the existing restorations using a modern composite material specifically developed for dual-shade layering – CLEARFIL MAJESTY™ ES-2 Premium (Kuraray Noritake Dental Inc.). For an exact shade analysis, photographs were taken with and without a cross-polarized filter (Figs. 1 to 4).


Fig. 1: Frontal view of the teeth  with extensive restoration loss on the maxillary left lateral incisor.


Fig. 2: Cross-polarized photograph of the teeth allowing for a detailed analysis of the shade irregularities.


Fig. 3: Lateral view of the teeth.


Fig. 4: Lateral view – cross-polarized photograph.


The solution

Following removal of the existing restorations, rubber dam was placed for working field isolation. A self-etching adhesive (CLEARFIL™ SE Bond 2, Kuraray Noritake Dental Inc.) was applied in the selective enamel etching mode before establishing the palatal shell using CLEARFIL MAJESTY™ ES-2 Premium in the shade A1E (Figs. 5 and 6). The mamelon structures were reconstructed with CLEARFIL MAJESTY™ ES-2 Premium in the shade A1D, while the translucent shade Blue was applied  to the opalescent zone. Finally, yellow and white tints were used for characterization. Fig. 7 illustrates the appearance before,  Fig. 8 after finishing and polishing.


Fig. 5: Palatal shell established with the enamel shade A1E of the selected composite.


Fig. 6: Lateral view of the teeth during the restoration procedure.


Fig. 7: Restoration before finishing and polishing.


Fig. 8: Appearance of the restorations after finishing and polishing.


The outcome

To evaluate the final colour integration, another photograph was taken with a cross-polarized filter, holding a grey reference card in place for calibration (Figs. 9 and 10). The lateral view of the restored teeth (Fig. 11) reveals that not only the right colour combination, but also a natural surface texture is required for a highly aesthetic outcome.


Fig. 9: Frontal view of the restored teeth taken with a cross-polarized filter.


Fig. 10: Gray reference card calibration and the resulting L*a*b* coordinates of the restoration.


Fig. 11: Lateral view of the restored teeth stressing the importance of surface texture.


DISCUSSION AND CONCLUSION

Observation, supported by modern tools for photography and image analysis (like polarized filters and L*a*b* coordinates), is  an important skill needed for the lifelike reconstruction of teeth with direct composite materials. By combining this skill with a highperformance composite system that offers fixed shade combinations and innovative light diffusion technology for a nice blend-in  with the surrounding tooth structure, creating beautiful restorations becomes a predictable business.

In the case presented, the patient was very satisfied with the outcome in terms of aesthetics and function. At regular recalls, the quality of the restorations is checked – they still offer a very nice functional and aesthetic integration.


Posterieure directe composietrestauratie binnen het “Universal Excellence”-concept

Case by Dt. Koray Kendir, DDS, Turkey (İzmir)


SYNOPSIS

Dit klinisch casusrapport beschrijft een posterieure directe composietrestauratie uitgevoerd met behulp van het “Universal Excellence”-productconcept van Kuraray Noritake Dental Inc. Een universeel adhesief (CLEARFIL™ Universal Bond Quick 2) en een hooggevuld, universeel flowable composiet (CLEARFIL MAJESTY™ ES Flow Universal) werden toegepast om zowel eenvoud als voorspelbaarheid te bereiken. Een stapsgewijze documentatie toont alle verschillende fasen van isolatie, preparatie van de caviteit, deep margin elevation, adhesief protocol tot de uiteindelijke restauratie. 

BESCHRIJVING

Een 38-jarige vrouwelijke patiënt meldde zich met klachten van bloedend tandvlees en gevoeligheid voor kou tussen haar maxillaire hoektand links en haar eerste premolaar (tanden #23 en #24 volgens de internationale nummering). Tijdens klinisch onderzoek werden een open marge en secundaire cariës geconstateerd bij de gingivale bodem van de bestaande restauratie op element #23. Na isolatie met een cofferdam werd de stapsgewijze behandeling gestart.


KLINISCHE PROCEDURE

Stap 1. Element #23 vertoonde een open gingivale marge en cariës (afb. 1).

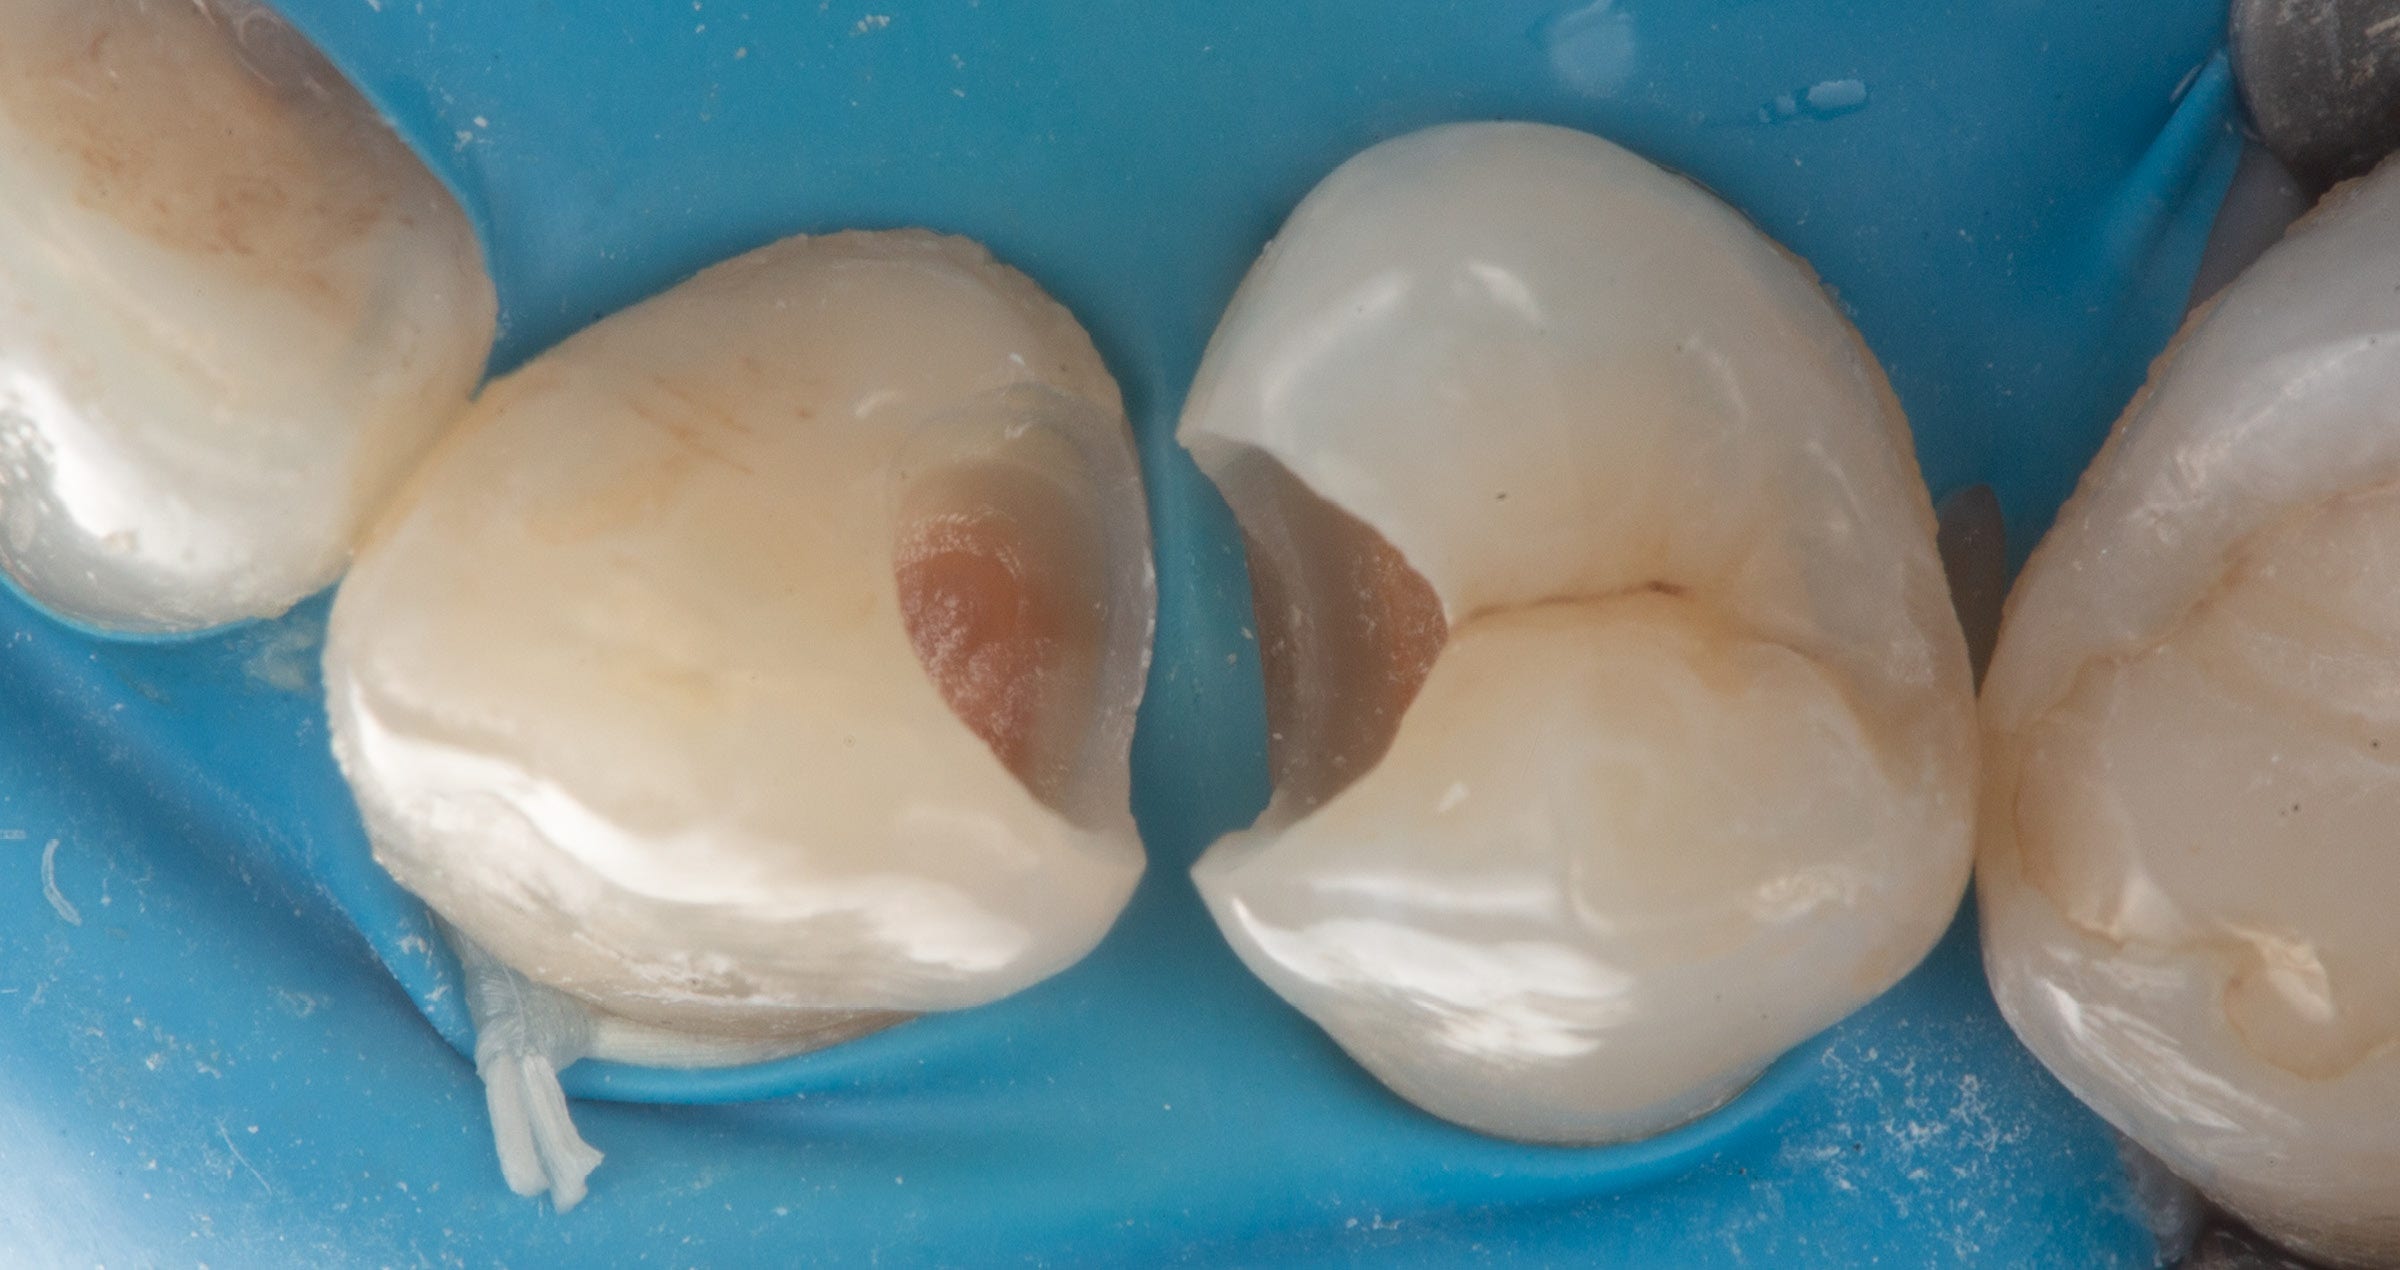
Stap 2. Na verwijdering van het glazuur werden de cariës geëxcaveerd tot op het gingivale niveau. Er werd geconstateerd dat de laesie op Element #24 zich subgingivaal had uitgebreid (afb. 2).

Stap 3. Na volledige excavatie van de cariës en verfijning van de caviteit werd duidelijk dat er een deep margin elevation (DME) nodig was op element #24 (afb. 3).

Stap 4. De Deep margin elevation (DME) werd uitgevoerd op element #24 met behulp van een op maat gemaakte sectionele matrix. Eerst werden selectieve ets en CLEARFIL™ Universal Bond Quick 2 aangebracht, gevolgd door het aanbrengen van CLEARFIL MAJESTY™ ES Flow Universal (Super Low) (afb. 4 tot 6).

Stap 5. Na het voltooien van de DME werden matrixbanden geplaatst gevolgd door een directe restauratie van elementen #23 en #24 met CLEARFIL MAJESTY™ ES Flow Universal (Super Low) (afb. 7 tot 9). Dankzij de gemakkelijke verwerking van het materiaal, kleuradaptatie en de uitstekende polijstbaarheid kon deze uitdagende DME casus succesvol en efficiënt worden voltooid.

Het resultaat van de behandeling is te zien in afbeeldingen 10 en 11.


Afb. 1. Preoperatief aanzicht onder isolatie met cofferdam 


Afb. 2. Klinische situatie na excavatie van de cariës


Afb. 3. Verfijnde caviteiten met een diepe marge op de premolaar 


Afb. 4. Op maat gemaakte wig om de marge te verhogen 


Afb. 5. Buccaal aanzicht van de tanden na Deep Margin Elevation met universele producten


Afb. 6. Occlusaal aanzicht na Deep Margin Elevation met universele producten


Afb. 7. Plaatsing van een sectionele matrix 


Afb. 8. Buccaal zicht van de elementen, hersteld met een universeel flowable composiet met zeer lage viscositeit


Afb. 9. Occlusaal aanzicht van de gerestaureerde elementen


Afb. 10. Occlusaal aanzicht van de gerestaureerde elementen #23 en #24, met zichtbare kleuradaptatie, anatomische vorm en oppervlakteglans


Afb. 11. Buccaal aanzicht van de gerestaureerde elementen #23 en #24, met esthetische kleuradaptatie, anatomische vorm en oppervlakteglans


DISCUSSIE

Universele adhesieven en moderne flowables vereenvoudigen posterieure directe restauraties door de techniekgevoeligheid te verminderen en tegelijkertijd duurzame resultaten te bieden. In deze casus zorgde CLEARFIL™ Universal Bond Quick 2 voor sterke adhesie met een minimale applicatietijd. Het universele flowable composiet toonde uitstekende aanpassingsvermogen, polijstbaarheid en duurzaamheid. Zelfs bij een subgingivale marge die DME vereiste, werd een gestroomlijnde aanpak bereikt zonder kwaliteitsverlies.


CONCLUSIE

De combinatie van CLEARFIL™ Universal Bond Quick 2 en CLEARFIL MAJESTY™ ES Flow Universal stelt clinici in staat posterieure restauraties op voorspelbare en efficiënte wijze uit te voeren. Hun universele toepasbaarheid en gebruikseigenschappen sluiten aan bij het “Universal Excellence”-concept, dat een vereenvoudigde maar betrouwbare dagelijkse praktijk ondersteunt.

Ethics & Disclosure

All procedures were performed in accordance with standard dental practice. The patient provided informed consent for treatment and publication of anonymized clinical images. Author collaborates with Kuraray Noritake Dental Inc. as an advisor; content reflects clinical experience.


Tandarts:

KORAY KENDIR


Dt. Koray Kendir is afgestudeerd aan de Faculteit Tandheelkunde van de Hacettepe Universiteit en is medeoprichter van een tandheelkundige privékliniek in İzmir. Hij is gespecialiseerd in digitale tandheelkunde, smile design en computerondersteunde restauratieve behandelingen. Vanwege zijn innovatieve benaderingen wordt Dr. Kendir vaak gevraagd als gastspreker op nationale tandheelkundige congressen en heeft hij een adviserende rol bij meerdere tandheelkundige bedrijven.

Use of the new CLEARFIL MAJESTY ES Flow Universal

Case by Dr. Michał Jaczewski


FLOWABLE INJECTION TECHNIQUE

What are the most important properties of a flowable composite used for the flowable injection technique? Personal experience shows that balanced optical properties are essential, with an appropriate translucency, blend-in ability and surface gloss leading the way. However, the mechanical properties are also important, not least because the restorative material will be in direct contact with the antagonist teeth. And finally, handling properties are essential: The right level of flowability is needed for proper injection, while a void-free application is required for an intact, stain-resistant surface.


For the last seven years, CLEARFIL MAJESTY™ ES Flow Low (Kuraray Noritake Dental Inc.) has been my go-to flowable composite for the flowable injection technique. Its level of flowability is ideal for the technique in the anterior and posterior region. Whenever a lower flowability is needed, it is possible to switch to the Super Low variant. Moreover, I like the shade offering, which – together with the superior polishability of the material – leads to natural aesthetics. Finally, its mechanical properties are so good that the product is approved for a wide indication range without load limitations.


When the company announced the introduction of CLEARFIL MAJESTY™ ES Flow Universal, which comes in just two universal shades and two different levels of flowability (Low and Super Low), I immediately decided to give it a try: The prospect of balanced properties I am already familiar with, combined with a simplified shade selection sounded very promising. So far, the new product comes up to my expectations: The following case example reveals the simplicity of the procedure and the beauty of the results. The patient presented during orthodontic (aligner) treatment for a shape correction in the anterior region due to wear of the incisal edge.


Fig. 1. Initial clinical situation: Patient in need of a shape correction in the maxillary incisor region.


Fig. 2. Application of CLEARFIL™ Universal Bond Quick 2 (Kuraray Noritake Dental Inc.) to the enamel of a central incisor, which has been merely roughened by air abrasion with aluminium oxide (50 μm at low pressure) followed by etching with a phosphoric acid etchant.


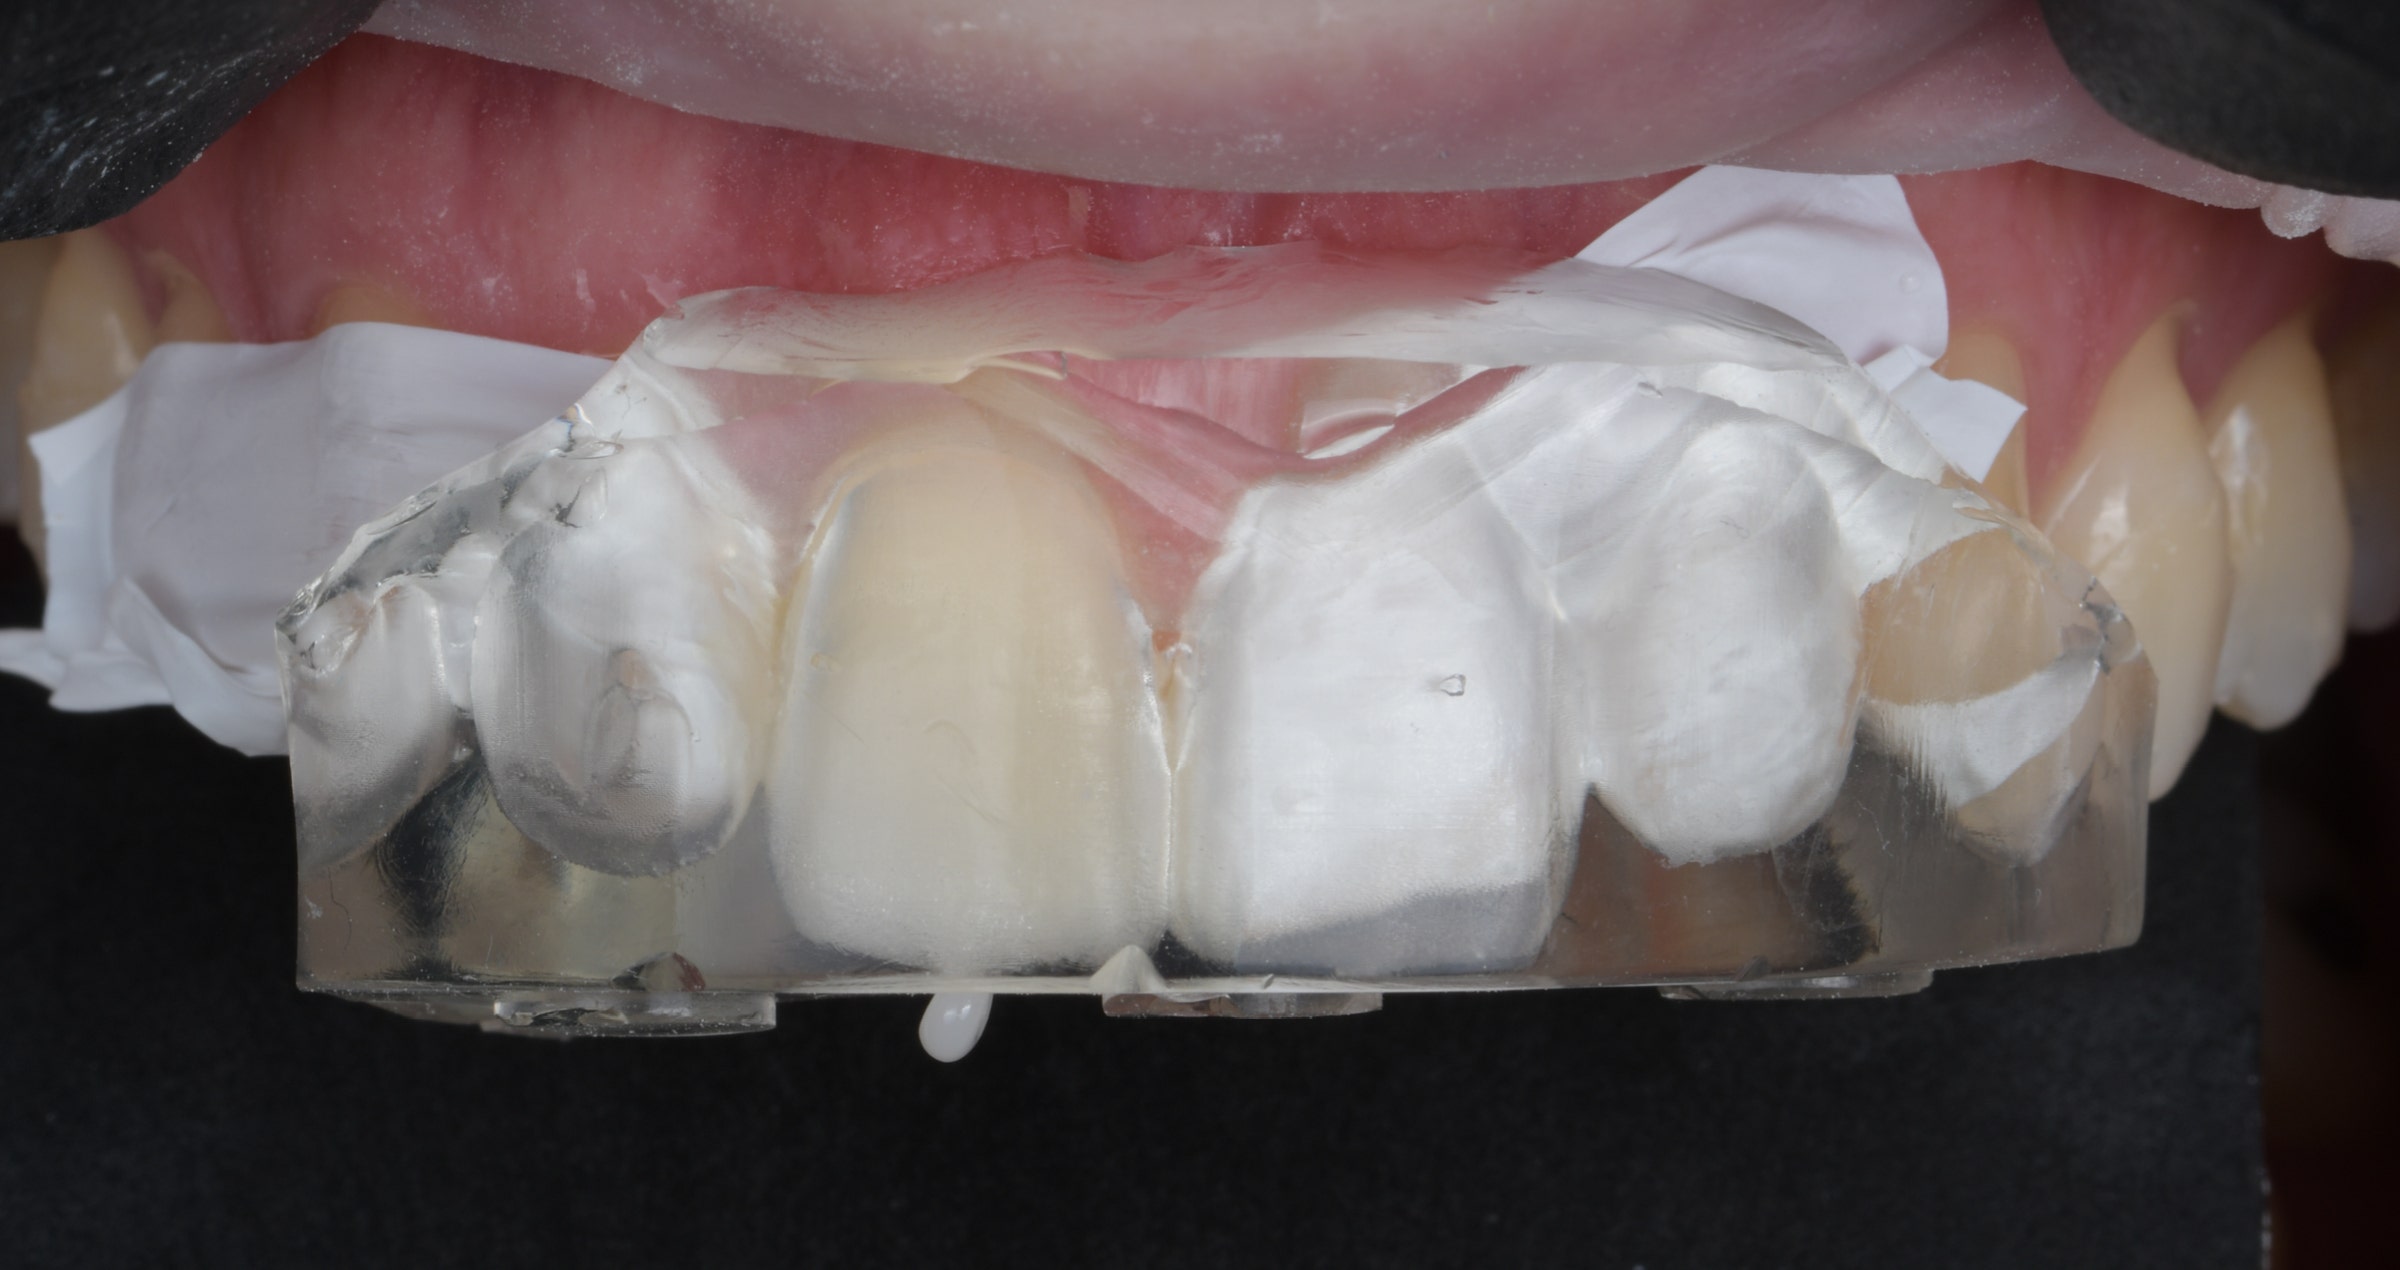
Fig. 3. Transparent silicon index placed in the mouth and CLEARFIL MAJESTY ES Flow Universal Low (U shade) already injected in the position of the maxillary right central incisor.


Fig. 4. Shape correction on the maxillary right central incisor completed.


Fig. 5. Situation after finishing and polishing of the incisor restorations.


Fig. 6. Nice shade match leading to a smooth blend-in with the surrounding natural tooth structure.


Fig. 7. Immediate treatment outcome supporting an improvement of the smile aesthetics and hence, the patient‘s quality of life during aligner therapy.


RESULTS THAT SPEAK FOR THEMSELVES

Like its related product CLEARFIL MAJESTY ES Flow, the universal-shade version CLEARFIL MAJESTY ES Flow Universal offers properties which are – from a personal perspective – ideal for the flowable injection technique. The shade-matching properties are astonishing; the translucency is quite high when placed in thin layers (so that enamel is very well imitated), and the polishability is as good as that of CLEARFIL MAJESTY ES Flow. For virtually effortless, bubble-free injection, the product comes in a nicely designed syringe. And last but not least, the product’s mechanical properties provide peace of mind even in the posterior region.


Dentist:

MICHAŁ JACZEWSKI


Michał Jaczewski graduated from Wroclaw Medical University in 2006 and today runs his private practice in the city of Legnica, Poland. He specializes in minimally invasive dentistry and digital dentistry and is the founder of the Biofunctional School of Occlusion. Here he lectures and runs workshops with focus on full comprehensive patient treatments.


Vervanging van amalgaam door flowable composiet met de nieuwe CLEARFIL MAJESTY™ ES Flow Universal

Casus van Dr. Julien Molia

Bij veel tandartsen leeft nog steeds de opvatting dat vloeibare composieten vooral geschikt zijn als liner of onderlaag onder sterkere, modelleerbare composieten en indirecte restauraties, of als materiaal voor tijdelijke restauraties. Er wordt echter vaak verondersteld dat hun toepassingsmogelijkheden beperkt zijn vanwege hun minder goede mechanische eigenschappen.

NIEUWE GENERATIE FLOWABLE COMPOSIETEN

Gelukkig is dat inmiddels verleden tijd. Verschillende flowable composieten van de nieuwste generatie, waaronder CLEARFIL MAJESTY™ ES Flow en CLEARFIL MAJESTY™ ES Flow Universal (beide van Kuraray Noritake Dental Inc.)beschikken over mechanische eigenschappen die vergelijkbaar zijn met die van pasta composieten. Hierdoor is het indicatiegebied aanzienlijk uitgebreid. Zo blijkt uit gegevens van de fabrikant dat CLEARFIL MAJESTY™ ES Flow Universal een hoog vulstofgehalte van 75 tot 78 wt/%, een buigsterkte van meer dan 150 MPa en een compressiekracht boven 370 MPa biedt. Dankzij deze hoge mechanische sterkte is het materiaal geschikt als betrouwbare en permanente oplossing die zelfs geschikt is voor belaste gebieden, zoals de occlusale oppervlakken van posterieure elementen.

Daarnaast biedt deze flowable composiet nog meer voordelen. Het materiaal is verkrijgbaar in twee viscositeiten – LOW en SUPER LOW – waardoor het aansluit bij uiteenlopende persoonlijke voorkeuren en indicaties. Bovendien is slechts keuze uit twee kleuren (Universal en Universal Dark) voldoende. Dit vereenvoudigt de kleurselectie aanzienlijk, ook in het front, dankzij een combinatie van kleuradaptatietechnologieën, waaronder geoptimaliseerde lichtdiffusie en een glazuurachtige translucentie.

De volgende casus laat zien hoe CLEARFIL MAJESTY™ ES Flow Universal mijn restauratieve behandeling van posterieure elementen eenvoudiger maakt.

CASUS

Bij deze patiënt moesten twee amalgaamrestauraties in de rechter mandibulaire molaren (tanden # 46 en 47 volgens de internationale tandnummering) worden vervangen (afb. 1). Omdat het materiaal een uitstekende adaptatie aan de caviteitswanden biedt, werd gekozen voor CLEARFIL MAJESTY™ ES Flow Universal LOW als enig restauratiemateriaal. Door de locatie van de restauraties was de kleurkeuze eenvoudig: kleur U (Universal) is geschikt voor alle posterieure restauraties.

De amalgaam restauraties werden verwijderd en cariës geëxcaveerd waarbij zoveel mogelijk van de gezonde tandstructuur werd behouden (afb. 2 en 3). Er werd gekozen voor selectieve glazuuretsing, gevolgd door het aanbrengen van een universeel adhesief (CLEARFIL™ Universal Bond Quick 2, Kuraray Noritake Dental Inc.). Daarna werd CLEARFIL MAJESTY™ ES Flow Universal LOW in de geselecteerde kleur U aangebracht in de caviteiten (afb. 4). Dankzij het innovatieve ontwerp van de spuitpunt kan het materiaal vrijwel luchtbelvrij worden aangebracht. Conform de gebruiksaanwijzing werd het composiet in lagen van maximaal 2 mm aangebracht om een volledige uitharding te waarborgen (afb. 5 en 6). Dit is een belangrijke voorwaarde voor de duurzaamheid van de definitieve restauratie. Iedere laag moet gedurende 10 tot 20 seconden (afhankelijk van de gebruikte polymerisatielamp) grondig uitharden voordat de volgende laag wordt aangebracht. Zoals getoond in afbeelding 7 maakt de lage viscositeit van het geselecteerde materiaal modelleren van de morfologie van het occlusale oppervlak mogelijk. In situaties waarbij meer anatomische details moeten worden hersteld, kan de minder vloeibare SUPER LOW variant een optie zijn. Het tot hoogglans polijsten van de restauraties nam slechts een paar seconden in beslag (afb. 8).

Afb. 1: Twee te vervangen amalgaam restauraties.


Afb. 2: Situatie na verwijderen van de bestaande amalgaam restauraties.


Afb. 3: Voor amalgaam kenmerkende verkleuring is zichtbaar onderaan in de grotere caviteit.


Afb. 4: Aanbrengen van de eerste laag flowable composiet.


Afb. 5: Tweede molar reeds gevuld, eerste molar heeft nog een laag flowable composiet nodig.


Afb. 6: Restauratie voltooid.


Afb. 7: Mooie occlusale anatomie en natuurlijke kleurovergang.


Afb. 8: Resultaat na verwijdering van de cofferdam. De restauraties sluiten qua kleur en oppervlakglans naadloos aan op de omliggende tandstructuur.


EENVOUDIG ALTERNATIEF VOOR PASTA COMPOSIETEN

Met name in de lastig te bereiken gebieden in de mond kan een flowable composiet met uitgebalanceerde mechanische eigenschappen een goed alternatief zijn voor pasta composiet. Dankzij de geavanceerde kleuradaptatie, de vrijwel luchtbelvrije applicatie, de eenvoudige verwerking, de goede modelleerbaarheid en het snelle polijsten wordt restaureren een stuk eenvoudiger.

Dentist:

JULIEN MOLIA


Dr. Julien Molia studeerde in 2008 af met een scriptie over computergestuurde implantologie. Hij heeft een algemene tandartspraktijk opgezet in Saint-Jean-de-Luz en richt zich op implantaatbehandelingen en kaakreconstructies. In 2017 behaalde hij een tweede universitaire graad in de implantologie om zijn expertise bij te werken en te verdiepen. Daarnaast heeft hij geavanceerde trainingen gevolgd op het gebied van digitale tandheelkunde, orthodontische minischroeven en mucogingivale chirurgie. Op basis van zijn toewijding aan weefselbehoud volgde hij privétrainingen bij Dr. Gil Tirlet en Dr. Jean-Pierre Attal in Parijs. Dr. Molia is een van de oprichters van het Franse Southwest BioTeam, een groep waarbinnen professionals toegewijd aan klinisch onderzoek en innovatie samenwerken.


Amalgam replacement with flowable composite

YES, IT WORKS!

In the minds of many dental practitioners, it has become firmly established that flowable composites are nice liner or base materials below stronger packable composites and indirect restorations or as a temporization material. Many of them assume, however, that their use is limited due to their poor mechanical properties.


A NEW GENERATION OF FLOWABLES

Luckily, this is no longer true: Several flowable composites of the latest generation – like CLEARFIL MAJESTY™ ES Flow and CLEARFIL MAJESTY™ ES Flow Universal (both Kuraray Noritake Dental Inc.) – are equipped with mechanical properties, which are on par with those of many packable alternatives. Consequently, the range of indications is extended. For example, CLEARFIL MAJESTY™ ES Flow Universal, has a high filler loading of 75 to 78 wt/%, a flexural strength of more than 150 MPa and a compressive strength exceeding 370 MPa according to the manufacturer. Thanks to its high strength, it serves as a reliable and permanent solution, even suitable for stress-bearing areas such as the occlusal surfaces of posterior teeth.


However, this flowable composite has even more to offer: It is available in two levels of flowability – LOW and SUPER LOW – to serve a wider range of personal preferences and individual indication-specific needs and in just two shades (universal and universal dark). The latter offers the benefit of intuitive shade selection even in the anterior area and is enabled by a mixture of shade matching technologies, including optimized light diffusion technology and an enamel-like translucency.


The following case example reveals how CLEARFIL MAJESTY™ ES Flow Universal makes my life easier in posterior restoration procedures.


CASE EXAMPLE

This patient presented for the replacement of two amalgam restorations in the mandibular right molars (teeth # 46 and 47 according to the FDI notation) (Fig. 1). As it would facilitate filling and provide for great adaptation to the cavity walls, it was decided to use CLEARFIL MAJESTY™ ES Flow Universal LOW as the only restorative material. The position of the teeth to be restored made shade selection easy: Shade U (universal) is designed to work perfectly for all posterior restorations.


The amalgam restorations were removed and caries was excavated, while saving as much of the healthy tooth structure as possible (Figs. 2 and 3). A selective enamel etching technique was chosen, followed by the application of a universal adhesive (CLEARFIL™ Universal Bond Quick 2, Kuraray Noritake Dental Inc.). Subsequently, CLEARFIL MAJESTY™ ES Flow Universal in the LOW version and the selected shade U was applied into the cavities (Fig. 4). Thanks to the innovative syringe design, the applied flowable composite is virtually free of voids. In line with the instructions for use of the product, the thickness of each layer did not exceed 2 millimetres to provide for a complete cure (Figs. 5 and 6), which has a decisive impact on the long-term performance of the final restorations. Each layer should be thoroughly cured for 10 to 20 seconds (depending on the curing light) before the next layer is applied. As shown in Figure 7, the low flowability of the selected material allows for some modelling of the occlusal surface morphology. When more anatomical details need to be restored, the steadier SUPER LOW variant may be an option. It took just a few seconds to polish the restorations to high gloss (Fig. 8).


Fig. 1. Two amalgam restorations to be replaced.


Fig. 2. Situation after removal of the existing amalgam restorations.


Fig. 3. Typical amalgam staining is visible at the bottom of the larger cavity.


Fig. 4. Filling procedure: Application of the first layer of flowable composite.


Fig. 5. Second molar already filled, first molar in need of another layer of flowable composite.


Fig. 6. Filling completed.


Fig. 7. Nice surface morphology and shade blend-in.


Fig. 8. Treatment outcome after rubber dam removal. The restorations blend in nicely with the surrounding dentition – qua shade and surface gloss.


EASY-TO-USE ALTERNATIVE TO PACKABLE COMPOSITES

Especially in difficult-to-reach areas in the mouth, the use of a flowable composite with well-balanced mechanical properties can be a nice alternative to packable ones. Advanced shade-matching abilities, virtually void-free application, easy adaptation and modelling, and quick polishing truly simplify the life of the dental practitioner. However, many assume their use is limited due to poor mechanical properties.


JULIEN MOLIA


Dr. Julien Molia graduated in 2008 with a thesis on computer-assisted implantology. He established a general dental practice in Saint-Jean-de-Luz, where he has since focused on implant surgery and jawbone reconstruction. In 2017, he completed a second university degree in implantology to update and deepen his expertise. He has also pursued advanced training in digital dentistry, orthodontic miniscrews, and mucogingival surgery. Committed to tissue preservation, he trained privately with Drs. Gil Tirlet and Jean-Pierre Attal in Paris. Dr. Molia is a founding member of the French Southwest BioTeam, a collaborative group dedicated to clinical research and innovation.


Restoring confidence after trauma: a biomimetic approach

Case by Dt. Koray Kendir, DDS, Turkey (İzmir)


INTRODUCTION

Trauma-related fractures of anterior teeth require a precise balance between aesthetics and function, often under emotional pressure from the patient. This clinical case demonstrates the restorative rehabilitation of a previously mismanaged central incisor using CLEARFIL MAJESTY™ ES-2 Premium and PANAVIA™ V5 (both Kuraray Noritake Dental Inc.). The team followed a biomimetic approach to re-establish biological, functional, and aesthetic harmony.


CASE SUMMARY

A 23-year-old female patient presented one month after a traumatic injury involving tooth #11 (FDI notation). Immediate root canal treatment and a direct composite build-up had been performed elsewhere in a single visit. The existing restoration showed poor aesthetics and marginal adaptation (Fig. 1).


Fig. 1. Initial clinical situation.


CLINICAL PROCEDURE

STEP 1: ISOLATION AND REMOVAL OF OLD RESTORATION

For the planned rehabilitation, the tooth was isolated with rubber dam (Figs. 2 and 3) and the existing composite restoration was removed. Gutta-percha from the previous endodontic treatment was found to be severely coronally trimmed (Fig. 4). This poses a risk of future discolouration. Consequently, the gutta-percha was condensed apically to a more biologically appropriate level using a downpack device (Figs. 5 to 9).


Fig. 2. Isolation of the working field with rubber dam: Labial view.


Fig. 3. Isolation of the working field with rubber dam: Occlusal view.


Fig. 4. Gutta-percha from the previous treatment.


Fig. 5. Gutta-percha removed, …


Fig. 6. … placed back into the root canal …


Fig. 7. … and condensed …


Fig. 8. … with a downpack device.


Fig. 9. Result of the procedure: Occlusal view.


STEP 2: CORE BUILD-UP

Subsequently, a fiber-reinforced composite was used to provide root-anchored support for the core structure. Then, the bonding surface was treated with phosphoric acid etchant, CLEARFIL™ Universal Bond Quick (Kuraray Noritake Dental Inc.) was applied as a universal adhesive and the core build-up was performed with CLEARFIL MAJESTY™ ES-2 Premium A1D (Figs. 10 to 13).


Fig. 10. Etching with phosphoric acid etchant.


Fig. 11. Application of the universal adhesive.


Fig. 12. Core build-up after thorough light curing.


Fig. 13. Intra-oral periapical radiograph or the treated tooth.


STEP 3: PREPARATION AND DIGITAL IMPRESSION

For definitive restoration, a 3/4 crown preparation was performed and an intraoral scan was taken. Moreover, a temporary crown was fabricated (Fig. 14) and shade photos were taken to finalize the session.


Fig. 14. Temporary restoration in place.


STEP 4: FINAL CEMENTATION

Once the lithium disilicate restoration was received from the laboratory, the temporary crown was removed and the abutment tooth was evaluated (Figs. 15 and 16). Try-in was performed using PANAVIA™ V5 Try-in Paste White to check shade and fit (Fig. 17). No modifications were required; the selected try-in paste contributed to a lifelike appearance of the restoration. For definitive placement, the intaglio surface of the crown was etched with hydrofluoric acid (Fig. 18). Figure 19 shows the appearance of the intaglio after this measure. To provide for optimal bonding conditions, the tooth surface was then cleaned with KATANA™ Cleaner (Kuraray Noritake Dental Inc.), which should be applied with a rubbing motion to the contaminated prepared tooth for more than ten seconds (Figs. 20 to 22). It may also be used to clean the intaglio of a restoration, which is contaminated with blood and saliva e.g. after try-in.


Fig. 15. Situation after removal of the temporary crown: Labial view.


Fig. 16. Situation after removal of the temporary crown: Occlusal view.


Fig. 17. Try-in of the lithium disilicate crown.


Fig. 18. Etching of the crown’s intaglio surface with hydrofluoric acid.


Fig. 19. Appearance of the etched surface.


Fig. 20. Cleaning of the abutment tooth …


Fig. 21. … surface covered with the cleaning agent.


Fig. 22. Thorough rinsing, which should be followed by drying with air.


Adhesive cementation itself was accomplished with the three-component PANAVIA™ V5 (Figs. 23 to 28): The prepared tooth structure and build-up was treated with PANAVIA™ V5 Tooth Primer, the intaglio surface of the crown with CLEARFIL™ CERAMIC PRIMER PLUS. Finally, PANAVIA™ V5 Universal (White) was extruded into the crown and the crown placed. Excess cement is best removed in the gel phase – i.e. after brief polymerization for 3 to 5 seconds before final light curing is performed. Alternatively, it may be removed immediately after seating the restoration with a brush or similar instrument. In this case the first option was chosen. The treatment outcome after rubber dam removal and final clinical and aesthetic evaluation is displayed in Figure 29.


Fig. 23. Priming of the tooth structure.


Fig. 24. Selected resin cement.


Fig. 25. Tooth structure ready for crown placement.


Fig. 26. Restoration in place.


Fig. 27. Lateral view of the restoration.


Fig. 28. Final light curing of the crown.


Fig. 29. Treatment outcome immediately after rubber dam removal.


CONCLUSION

This case highlights a comprehensive restorative approach to preserving a traumatized anterior tooth at risk of loss, while restoring both function and aesthetics. The strong core foundation provided by CLEARFIL MAJESTY™ ES-2 Premium and the reliable adhesive performance of PANAVIA™ V5 played a pivotal role in the successful procedure and outcome.


Overwegingen bij het gebruik van een universele composiet in het anterieure gebied met CLEARFIL MAJESTY™ ES-2 Universal

4 Klinische casussen


Composieten met een universeel kleurconcept - een beperkt aantal kleuren die zonder kleurenschaal kunnen worden geselecteerd - vormen een duidelijke trend binnen de restauratieve tandheelkunde. Dankzij de specifieke aanpassingseigenschappen kunnen deze materialen bijdragen aan het stroomlijnen van restauratieve procedures en een vermindering van behandeltijden. Dit kan de werkdruk van de tandheelkundige praktijkbeoefenaar wat verlichten en goede resultaten bevorderen. Sommige gebruikers staan echter sceptisch tegenover een breed gebruik van deze materialen, vooral als het gaat om de restauratie van tanden in het anterieure gebied. Mogelijke redenen: een relatief hoge translucentie, die in bepaalde situaties de aparte toepassing van een blocker (of ondoorzichtige kleur) nodig maakt, of een te beperkt kleuraanbod.


Mijn persoonlijke ervaring heeft aangetoond dat CLEARFIL MAJESTY™ ES-2 Universal bij uitstek geschikt is voor een breed scala aan 1-kleur-restauraties van anterieure tanden. Dit product heeft een geweldige polijstbaarheid plus langdurig glansbehoud, en is leverbaar in slechts vier kleuren: een Universele kleur (U), aanvankelijk ontwikkeld voor posterieure restauraties, Universal Light (UL) en Universal Dark (UD) als de twee belangrijkste opties voor anterieure tanden en tot slot Universal White (UW) om alle bleachkleuren na te bootsen. In het algemeen kunnen deze opties alle vier worden toegepast in het anterieure en posterieure gebied. Aangezien het aanpassingsvermogen te danken is aan een propriëtaire lichtdiffusietechnologie en niet wordt geregeld via een verhoogde translucentie, is het gebruik van een blocker meestal niet nodig en kunnen zelfs grotere gedeelten heel onopvallend worden gerestaureerd.


De hierna volgende voorbeelden van klinisch casussen bieden, samen met het commentaar, wellicht houvast voor degenen die twijfelen over de juiste kleurkeuze in het anterieure gebied. De aanbevelingen en praktische tips zijn gebaseerd op mijn persoonlijke ervaring. Alle patiënten werden behandeld voor de sluiting van een diasteem of voor een vormaanpassing, maar de selectiecriteria gelden ook voor andere vormen van anterieure restauraties.


UNIVERSAL LIGHT: VOOR NATUURLIJKE RESULTATEN BIJ LICHTERE TANDEN


Deze jonge 35-jarige patiënt met microdontie meldde zich bij de praktijk omdat hij graag een mooier gevormd gebit wilde. Zijn gebit vertoonde vrijwel geen cariës, maar wél een gebrek aan mondhygiëne en tekenen van ontstoken tandvlees. Er was ook duidelijk sprake van een diepe beet. Na een professionele gebitsreiniging en advies over mondhygiëne werden de tanden hersteld met behulp van CLEARFIL MAJESTY™ ES-2 Universal in de kleur UL.


Afb. 1: Aanvankelijke situatie.


Afb. 2: Aanvankelijke situatie: diepe beet.


Afb. 3: Tanden gerestaureerd met composiet via de 1-kleurtechniek.


Afb. 4: Direct behandelingsresultaat.


Redenen voor de keuze van Universal Light:

- Voor jongere patiënten (tandkleuren A2 en lichter)

- Situaties waarin licht gemakkelijk door de composiet gaat (bijvoorbeeld Klasse III en Klasse IV)


Eigenschappen van Universal Light:

- Hoog lichtverspreidend effect

- Uitgebalanceerde translucentie


UNIVERSAL DARK: VOOR NATUURLIJKE RESULTATEN BIJ DONKERDERE TANDEN


Abrasie en vormcorrectie waren ook voor deze 58-jarige patiënt de belangrijkste redenen om een kosmetische tandheelkundige behandeling aan te vragen. Ze was ongelukkig met de aanblik van de anterieure tanden in haar bovenkaak, die tekenen van gebitsslijtage en verkleuring vertoonden. De gekozen aanpak was een composietveneerbehandeling met CLEARFIL MAJESTY™ ES-2 Universal in de kleur UD. De kleur werd geselecteerd op basis van de indicatie en de ietwat donkerder kleur van het natuurlijke gebit van de patiënt.


Afb. 5: Klinische beginsituatie.


Afb. 6: Resultaat van de behandeling.


Redenen voor de keuze van Universal Dark:

- Voor oudere patiënten (tandkleuren A3 en donkerder)

- Situaties waarin licht gemakkelijk door de composiet gaat (bijvoorbeeld Klasse III en Klasse IV)


Eigenschappen van Universal Light:

- Hoog lichtverspreidend effect

- Uitgebalanceerde translucentie


UNIVERSAL: ALTIJD ALS EEN HOGE TRANSLUCENTIE IS GEWENST


Als de te restaureren tanden worden omringd door uitgebreide niet-verkleurde gebitsstructuren - wat kan voorkomen bij Klasse I-, II- en V-caviteiten - kan het gebruik van CLEARFIL MAJESTY™ ES-2 Universal in de kleur U een optie zijn. De tanden van de 28-jarige patiënt die zich had gemeld voor een diasteemsluiting, hadden een relatief lage translucentie en verschillende kleuren als gevolg van roken en overmatige koffieconsumptie. Aangezien de composiet alleen in glazuurgedeelten werd aangebracht, leek de relatief hoge translucentie van de kleur Universal in deze casus een voordeel te zijn.


Afb. 7: Klinische beginsituatie.


Afb. 8: De nieuwe smile van de patiënt.


Redenen voor de keuze van Universal:

- Uitgebreide aanwezigheid van onderliggende of omringende tandstructuren

- Gemiddelde lichtverspreiding gewenst


Eigenschappen van Universal:

- Hoge translucentie

- Gemiddeld lichtverspreidend effect


UNIVERSAL WHITE: VOOR ALLE PATIËNTEN DIE VRAGEN OM EEN BLEACHEFFECT


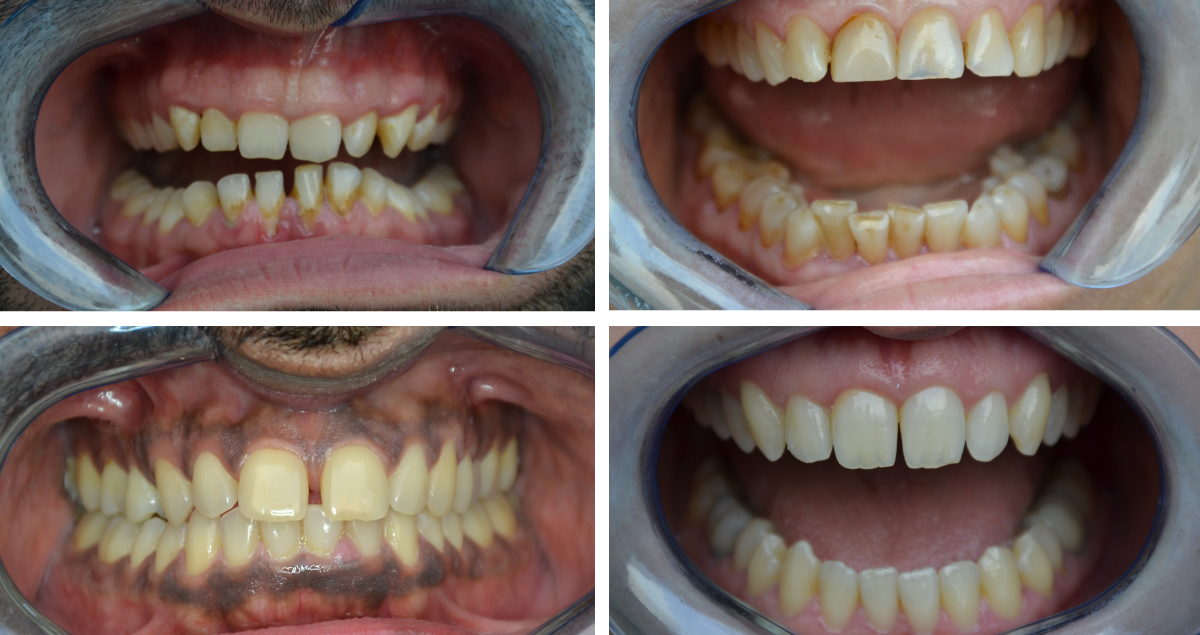
Voor alle behandelingen waarbij een bijzonder lichte tandkleur nodig is - bijvoorbeeld kinderen of patiënten met gebleekte tanden, of patiënten die vragen om een restauratie met een bleacheffect - komt CLEARFIL MAJESTY™ ES-2 Universal in de kleur UW als eerste optie in aanmerking. De hieronder getoonde jonge 28-jarige patiënt had gevraagd om een diasteemsluiting compleet met een vorm- en kleurcorrectie; ze wilde een lichtere en meer aantrekkelijke smile.


Afb. 9: Klinische beginsituatie.


Afb. 10: Een vorm- en kleurcorrectie waren gewenst bij deze casus.


Afb. 11: Resultaat van de behandeling ...


Afb. 12: … die zorgde voor de prachtige smile die de patiënt zo graag wilde.


Redenen voor de keuze van Universal White:

- Behandelingen die vragen om een uitzonderlijk hoge helderheid of value

- Restauraties van melktanden

- Restauraties van gebleekte tanden


Eigenschappen van Universal White:

- Uitgebalanceerde translucentie

- Hoog lichtverspreidend effect


CONCLUSIE


Eén universele composiet, vier kleuren: in het geval van CLEARFIL MAJESTY™ ES-2 Universal is het assortiment zonder meer voldoende voor 1-kleurestauraties, zelfs in het esthetisch veeleisende anterieure gebied. Tandheelkundige praktijkbeoefenaren kunnen fantastische restauraties realiseren dankzij eigenschappen zoals een mooi aanpassingseffect, ideale polijstbaarheid en langdurig glansbehoud. De kleur kan in principe worden bepaald op basis van slechts enkele criteria, dus zonder een complexe kleurenschaal; daarmee wordt de algehele restauratieprocedure relaxter en efficiënter. Bovendien hoeft er - met slechts vier kleuren en doorgaans zonder de noodzaak van een blocker - minder materiaal op voorraad te worden gehouden; het voorraadbeheer wordt dus ook vergemakkelijkt.

Dentist:

JUSUF LUKARCANIN


Dr. Jusuf Lukarcanin is een Certified Dental Technician (DCT) en tevens Doctor of Dental Science (DDS). Hij is in 2011 als Master afgestudeerd aan de Tandheelkundige Faculteit van de Ege Universiteit in het Turkse Izmir. In 2017 voltooide hij zijn doctoraalstudie bij de faculteit Restauratieve Tandheelkunde van die universiteit. Tussen 2012 en 2019 was dr. Lukarcanin chef de clinique en general manager van een privékliniek in Izmir.


Tussen 2019 en 2020 werkte hij als specialist Restauratieve Tandheelkunde bij het Tinaztepe Galen Hospital; van 2020 tot 2022 bekleedde hij diezelfde functie bij het Medicana International Hospital in Izmir. Momenteel is hij eigenaar van een privékliniek voor esthetiek en cosmetiek in Izmir.


Amalgam replacement: Why and when hybrid ceramics are a great option

Case by Dr. Enzo Attanasio


The selection of the restorative material is a crucial step in prosthodontics. Hybrid ceramics offer a range of properties well-suited for various therapeutic situations, both in the presence of vital teeth and of endodontically treated teeth. Using the example of a clinical case, this article will explore the advantages associated with the use of hybrid ceramics in a cracked tooth syndrome scenario.


INITIAL SITUATION

The affected tooth in this case was a mandibular right second premolar (45 according to the FDI notation) with an old amalgam restoration (Figs. 1 and 2). The patient experienced pain upon chewing (specifically upon release). Clinically, there were visible horizontal and vertical crack lines. The tooth was vital and showed no signs of pulpal pathology. It was decided to replace the amalgam restoration and restore the tooth with an overlay made of the hybrid ceramic KATANA™ AVENCIA™ Block. There were two main reasons for this decision. First, whenever root canal treatment would be necessary in the future, the hybrid ceramic material would facilitate endodontic access cavity preparation (compared to any other ceramic material) and subsequent restoration with composite filling material. Second, hybrid ceramics offer greater resistance and improved mechanical properties compared to composite filling materials applied in an incremental layering technique.


Fig. 1. Initial situation: Occlusal view.


Fig. 2. Initial situation: Buccal view.


PREPARATION AND IMMEDIATE DENTIN SEALING

To remove the amalgam restoration and weakened surrounding tooth structure, the occlusal surface of the tooth was reduced by approximately 2 mm. For a smooth colour transition between the tooth and the restoration, the preparation outline was created at the level of interproximal boxes with a vestibular inclined plane (Fig. 3). Subsequently, Immediate Dentinal Sealing (IDS) was carried out (Figs. 4 to 10). This technique involves the use of a universal adhesive like CLEARFIL™ Universal Bond Quick, which is applied to the preparation without prior etching of the peripheral enamel. In the second step, a highly filled flowable composite is applied. In the present case, the material of choice was CLEARFIL MAJESTY™ ES Flow Super Low, applied in a thickness of just 0.5 mm. The preparation was refined using ultrasonic instrumentation: Sonic tips SFM7 and SFD7 (Komet Dental) for refining the boxes; SFD1F and SFM1F (Komet Dental) for margins and steps. Sharp edges were rounded with abrasive discs and then polished with fine polishers. It is crucial that the residual occlusal thickness (prosthetic space) is 1.5 mm, as required by the selected material.


Fig. 3. Prepared tooth structure prior to immediate dentin sealing.


Fig. 4. IDS: Application of the universal adhesive.


Fig. 5. IDS: Light curing of the adhesive layer.


Fig. 6. Thin layer of flowable composite applied to the preparation.


Fig. 7. Contouring, …


Fig. 8. … rounding off sharp edges …


Fig. 9. … and polishing of the sealed surface with dedicated instruments.


Fig. 10. Sealed tooth preparation ready for impression taking.


FROM SCANNING TO TRY-IN

Following digital scanning with the intraoral scanner Primescan™ (Dentsply Sirona), MDT Daniele Rondoni produced the restoration (Figs. 11 and 12). The cementation process involves an initial try in phase to assess the marginal fit of the overlay and the contact areas. Testing occlusion at this stage could be risky as it may lead to fracture of the restoration in case of excessive premature contacts. After try-in (when carried out without rubber dam), the restoration may be contaminated by blood, saliva, or glycerin gel used for the evaluation of fit and aesthetics. Therefore, it is necessary to clean the restoration before proceeding with adhesive phases. The use of a cotton pellet soaked in alcohol is an option, a cleaning agent like KATANA™ Cleaner may be even better as it chemically cleans the restoration and eliminates the contaminants.


Fig. 11. Hybrid ceramic overlay on the printed model.


Fig. 12. Separate overlay.


CONDITIONING OF THE TOOTH AND THE RESTORATION

Afterwards, the restoration was sandblasted (as recommended for most hybrid ceramics) with 50 μm aluminum oxide using AquaCare (Akura Medical) (Fig. 13), and then immersed in distilled water in an ultrasonic bath for 5 minutes. Meanwhile, rubber dam was placed over the entire sextant, the build-up was sandblasted like the intaglio of the overlay and a phosphoric acid etchant (Ultra Etch, Ultradent) was applied to the enamel, rinsed off and the area dried (Figs. 14 to 17). The clean restoration was subsequently conditioned with a silane containing 10-MDP (CLEARFIL™ Ceramic Primer Plus, Kuraray Noritake Dental Inc.) according to the manufacturer’s instructions (Fig. 18). What followed was the application of the universal adhesive (CLEARFIL™ Universal Bond Quick) to the intaglio of the overlay and to the preparation and light curing on both sites (Figs. 19 and 20). One of the advantages of universal adhesives compared to three-step adhesive systems is their minimal film thickness, which does not compromise the fit of the restoration.


It is important to protect adjacent teeth with metal matrix strips during adhesive phases to provide for proper fitting. These elements do not create operational difficulties, but serve their purpose: After restoration placement, the composite or cement used for placement will be easily removable from the mesial and distal surfaces of the adjacent teeth, as they are free of adhesive.


Fig. 13. Sandblasting of the overlay …


Fig. 14. … and the tooth structure.


Fig. 15. Selective etching of the enamel, …


Fig. 16. … followed by thorough rinsing. Adjacent teeth are protected by a metal matrix strip.


Fig. 17. Tooth structure after selective etching, rinsing and drying.


Fig. 18. Silane application.


Fig. 19. Application of the universal adhesive into the overlay.


Fig. 20. Treatment of the tooth structure with the universal adhesive.


DEFINITIVE PLACEMENT

In the present case, a heated composite paste (heated to a temperature of 55 °C) was extruded into the restoration, which was then placed by applying slow, gradual, and strong pressure (Figs. 21 and 22). Excess composite was removed with a scaler in the buccal and lingual areas and floss (e.g. SuperFloss®, Oral-B) in the interproximal areas. Several pressurization phases were performed until no more composite was observed at the tooth-restoration interface.


Fig. 21. Heated composite paste used for definitive placement.


Fig. 22. Restoration placed under rubber dam isolation.


Then, the composite was polymerized for 30 seconds from the buccal and lingual sides with two curing lights, before applying glycerin gel to the margins and polymerizing from occlusal for another minute (Fig. 23). If thorough attention is given to removing excess composite during placement phases, subsequent finishing steps will be quick and easy (Figs. 24 to 27). Finishing and polishing of the interproximal areas was accomplished with an EVA handpiece and 3M™ Sof-Lex™ Finishing Strips (3M). For finishing of the buccal and lingual areas, a medium-grit, flame-shaped diamond bur (diameter 14/16) was used. Finally, the margins should be polished using composite polishers like TWIST™ DIA for Composite (Kuraray Noritake Dental Inc.). After the local anesthesia wears off, one should observe the cessation of pain symptoms, as seen in the present case. The treatment outcome is displayed in Figures 28 and 29.


Fig. 23. Light curing through a layer of glycerin gel blocking the oxygen.


Fig. 24. Finishing of the buccal and lingual margin with a medium-grid, flame-shaped diamond bur.


Fig. 25. Finishing of the interproximal areas with EVA handpiece (fine grain).


Fig. 26. Checking the occlusal contacts.


Fig. 27. Occlusal polishing.


FINAL SITUATION

Fig. 28. Treatment outcome – buccal view.


Fig. 29. Treatment outcome – occlusal view.


CONCLUSION

For posterior teeth restored with amalgam and a significant level of destruction, restoration replacement with hybrid ceramic overlays can be a great option. Mechanical material properties are usually superior to those of layered composites, processing is possible chairside or labside and comparatively quick (no firing required), while the clinical placement procedure is similar to that involved in placing glass ceramics – with the major difference of sandblasting instead of etching the intaglio of the restoration. One of the most important benefits of hybrid ceramics over glass ceramics, however, is the ability to modify the restoration whenever desired. Endodontic access cavities are easily prepared and closed with composite, contact points are quickly adjusted and the surface is polished or re-polished in next to no time. Moreover, the wear properties are similar to those of tooth structure and patients are happy about a natural touch and feel. The aesthetic properties are quite impressive, too.


 

Same-day dentistry: Replacement of two PFM crowns with zirconia restorations

Clinical case by Dr. Frank Heldenbergh


The advancements in zirconia in contemporary dentistry nowadays allow for a wider range of applications, including in the anterior sector, and for chairside production using dedicated CAD/CAM systems. Even without a cutback, KATANA™ Zirconia Block (STML), combined with CERABIEN™ ZR FC Paste Stain (both Kuraray Noritake Dental Inc.), offer an extremely satisfactory aesthetic solution.


In the present patient case, the materials were chosen to replace old PFM crowns on the maxillary central incisors. The planned treatment was in accordance with the patient's wishes, and carried out in a single appointment.


CASE DESCRIPTION

The patient asked for a replacement of the existing crowns on the two maxillary central incisors (teeth 11 and 21, FDI notation). The porcelain-fused-to-metal (PFM) restorations had been in place for about thirty years (Figure 1). She desired aesthetic improvements and slight repositioning of these two teeth.


TREATMENT PLAN

In agreement with the patient, it was decided to perform the entire procedure in one appointment: removal of the existing crowns, digital impressions, production, and bonding of new restorations. The periodontium was healthy with no bleeding. The only uncertainty was whether the existing crowns were cemented onto inlay-cores or if they were Richmond crowns. A preliminary silicone impression was taken as a precautious measure: in case something unexpected prevented the new crowns from being bonded during the session, it would be easily possible to produce temporary crowns.


Fig. 1. Initial clinical situation.


TREATMENT

Using a diamond bur followed by a tungsten carbide bur, the existing crowns were removed, revealing that they indeed were Richmond crowns. Because the anatomy of the intra-radicular posts clearly contraindicates an attempt to remove these posts, it was decided to trim the crowns to transform them into inlay cores rather than risk further damage. The corono-peripheral preparations were reworked at the same time. One of the major challenges was related to the necessity of masking the metal of the transformed coronal-radicular reconstructions. Luckily, the space available was sufficient for the production of full zirconia crowns with a significant thickness (Figure 2). The target shade of the crowns was chosen in consultation with the patient (Figure 3).


Fig. 2. Situation after removal of the existing restorations.


Fig. 3. Shade determination using a shade tab: A2 was the appropriate shade.


Subsequently, impressions were taken using and intraoral scanner, the virtual models were checked and the crowns designed, considering the patient's request to have her two incisors slightly retracted (Figures 4 and 5).


Fig. 4. Virtual models of the patient’s teeth with the newly designed crowns, revealing the space available for a slight retraction.


Fig. 5. Designing of the two crowns.


The two crowns were milled from KATANA™ Zirconia Block 14Z A2 (Figure 6). A quick reminder: unlike lithium disilicate, zirconia prosthetic parts cannot be tried in immediately after milling, as they are around 20 percent larger than their final size after sintering. Final sintering was performed within about 18 minutes using the furnace SINTRA CS (ShenPaz Dental Ltd). After this process, the crowns may be tried on to check their fit, shape, shade and optical integration.


Fig. 6. Milled crowns in the CAD/CAM blocks.


For finishing of the restorations, different options are available. In this case, we decided not to limit ourselves to mechanical polishing of the prosthetic parts, as zirconia does not fluoresce like natural teeth. To add fluorescence as an optical feature, the surface was lightly stained and glazed with CERABIEN™ ZR FC Paste Stain (Figure 7).


Fig. 7. Crowns in the furnace after staining and glazing with liquid ceramics.


After firing, the two incisor crowns were tried in again using a try-in paste corresponding to the chosen resin cement system (PANAVIA™ V5, Kuraray Noritake Dental). In this way, the final appearance was simulated to validate the shade of the cement. The intaglio surfaces of the crowns were then sandblasted before applying CLEARFIL™ CERAMIC PRIMER PLUS as the restoration primer. The prepared teeth were treated with KATANA™ Cleaner (Kuraray Noritake Dental Inc.) to decontaminate the surface from proteins in saliva and possibly blood. Those clean surfaces are ideal for bonding. After thorough rinsing and drying, PANAVIA™ V5 Tooth Primer (containing MDP monomer for bonding with the hydroxyapatite and metal of the preparation) was applied according to the manufacturer’s instructions (Figure 8).


Fig. 8. Selected cementation system and try-in.


Subsequently, PANAVIA™ V5 Paste was applied into the first crown, which was then seated, followed by tack curing (brief photopolymerization for three to five seconds), excess removal and final light curing from all sides.


The procedure was then repeated for the second maxillary central incisor. The result instantly satisfied the patient, both in terms of aesthetics (adaptation, position of the new crowns, mimicry) and the comfort provided (Figures 9 and 10).


Fig. 9. Crowns immediately after placement.


Fig. 10. Aesthetically pleasing and comfortable result.


At a recall after four months, soft tissue conditions were ideal and the patient was happy with the outcome (Figures 11 to 13). The selected zirconia had nice optical properties, masking of the metal posts was successful and the natural surface texture contributed its share to a nice overall picture. The retracted position of the teeth was also perceived positively by the patient, while comfort and function were excellent.


DISCUSSION

Although lithium disilicate has so far been considered the material of choice for prosthetic work in the anterior region, zirconia is nowadays proving to be an extremely satisfactory alternative from every point of view: milling, strength, aesthetics, assembly (among other things, no hydrofluoric acid is required for bonding). KATANA™ Zirconia Blocks (STML) with a multi-layered colour structure in a single 4Y-TZP zirconia block, combined with CERABIEN™ ZR FC Paste Stain, offer a remarkable solution. This applies to treatments around the replacement of existing crowns as well as first-line treatments with less invasive preparations (verti-prep) than those required by other types of ceramics.


Fig. 11. The patient’s smile at a recall after four months.


Fig. 12. Great optical integration.


Fig. 13. Natural surface texture contributing to success Control pictures after four months taken by Emmanuel Charleux.

Plaatsing van een lithiumdisilicaat-kroon

Een gemakkelijke procedure en een betrouwbaar resultaat; dát zien de meeste tandheelkundige praktijkbeoefenaren het liefst als ze een indirecte restauratie plaatsen. Aan de hand van onderstaande klinische casus wordt een gemakkelijk, maar uiterst succesvol klinisch protocol gepresenteerd voor de bevestiging van een lithiumdisilicaat-kroon.


Afb. 1.  Lithiumdisilicaat-kroon na het etsen van het intagliooppervlak met hydrofluoridezuur en try-in.


Afb. 2a.  Applicatie van KATANA™ Cleaner in de kroon voor volledige verwijdering van contaminanten zoals eiwitten van bloed en speeksel, die afbreuk kunnen doen aan de werking van een composietcementsysteem.

OF Afb. 2b.  Als alternatief wordt KATANA™ Cleaner in een mengbakje geappliceerd.


Afb. 3. Aanbrengen van KATANA™ Cleaner op de restauratie.


Afb. 4. KATANA™ Cleaner wordt op dezelfde manier aangebracht op de geprepareerde tandstructuur (tien seconden wrijven, gevolgd door spoelen en drogen).


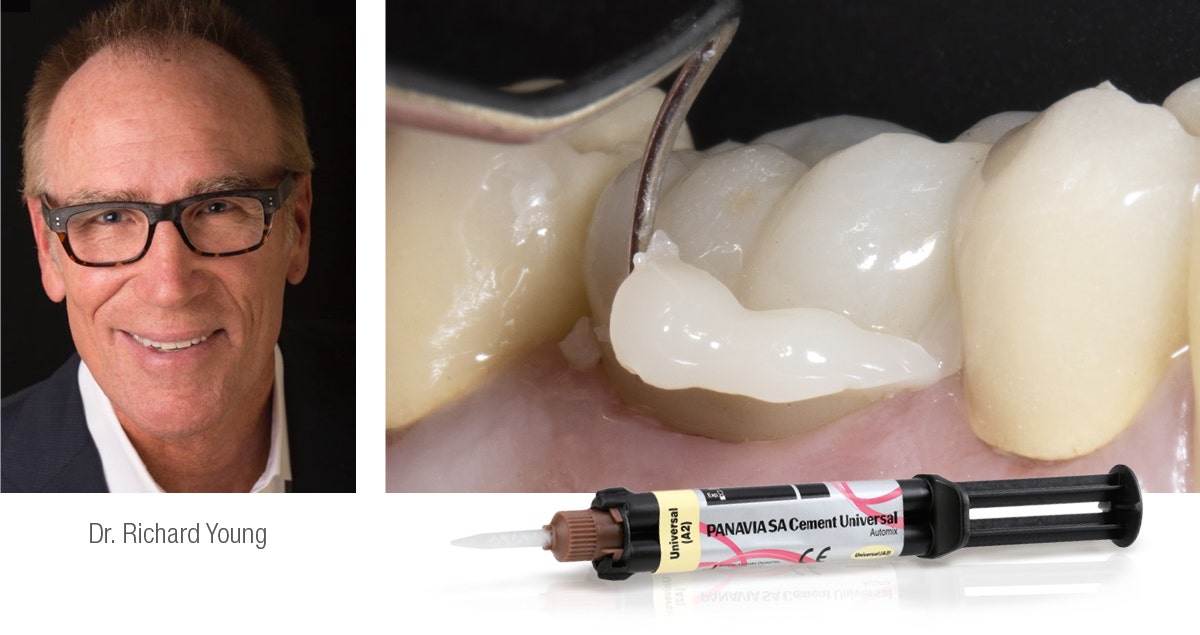
Afb. 5. Aanbrengen van PANAVIA™ SA Cement Universal in de gereinigde kroon.


Afb. 6. Het cement bevat een uniek silaankoppelmiddel - het LCSi-monomeer - voor een sterke en betrouwbare bevestiging aan lithiumdisilicaat en andere restauratieve materialen zoals glas- en hybridekeramiek.


  Het silaan wordt in de mengpunt geactiveerd door Original MDP


Afb. 7. Gemakkelijke reiniging na twee tot vijf seconden tack-curing.


Afb. 8. De cementovermaat heeft een gelachtige consistentie en wordt in z‘n geheel verwijderd met een sikkelsonde.


FINAL SITUATION


Afb. 9. Resultaat van de behandeling meteen na plaatsing van de kroon.


Dentist:

RICHARD YOUNG DDS


MET DANK AAN RICHARD YOUNG,  DDS IN SAN BERNARDINO, CA,  VOOR DE CASUS EN BEELDEN


Trauma case: Cementation of a fractured crown fragment

Case by Aleksandra Łyżwińska DMD, Warsaw, Poland


Dental injuries can be stressful for patients, parents of pediatric patients, and dentists alike. The following tips offer support in turning the treatment of crown fractures into a simple, quick and predictable procedure. In the case described, we opted for a reattachment of fractured crown fragments.


YOUNG PATIENT WITH A FRACTURED CENTRAL INCISOR

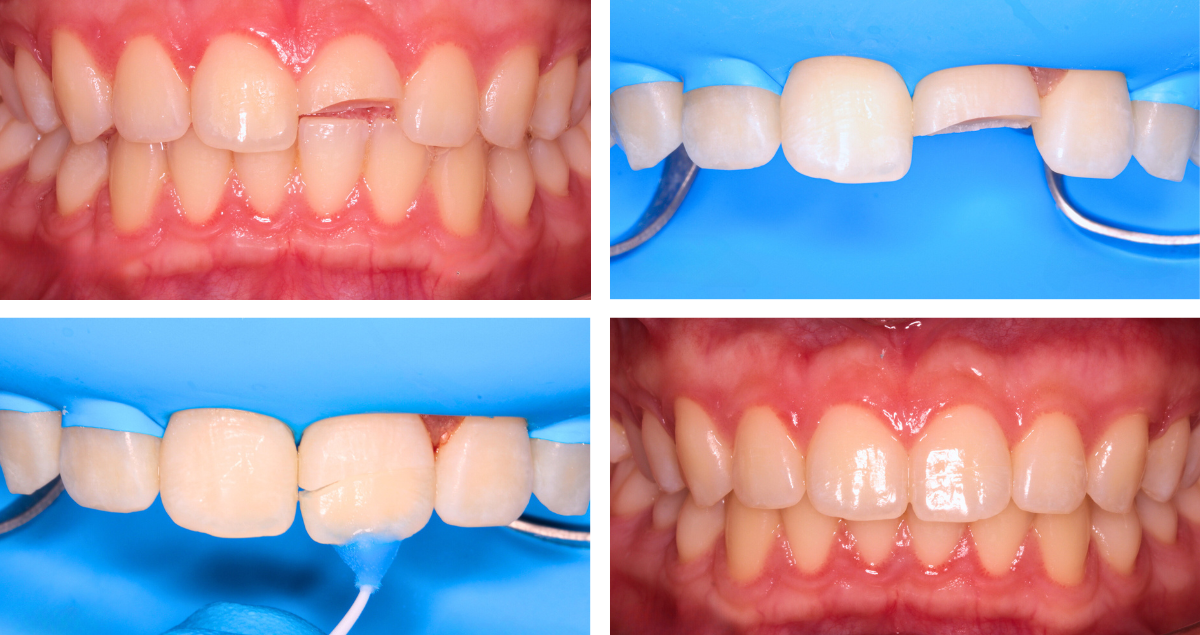
A 16-year-old patient presented immediately after an accident. Her maxillary left central incisor was fractured, involving half of the coronal enamel and dentin (Fig. 1). The pulp was not involved, but the fracture line was quite close to the pulp (Fig. 2). After examination and radiographic evaluation, the patient was anesthetized. When placing the rubber dam, it tore between the left central and lateral incisor (Figs. 3 and 4). Due to the patient’s young age and limited willingness to cooperate, the decision was made to proceed without replacing the rubber dam. This was expected to work well in this specific region due to the limited flow of saliva from the palate and a low associated risk of contamination.


Fig. 1. Fractured maxillary left central incisor at the day of the accident.


Fig. 2. Occlusal view of the maxillary anterior teeth with the pulp of the fractured central incisor shining through.


Fig. 3. Rubber dam placed and torn between the left central and lateral incisor.


Fig. 4. Occlusal view of the teeth isolated with rubber dam.


REMOVAL OF UNSUPPORTED ENAMEL PRISMS

In order to provide for a high-quality bond and natural aesthetics, unsupported enamel prisms should be removed. As the use of burs might be too invasive (removing too much structure) and thus hinder the alignment of crown fragments, air-abrasion with 50 μm alumina particles was the method of choice. To avoid iatrogenic pulp exposure, the deepest part of the affected tooth was protected with a colored flowable composite before sandblasting (Fig. 5). The adjacent teeth were protected using a metal strip (Fig. 6). Several seconds of air abrasion were sufficient to remove the enamel prisms and obtain a homogeneous enamel surface (Fig. 7). Subsequently, the colored flowable composite was removed from the dentin surface and the tooth fragment was treated in the same way.


Fig. 5. Preparations for sandblasting: Dentin area near the pulp protected with flowable composite.


Fig. 6. Protection of the adjacent teeth with a metal strip.


Fig. 7. Homogeneous enamel surface after air abrasion.


JOINING OF THE FRAGMENT WITH THE REMAINING TOOTH STRUCTURE

After air-abrasion treatment, the fit of the tooth and the fragment was checked and approved (Fig. 8). To improve retention of the fractured crown portion, it was bonded to a micro applicator using composite resin. Alternatively, prefabricated prosthetic carriers may be used. Then, selective etching of the enamel was performed on the tooth and the fragment (Figs. 9 and 10). During this procedure, the adjacent teeth were protected with a celluloid strip (Fig. 11). To better adapt the strip to the distal surface, a curved wedge was placed interproximally (Fig. 12).


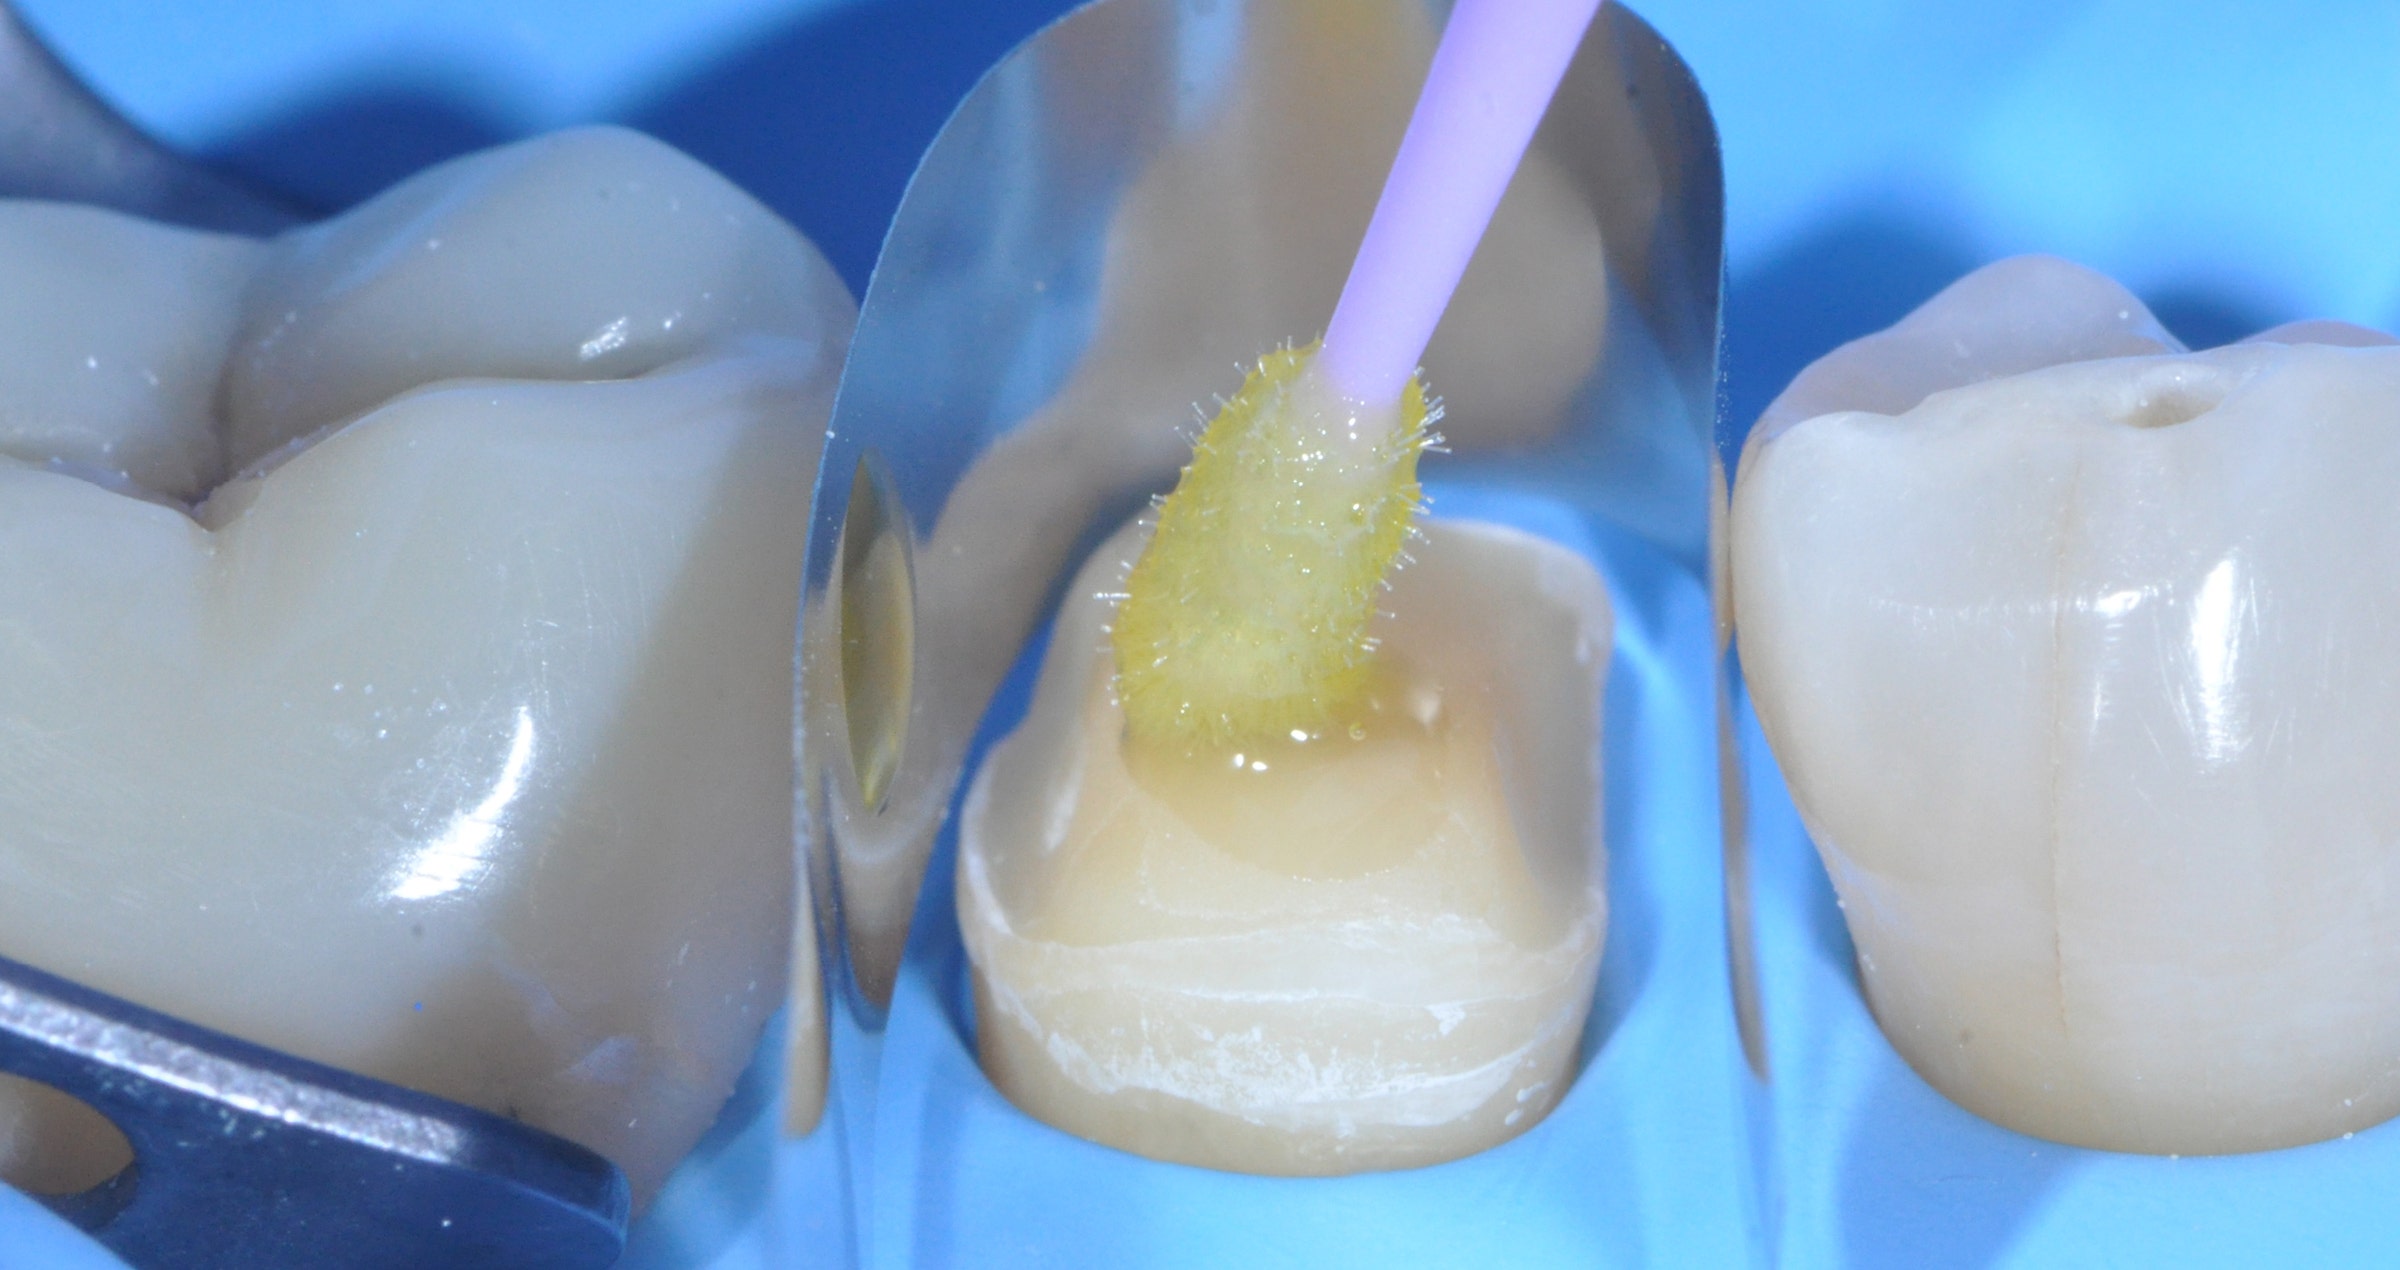
The bonding system of choice was CLEARFIL™ SE Bond 2 (Kuraray Noritake Dental Inc.). After applying this adhesive to the tooth and the fragment (Fig. 13), a small portion of CLEARFIL MAJESTY™ ES Flow Super Low (Kuraray Noritake Dental Inc.) in the shade A2 was applied to the part of the fragment treated with adhesive.* After careful repositioning of the fragment and while holding it in place with the micro applicator, the composite was light cured.


Fig. 8. Perfect fit of the fragment to the tooth.


Fig. 9. Selective etching of the enamel on the tooth …


Fig. 10. … and the fragment.


Fig. 11. Position of the wedge …


Fig. 12. … used for better adaptation to the distal surface.


Fig. 13. Fragment treated with CLEARFIL™ SE Bond 2 PRIMER and BOND, which were both carefully air-dried, while the Bond was also light cured.


Fig. 14. Fragment back in place.


Fig. 15. Occlusal view of the teeth with the reattached fragment perfectly fitting the mould.


EXCESS REMOVAL AND POLISHING

Excess composite was removed with a scalpel blade and abrasive discs. The entire restoration was then polished using TWIST™ DIA for Composite (Kuraray Noritake Dental Inc., Fig. 16). A nice optical integration was obtained immediately after finishing due to fact that the fragment was stored in water during the waiting time and treatment. As observed with teeth isolated with rubber dam during treatment, teeth undergo dehydration outside the oral cavity. The effect is much stronger in the latter setting, making a fragment become chalky white. By keeping the fragment in water, dehydration is limited to a minimum and it is possible to properly evaluate the aesthetic outcome. This has a positive impact on patient satisfaction. In the present case, the fragment and the tooth structure had a similar appearance, both showing a slightly increased brightness as a result of manipulation under rubber dam or in the air, respectively.


Fig. 16. Immediately after polishing, the fragment has almost the same brightness as the tooth thanks to water storage. A slight dehydration effect is visible.


TREATMENT OUTCOME

To achieve optimal aesthetics and long-lasting gloss, the composite was repolished one week later (Fig. 17). This was accomplished with a light blue high-shine rubber polisher of the TWIST™ DIA for Composite system, followed by polishing with diamond paste and a goat hair brush.


Fig. 17. Treatment outcome after one week.


Teeth previously isolated with a rubber dam and the fractured crown fragment had undergone rehydration and returned to their natural colour. The colour adaptation is satisfactory. Harmonious light reflections on the labial surface of the treated tooth a beautiful, natural shine have made the fracture site nearly invisible. In addition to aesthetic value, good therapeutic results were also achieved - the tooth responds appropriately to stimuli and is pain-free.


CONCLUSION

The described approach is a valuable treatment option for anterior trauma cases with relatively large fragments that are still available. By reattaching the natural structure, the need for complicated and time-consuming multi-shade layering and free-hand modeling is eliminated, while all the remaining natural tooth structure is saved. Instead of preparing the tooth, a removal of the unsupported enamel prisms and roughening of the surface is absolutely sufficient. Key elements for a great optical integration and long-lasting success are the proper use of a high-performance adhesive as well as the selection of a composite that has the ability to properly blend into its environment and offers a nature-like gloss retention. The selected materials offer precisely these features, so that the great outcome may be expected to last.


*CLEARFIL MAJESTY™ ES Flow Super Low is indicated for cementation purposes. The cementation of tooth fragments, however, is not explicitly mentioned in the instructions for use. The decision to use the product in this context was made by the dental practitioner in charge of the treatment.


Universal White: For all patients asking for a bleached effect

Case by Dr. Jusuf Lukarcanin


For all cases that require a particularly bright tooth shade – e.g. children or patients with bleached teeth / asking for a bleached effect in their restorations – CLEARFIL MAJESTY™ ES-2 Universal in the shade UW is likely to be the first choice. The young patient aged 28 shown below asked for diastema closure including shape and shade correction: She wanted to have a brighter, more beautiful smile.


Fig. 1. Initial clinical situation.


Fig. 2. Shape and shade correction were desired in this case.


Fig. 3. Treatment outcome …


Fig. 4. … leading to the beautiful smile the patient desired.


Reasons for selecting universal white:

- Cases requiring a particularly high brightness or value

- Restorations in deciduous teeth

- Restorations in bleached teeth


Universal white properties:

- Well-balanced translucency

- High light-scattering effect


CONCLUSION

One universal composite, four shades: In the case of CLEARFIL MAJESTY™ ES-2 Universal, this portfolio is absolutely sufficient for single-shade restorations even in the aesthetically demanding anterior region. Properties such as a nice blend-in effect, a great polishability and gloss retention over time support dental practitioners in creating beautiful restorations. As shade determination may be based on very few criteria instead of a complex shade guide, the whole restoration procedure becomes less stressful and more efficient. Furthermore, with only four shades to stock and usually no blocker needed, the number of materials on stock is reduced, leading to facilitations in stock management as well.