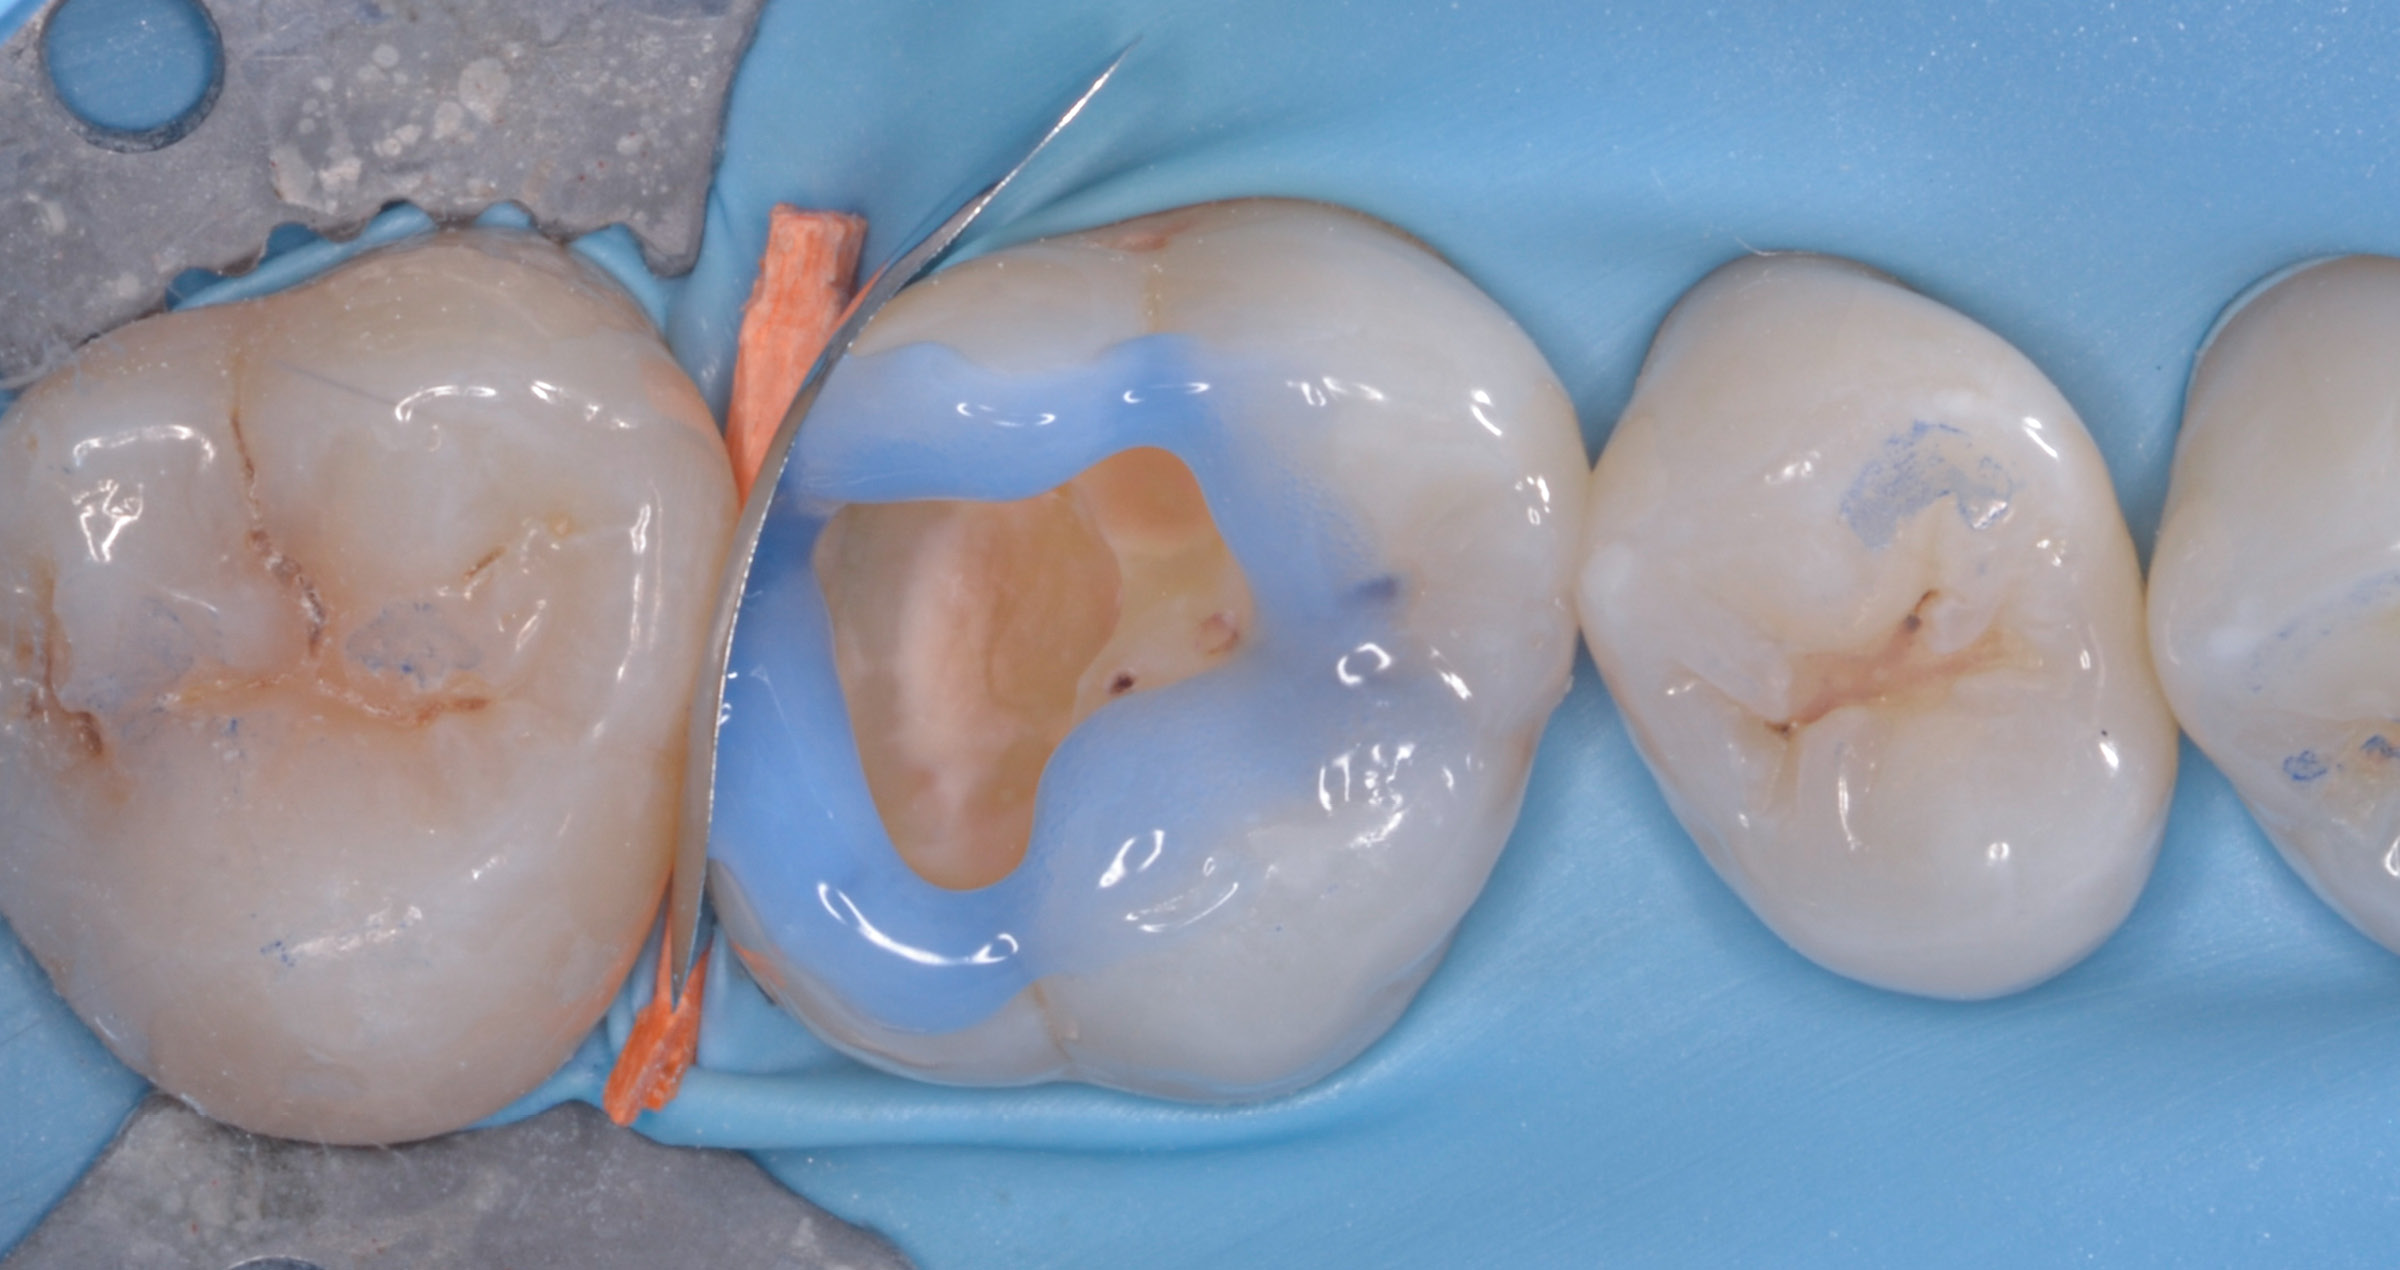

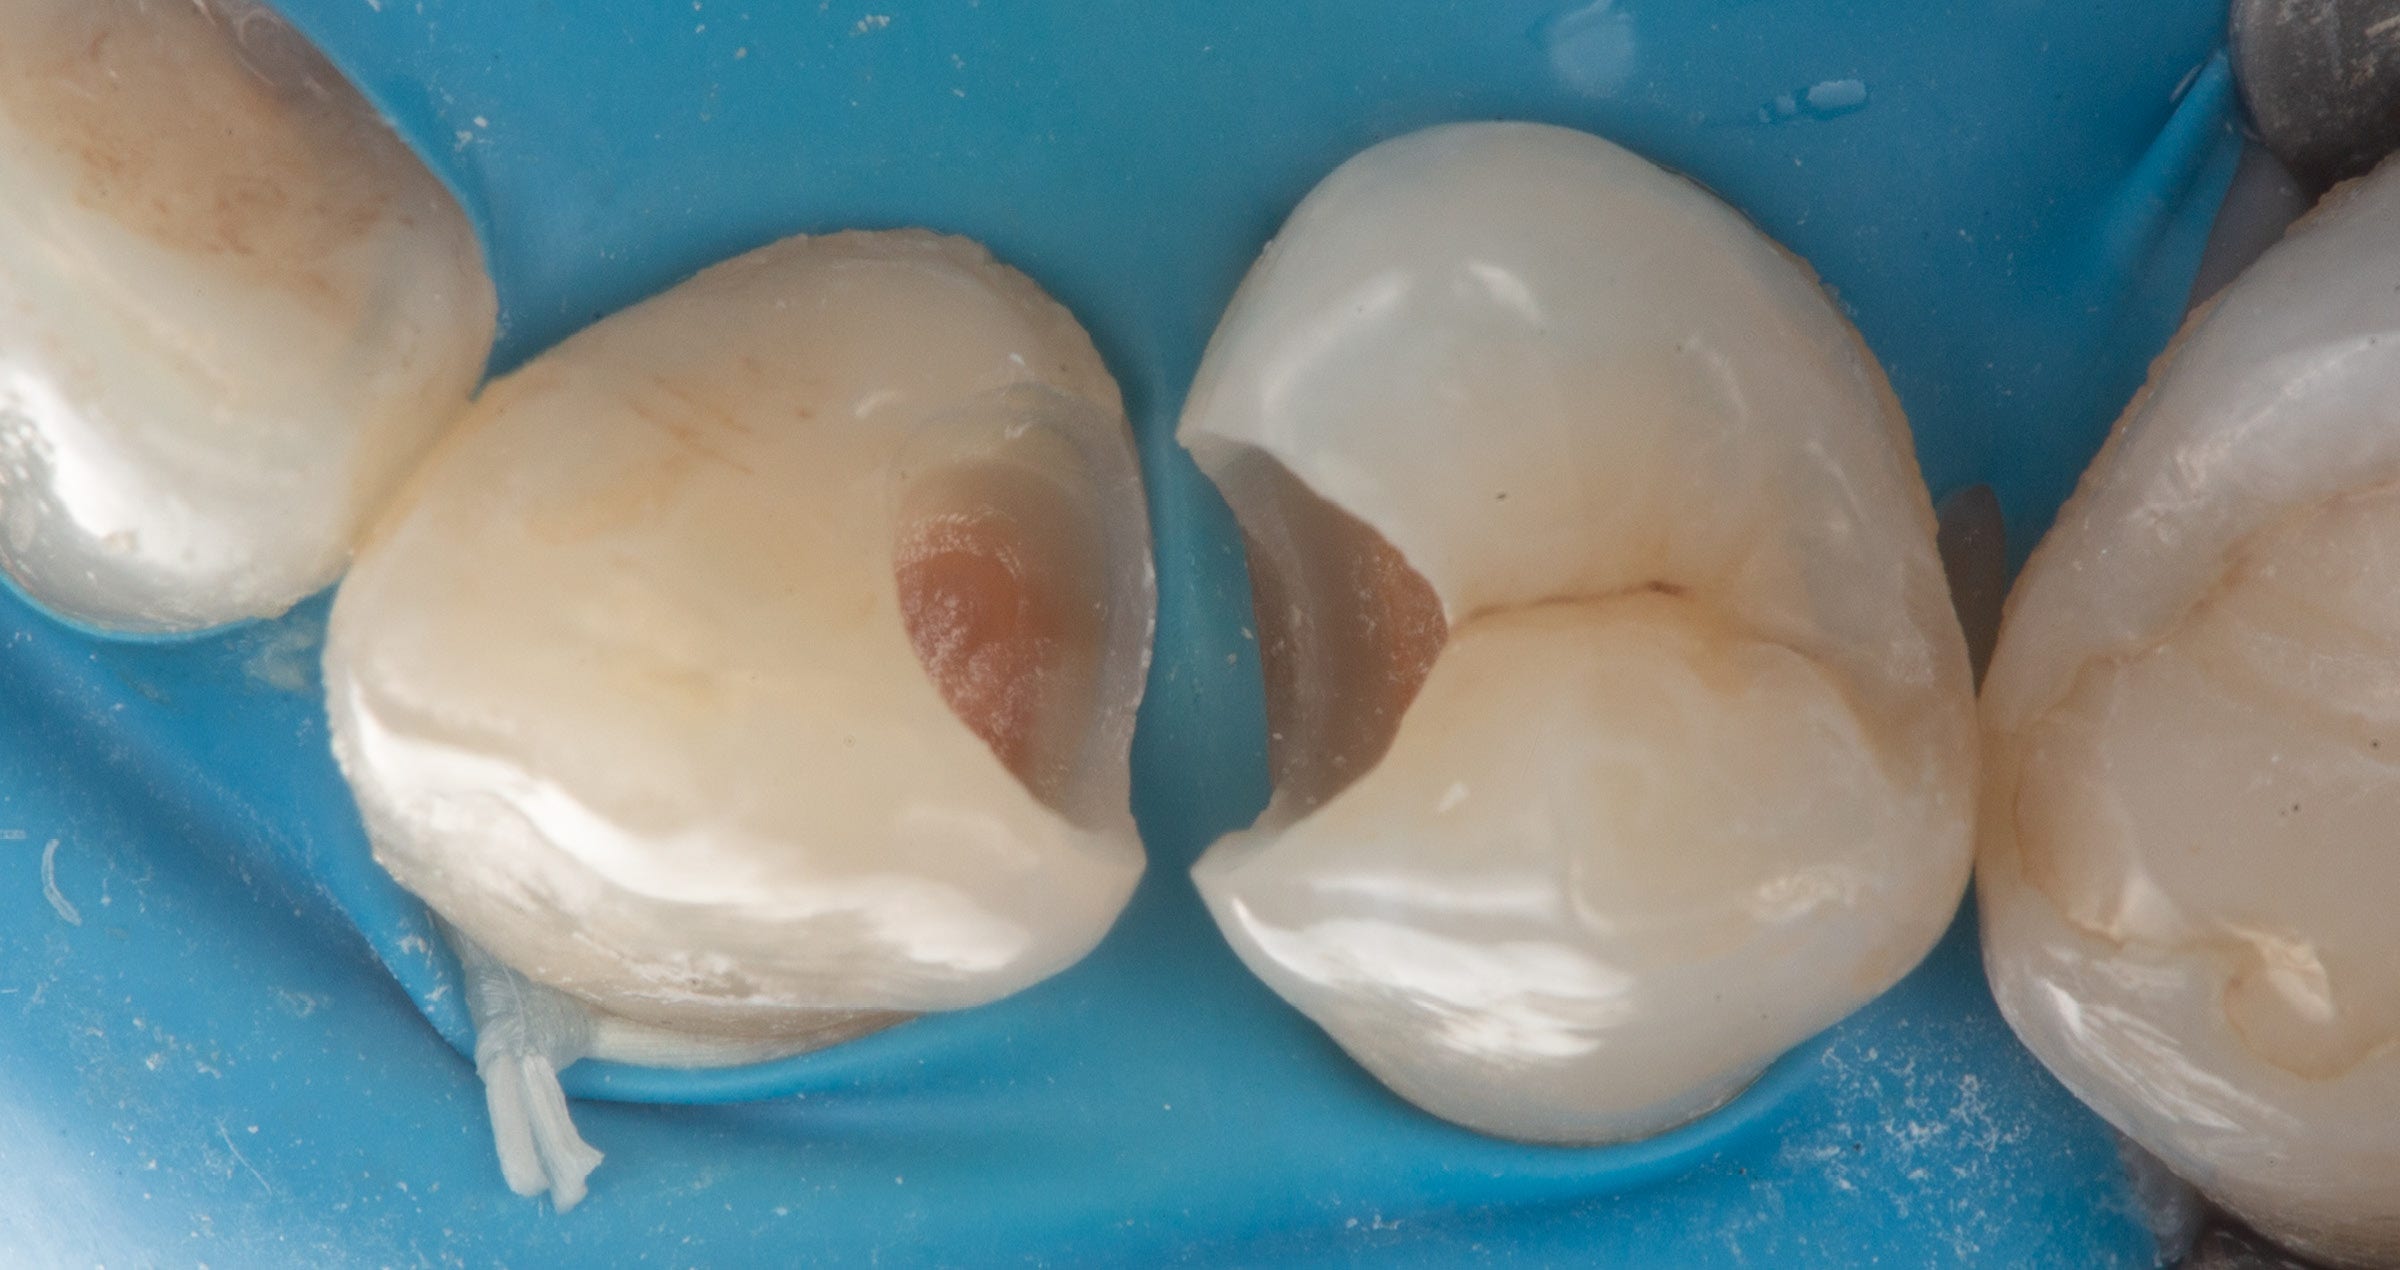
Clinical Cases, Chairside Posterior direct composite restoration within the “Universal Excellence” concept Jan 14, 2026 Case by Dt. Koray Kendir, DDS, Turkey (İzmir) ABSTRACT This clinical case report presents a posterior direct composite restoration performed using Kuraray Noritake Dental Inc.’s “Universal Excellence” product concept. A universal adhesive (CLEARFIL™ Universal Bond Quick 2) and a highly filled, universal-shade flowable composite (CLEARFIL MAJESTY™ ES Flow Universal) were utilized to achieve both simplicity and predictability. Step-by-step documentation demonstrates isolation, cavity preparation, deep margin elevation, adhesive protocol, and final restoration. CASE DESCRIPTION A 38-year-old female patient presented with complaints of interdental bleeding and cold sensitivity between her maxillary left canine and first premolar (teeth #23 and #24, FDI notation). Clinical examination revealed an open margin and secondary caries at the gingival floor of the existing restoration on tooth #23. After rubber dam isolation, the stepwise treatment procedure was initiated. CLINICAL PROCEDURE Step 1. Tooth #23 exhibited an open gingival margin and caries (Fig. 1). Step 2. After enamel removal, caries was excavated down to the gingival level. The lesion on tooth #24 was observed to extend subgingivally (Fig. 2). Step 3. After complete caries excavation and cavity refinement, the need for deep margin elevation (DME) on tooth #24 became evident (Fig. 3). Step 4. Deep margin elevation (DME) was performed on tooth #24 using a custom sectional wedge. First, selective etching and CLEARFIL™ Universal Bond Quick 2 were applied, followed by the placement of CLEARFIL MAJESTY™ ES Flow Universal (Super Low) (Figs. 4 to 6). Step 5. After completion of the DME (deep margin elevation), appropriate matrix bands were placed, followed by a direct restoration of teeth #23 and #24 with CLEARFIL MAJESTY™ ES Flow Universal (Super Low) (Figs. 7 to 9). Thanks to the material’s easy handling, shade adaptation, and excellent polishability, this challenging DME case was successfully and efficiently managed. The treatment outcome is shown in Figures 10 and 11. Fig. 1. Preoperative view under rubber dam isolation. Fig. 2. Clinical situation after caries excavation. Fig. 3. Refined cavities with a deep margin on the premolar. Fig. 4. Custom wedge placed to elevate the margin. Fig. 5. Buccal view of the teeth after deep margin elevation with universal products. Fig. 6. Occlusal view of the teeth after deep margin elevation with universal products. Fig. 7. Placement of a sectional matrix. Fig. 8. Buccal view of the teeth restored with a universal-shade flowable composite with super low flowability. Fig. 9. Occlusal view of the teeth restored with a universal-shade flowable composite. Fig. 10. Occlusal view of the final restorations of teeth #23 and #24, showing colour blending, anatomical form, and surface gloss. Fig. 11. Buccal view of the final restorations of teeth #23 and #24, showing colour blending, anatomical form, and surface gloss. DISCUSSION Universal adhesives and modern flowable composites simplify posterior direct restorations by reducing technique sensitivity while providing for durable outcomes. In this case, CLEARFIL™ Universal Bond Quick 2 provided strong adhesion with minimal application time. The universal flowable composite demonstrated excellent adaptability, polishability, and durability. Even with a subgingival margin requiring DME, a streamlined approach was achieved without compromising quality. CONCLUSION The combination of CLEARFIL™ Universal Bond Quick 2 and CLEARFIL MAJESTY™ ES Flow Universal allows clinicians to perform predictable, efficient posterior restorations. Their universal applicability and handling properties align with the “Universal Excellence” concept, supporting simplified, yet reliable daily practice. Ethics & Disclosure All procedures were performed in accordance with standard dental practice. The patient provided informed consent for treatment and publication of anonymized clinical images. Author collaborates with Kuraray Noritake Dental Inc. as an advisor; content reflects clinical experience. Dentist: KORAY KENDIR Dt. Koray Kendir is a graduate of Hacettepe University Faculty of Dentistry and the co-founder of a private dental clinic in İzmir. He specializes in digital dentistry, smile design, and computer-aided restorative treatments. Known for his innovative approach, Dr. Kendir is a frequent speaker at national dental congresses and serves as an advisor to several dental companies.
Clinical Cases, Chairside Restoring confidence after trauma: a biomimetic approach Jul 22, 2025 Case by Dt. Koray Kendir, DDS, Turkey (İzmir) INTRODUCTION Trauma-related fractures of anterior teeth require a precise balance between aesthetics and function, often under emotional pressure from the patient. This clinical case demonstrates the restorative rehabilitation of a previously mismanaged central incisor using CLEARFIL MAJESTY™ ES-2 Premium and PANAVIA™ V5 (both Kuraray Noritake Dental Inc.). The team followed a biomimetic approach to re-establish biological, functional, and aesthetic harmony. CASE SUMMARY A 23-year-old female patient presented one month after a traumatic injury involving tooth #11 (FDI notation). Immediate root canal treatment and a direct composite build-up had been performed elsewhere in a single visit. The existing restoration showed poor aesthetics and marginal adaptation (Fig. 1). Fig. 1. Initial clinical situation. CLINICAL PROCEDURE STEP 1: ISOLATION AND REMOVAL OF OLD RESTORATION For the planned rehabilitation, the tooth was isolated with rubber dam (Figs. 2 and 3) and the existing composite restoration was removed. Gutta-percha from the previous endodontic treatment was found to be severely coronally trimmed (Fig. 4). This poses a risk of future discolouration. Consequently, the gutta-percha was condensed apically to a more biologically appropriate level using a downpack device (Figs. 5 to 9). Fig. 2. Isolation of the working field with rubber dam: Labial view. Fig. 3. Isolation of the working field with rubber dam: Occlusal view. Fig. 4. Gutta-percha from the previous treatment. Fig. 5. Gutta-percha removed, … Fig. 6. … placed back into the root canal … Fig. 7. … and condensed … Fig. 8. … with a downpack device. Fig. 9. Result of the procedure: Occlusal view. STEP 2: CORE BUILD-UP Subsequently, a fiber-reinforced composite was used to provide root-anchored support for the core structure. Then, the bonding surface was treated with phosphoric acid etchant, CLEARFIL™ Universal Bond Quick (Kuraray Noritake Dental Inc.) was applied as a universal adhesive and the core build-up was performed with CLEARFIL MAJESTY™ ES-2 Premium A1D (Figs. 10 to 13). Fig. 10. Etching with phosphoric acid etchant. Fig. 11. Application of the universal adhesive. Fig. 12. Core build-up after thorough light curing. Fig. 13. Intra-oral periapical radiograph or the treated tooth. STEP 3: PREPARATION AND DIGITAL IMPRESSION For definitive restoration, a 3/4 crown preparation was performed and an intraoral scan was taken. Moreover, a temporary crown was fabricated (Fig. 14) and shade photos were taken to finalize the session. Fig. 14. Temporary restoration in place. STEP 4: FINAL CEMENTATION Once the lithium disilicate restoration was received from the laboratory, the temporary crown was removed and the abutment tooth was evaluated (Figs. 15 and 16). Try-in was performed using PANAVIA™ V5 Try-in Paste White to check shade and fit (Fig. 17). No modifications were required; the selected try-in paste contributed to a lifelike appearance of the restoration. For definitive placement, the intaglio surface of the crown was etched with hydrofluoric acid (Fig. 18). Figure 19 shows the appearance of the intaglio after this measure. To provide for optimal bonding conditions, the tooth surface was then cleaned with KATANA™ Cleaner (Kuraray Noritake Dental Inc.), which should be applied with a rubbing motion to the contaminated prepared tooth for more than ten seconds (Figs. 20 to 22). It may also be used to clean the intaglio of a restoration, which is contaminated with blood and saliva e.g. after try-in. Fig. 15. Situation after removal of the temporary crown: Labial view. Fig. 16. Situation after removal of the temporary crown: Occlusal view. Fig. 17. Try-in of the lithium disilicate crown. Fig. 18. Etching of the crown’s intaglio surface with hydrofluoric acid. Fig. 19. Appearance of the etched surface. Fig. 20. Cleaning of the abutment tooth … Fig. 21. … surface covered with the cleaning agent. Fig. 22. Thorough rinsing, which should be followed by drying with air. Adhesive cementation itself was accomplished with the three-component PANAVIA™ V5 (Figs. 23 to 28): The prepared tooth structure and build-up was treated with PANAVIA™ V5 Tooth Primer, the intaglio surface of the crown with CLEARFIL™ CERAMIC PRIMER PLUS. Finally, PANAVIA™ V5 Universal (White) was extruded into the crown and the crown placed. Excess cement is best removed in the gel phase – i.e. after brief polymerization for 3 to 5 seconds before final light curing is performed. Alternatively, it may be removed immediately after seating the restoration with a brush or similar instrument. In this case the first option was chosen. The treatment outcome after rubber dam removal and final clinical and aesthetic evaluation is displayed in Figure 29. Fig. 23. Priming of the tooth structure. Fig. 24. Selected resin cement. Fig. 25. Tooth structure ready for crown placement. Fig. 26. Restoration in place. Fig. 27. Lateral view of the restoration. Fig. 28. Final light curing of the crown. Fig. 29. Treatment outcome immediately after rubber dam removal. CONCLUSION This case highlights a comprehensive restorative approach to preserving a traumatized anterior tooth at risk of loss, while restoring both function and aesthetics. The strong core foundation provided by CLEARFIL MAJESTY™ ES-2 Premium and the reliable adhesive performance of PANAVIA™ V5 played a pivotal role in the successful procedure and outcome.