429 Too Many Requests

429 Too Many Requests


nginx

Welcome to the future of ceramic layering

Cases by DT Ioulianos Moustakis and MDT Andreas Chatzimpatzakis


Producing dental restorations that are not recognizable as such – this is probably the ultimate goal of every dental technician. For a long time, pursuing this goal was complicated by core materials whose optical properties were very different from those of natural teeth. The dark metal or opaque zirconia substructures had to be masked by applying multiple layers of intensively coloured ceramic powders, topped by more translucent porcelains imitating the enamel.


The rise of modern, tooth-coloured core materials such as lithium disilicate and zirconia has changed the game. With a core that is highly aesthetic, translucent and close to the final shade, it became much easier to produce a restoration that is virtually indistinguishable from the adjacent teeth. The thickness of the porcelain layer decreased as did the number of shades to be combined and necessary bakes to be conducted. The use of the existing porcelain systems for the new micro-layering techniques posed several new challenges: those systems originally developed for opaque zirconia were indicated for the more translucent zirconia core materials, but usually not for lithium disilicate. Moreover, the complexity of the systems made their use unnecessarily complicated for inexperienced users.


Consequently, Kuraray Noritake Dental Inc. developed a new porcelain system for micro layering on zirconia and lithium disilicate core materials. The portfolio of CERABIEN™ MiLai, which refers to micro-layering and the Japanese word for future (mirai), consists of 15 internal stains (13 tooth colours including Bright to boost the translucent and Fluoro to boost the fluorescent effect, and two tissue colours) and 16 porcelains (12 tooth porcelains and four tissue porcelains). Hence, it enables dental technicians to implement a modernized version of the original Internal Live Stain Technique developed by Hitoshi Aoshima in the early 1990s in a porcelain layer of minimal thickness.


The following demo cases are used to show how to achieve lifelike aesthetic restorations based on aesthetic zirconia and on lithium disilicate. Illustrating each step, the cases allow users to anticipate how much time and effort can be saved compared to traditional layering techniques.


CASE 1

MAXIMALLY SIMPLE APPROACH ON LITHIUM DISILICATE

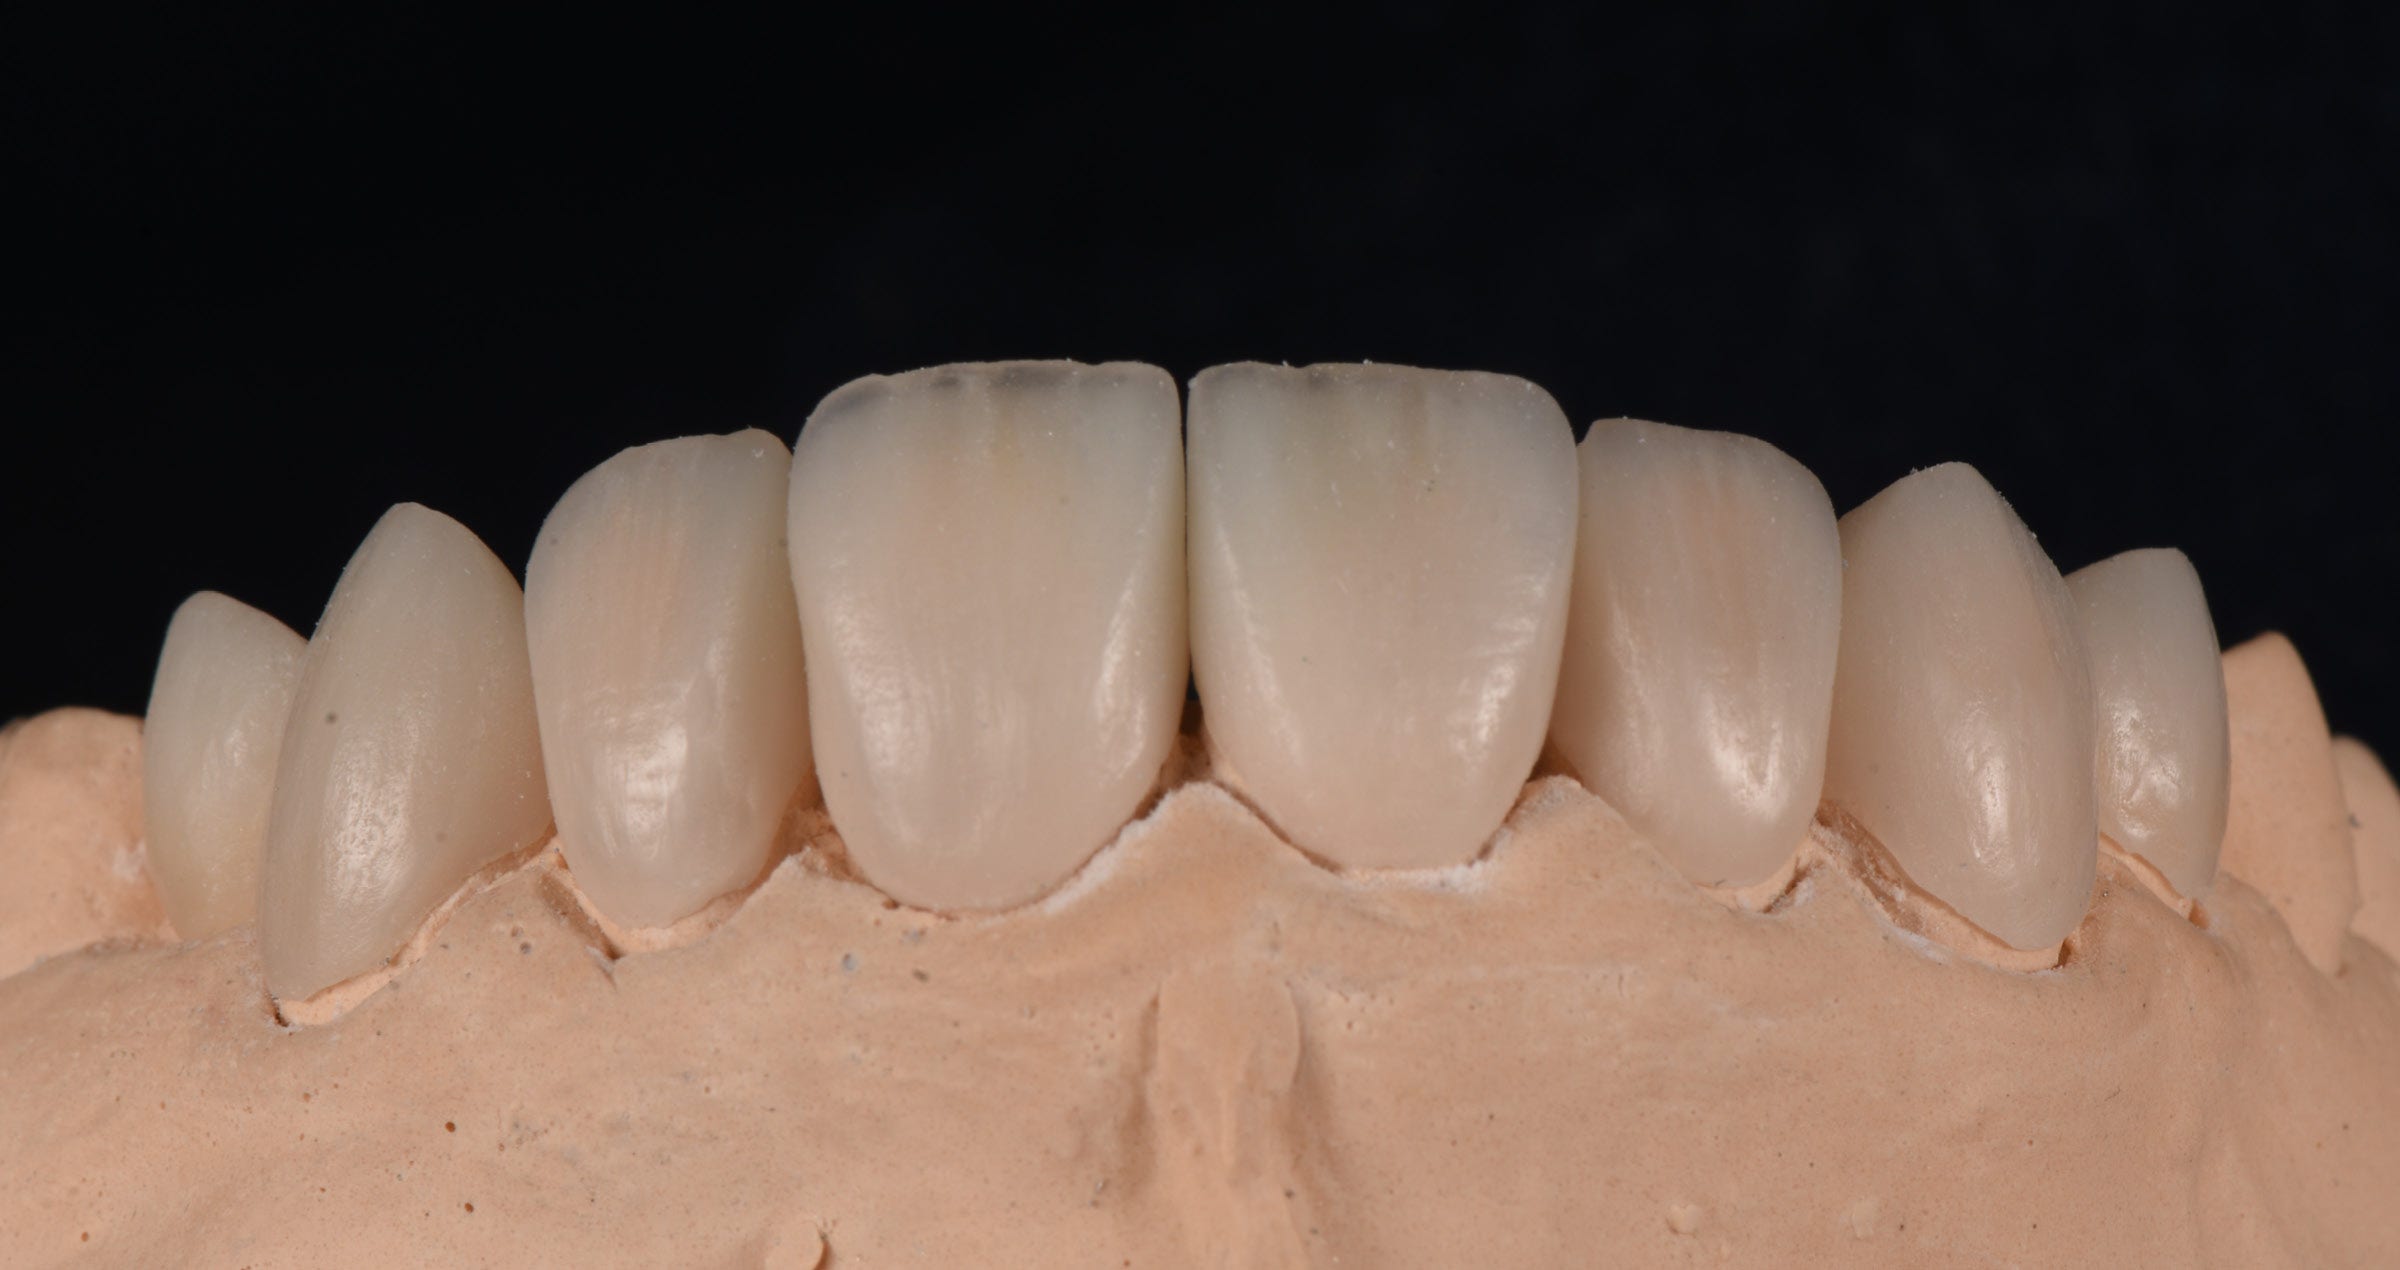
In this case, the idea was to restore the six maxillary anterior teeth in a simple way. The selected core material for the planned veneers was Amber Press (HASS Bio) LT in the shade B1. The lithium disilicate restorations were pressed with a micro cut-back and their fit was checked on the model, followed by surface texturing, sandblasting and steam cleaning [Fig. 1a]. When the veneers are milled instead of pressed, the procedure is the same. After that, the restorations are ready for the application of the CERABIEN™ MiLai internal stains for characterization of the core. In order to achieve the desired result, it is critical to mix the selected stains with the internal stain Bright responsible for a translucent effect. The chroma map for internal staining is shown in figure 1b, the outcome of the procedure in figure 1c. Subsequently, the veneers were built up to their final anatomy with selected CERABIEN™ MiLai Porcelains [Fig. 1d] to imitate the enamel and create a window effect. In this approach, simple layering and a single bake are sufficient to create the desired restoration. After glazing with Clear Glaze, finishing of the restorations was accomplished with paper-abrasive cones, a rubber polisher and polishing paste. The outcome is shown in figure 1e.


Fig. 1a. Pressed lithium disilicate veneers after surface optimization (grinding), sandblasting and steam cleaning on the model.


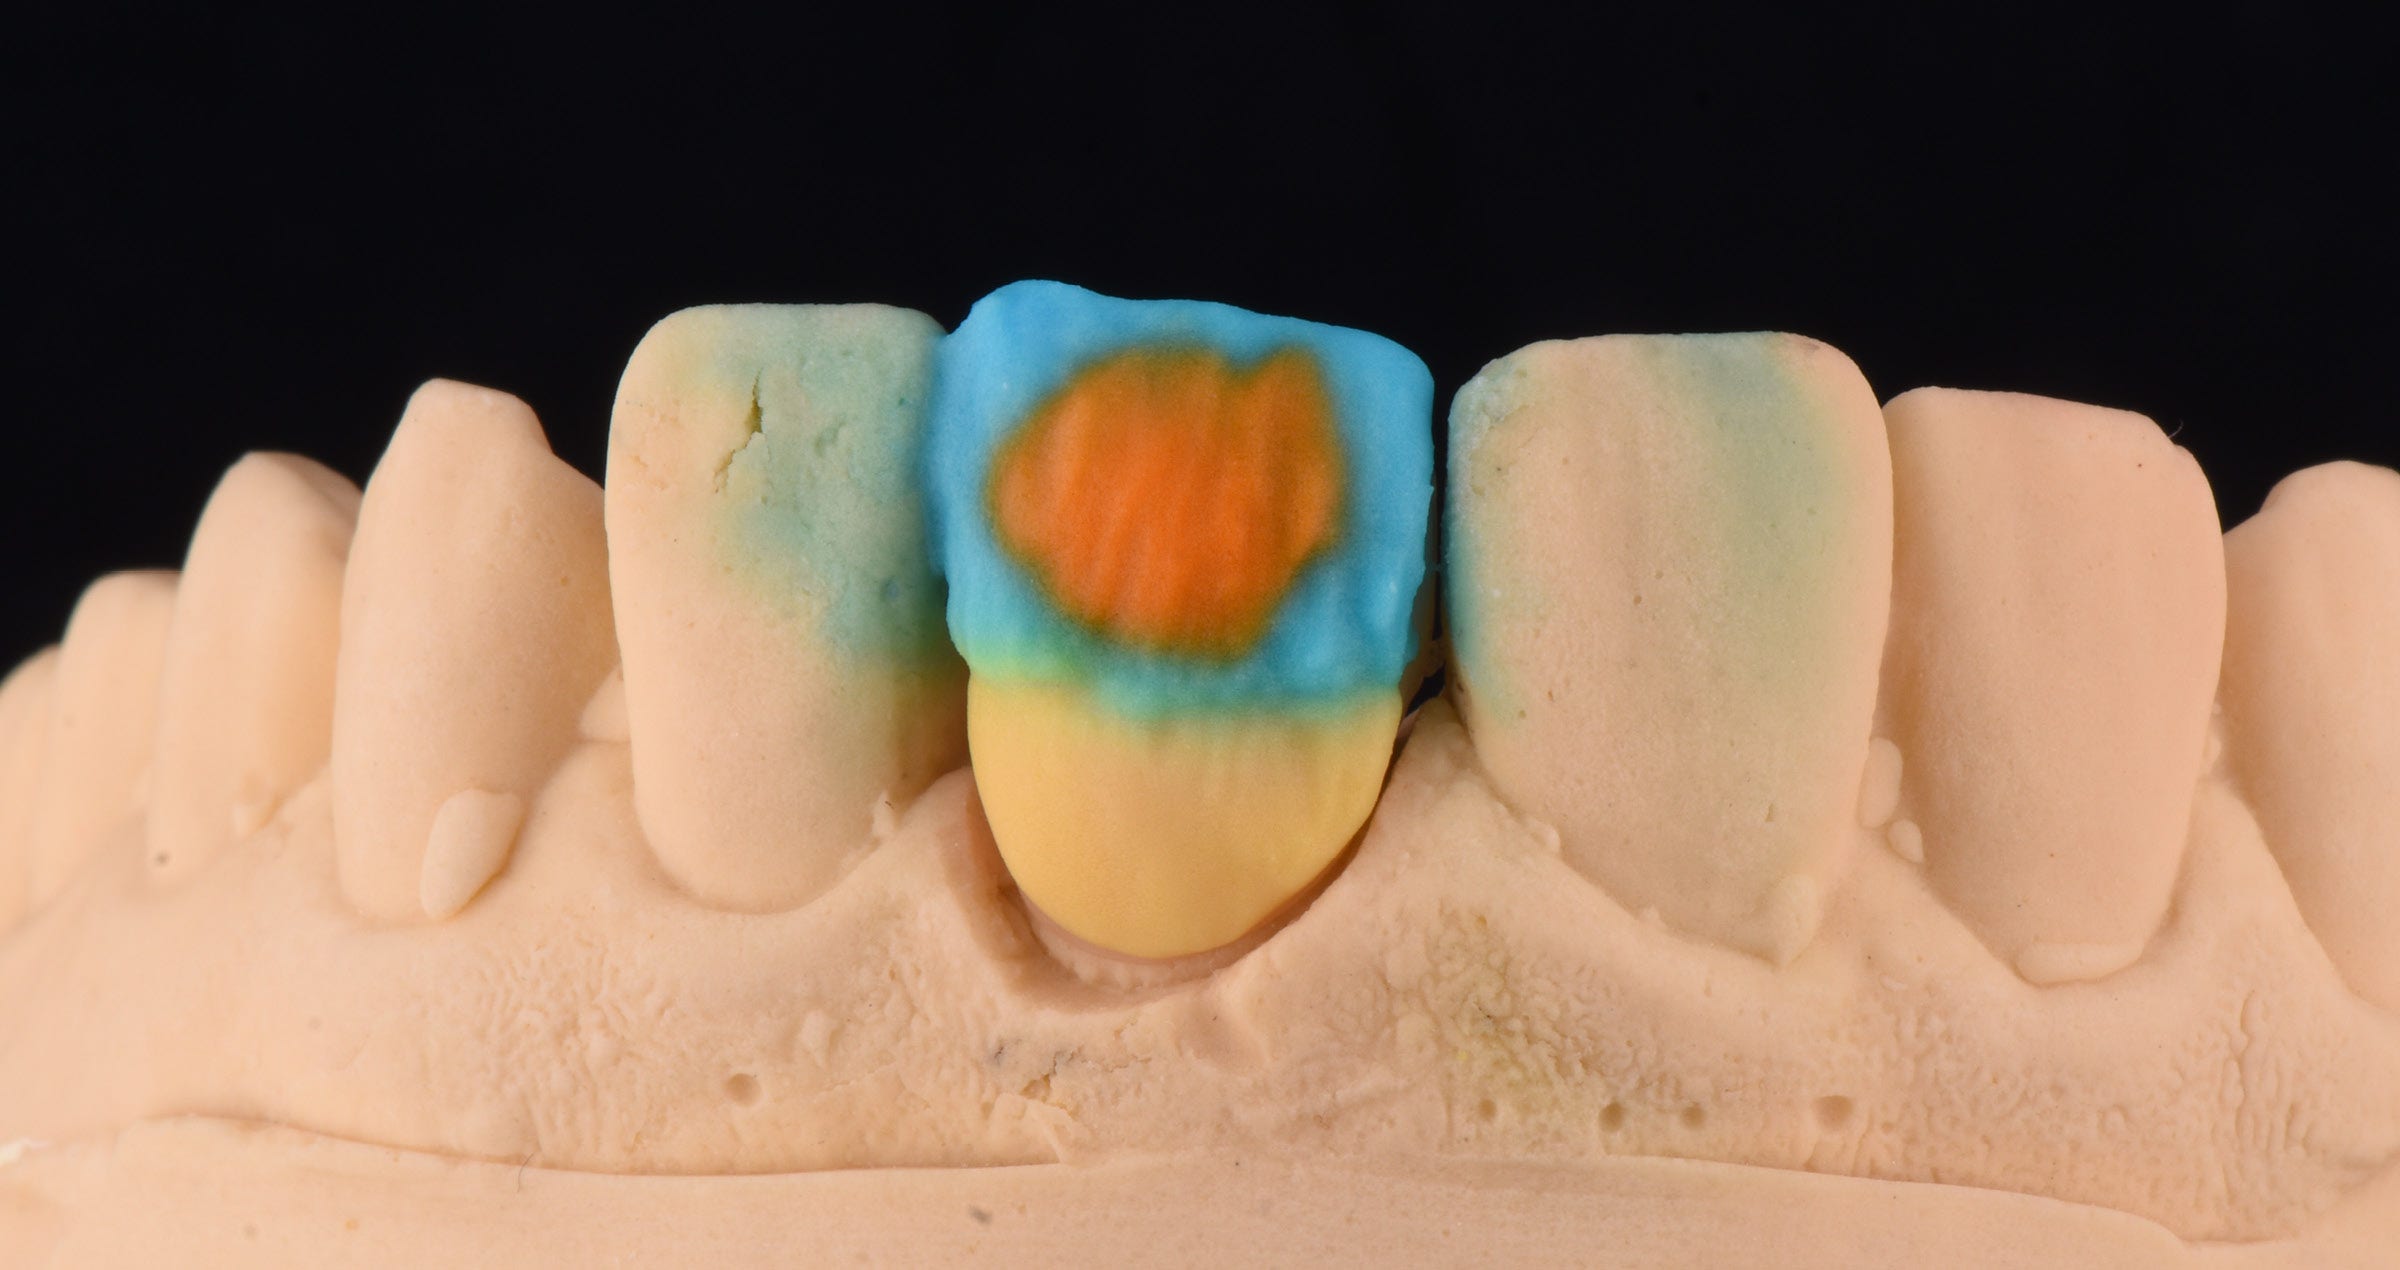
Fig. 1b. Chroma map for the application of CERABIEN™ MiLai Internal Stains to the lithium disilicate surface. We selected B+ (red colour) for the cervical area. For the proximal and middle incisal areas, Incisal Blue 1 & 2 (gradient blue colour) were applied and incisally in the middle, we chose Cervical 2 (orange colour). Tip: all internal stains were mixed with Bright and IS Liquid.


Fig. 1c. Appearance of the veneers after the application of CERABIEN™ MiLai Internal Stains.


Fig. 1d. CERABIEN™ MiLai Porcelains applied on top of the internal stains: LT1 is used for the cervical area (red) and a mixture of TX and E2 (30:70 ratio) for the middle and the incisal third.


Fig. 1e. The final restorations after glazing with Clear Glaze and mechanical polishing using paper-abrasive cones, a rubber polisher and Pearl Surface Z (Kuraray Noritake Dental Inc.).

Images courtesy of Andreas Chatzimpatzakis.


CASE 2

ADVANCED APPROACH ON LITHIUM DISILICATE

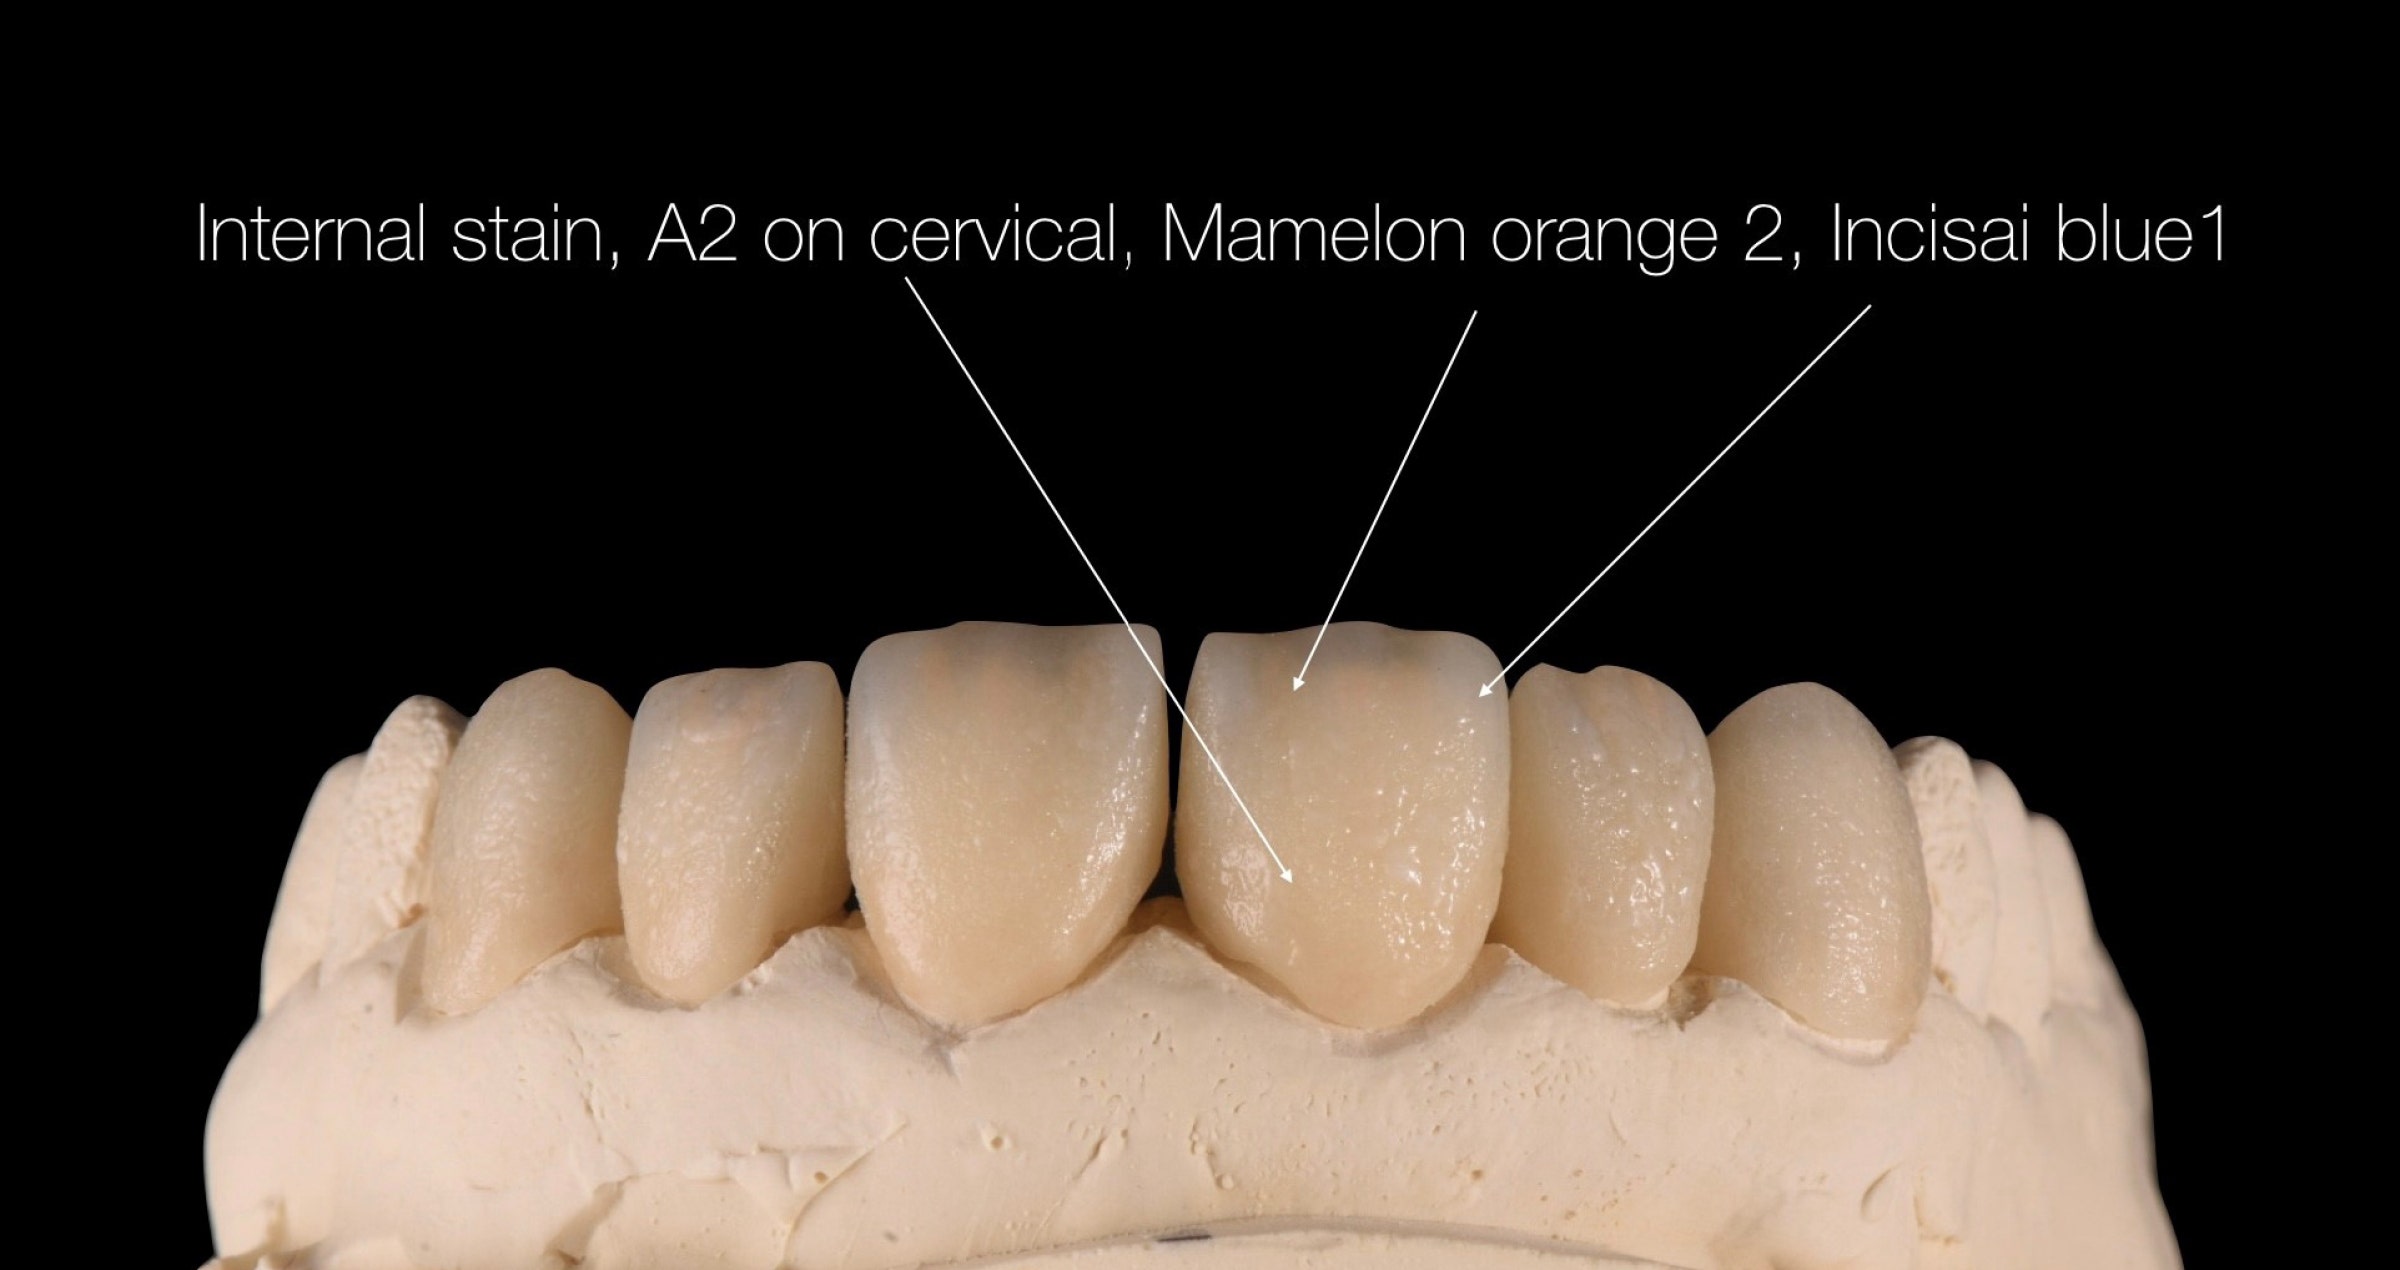
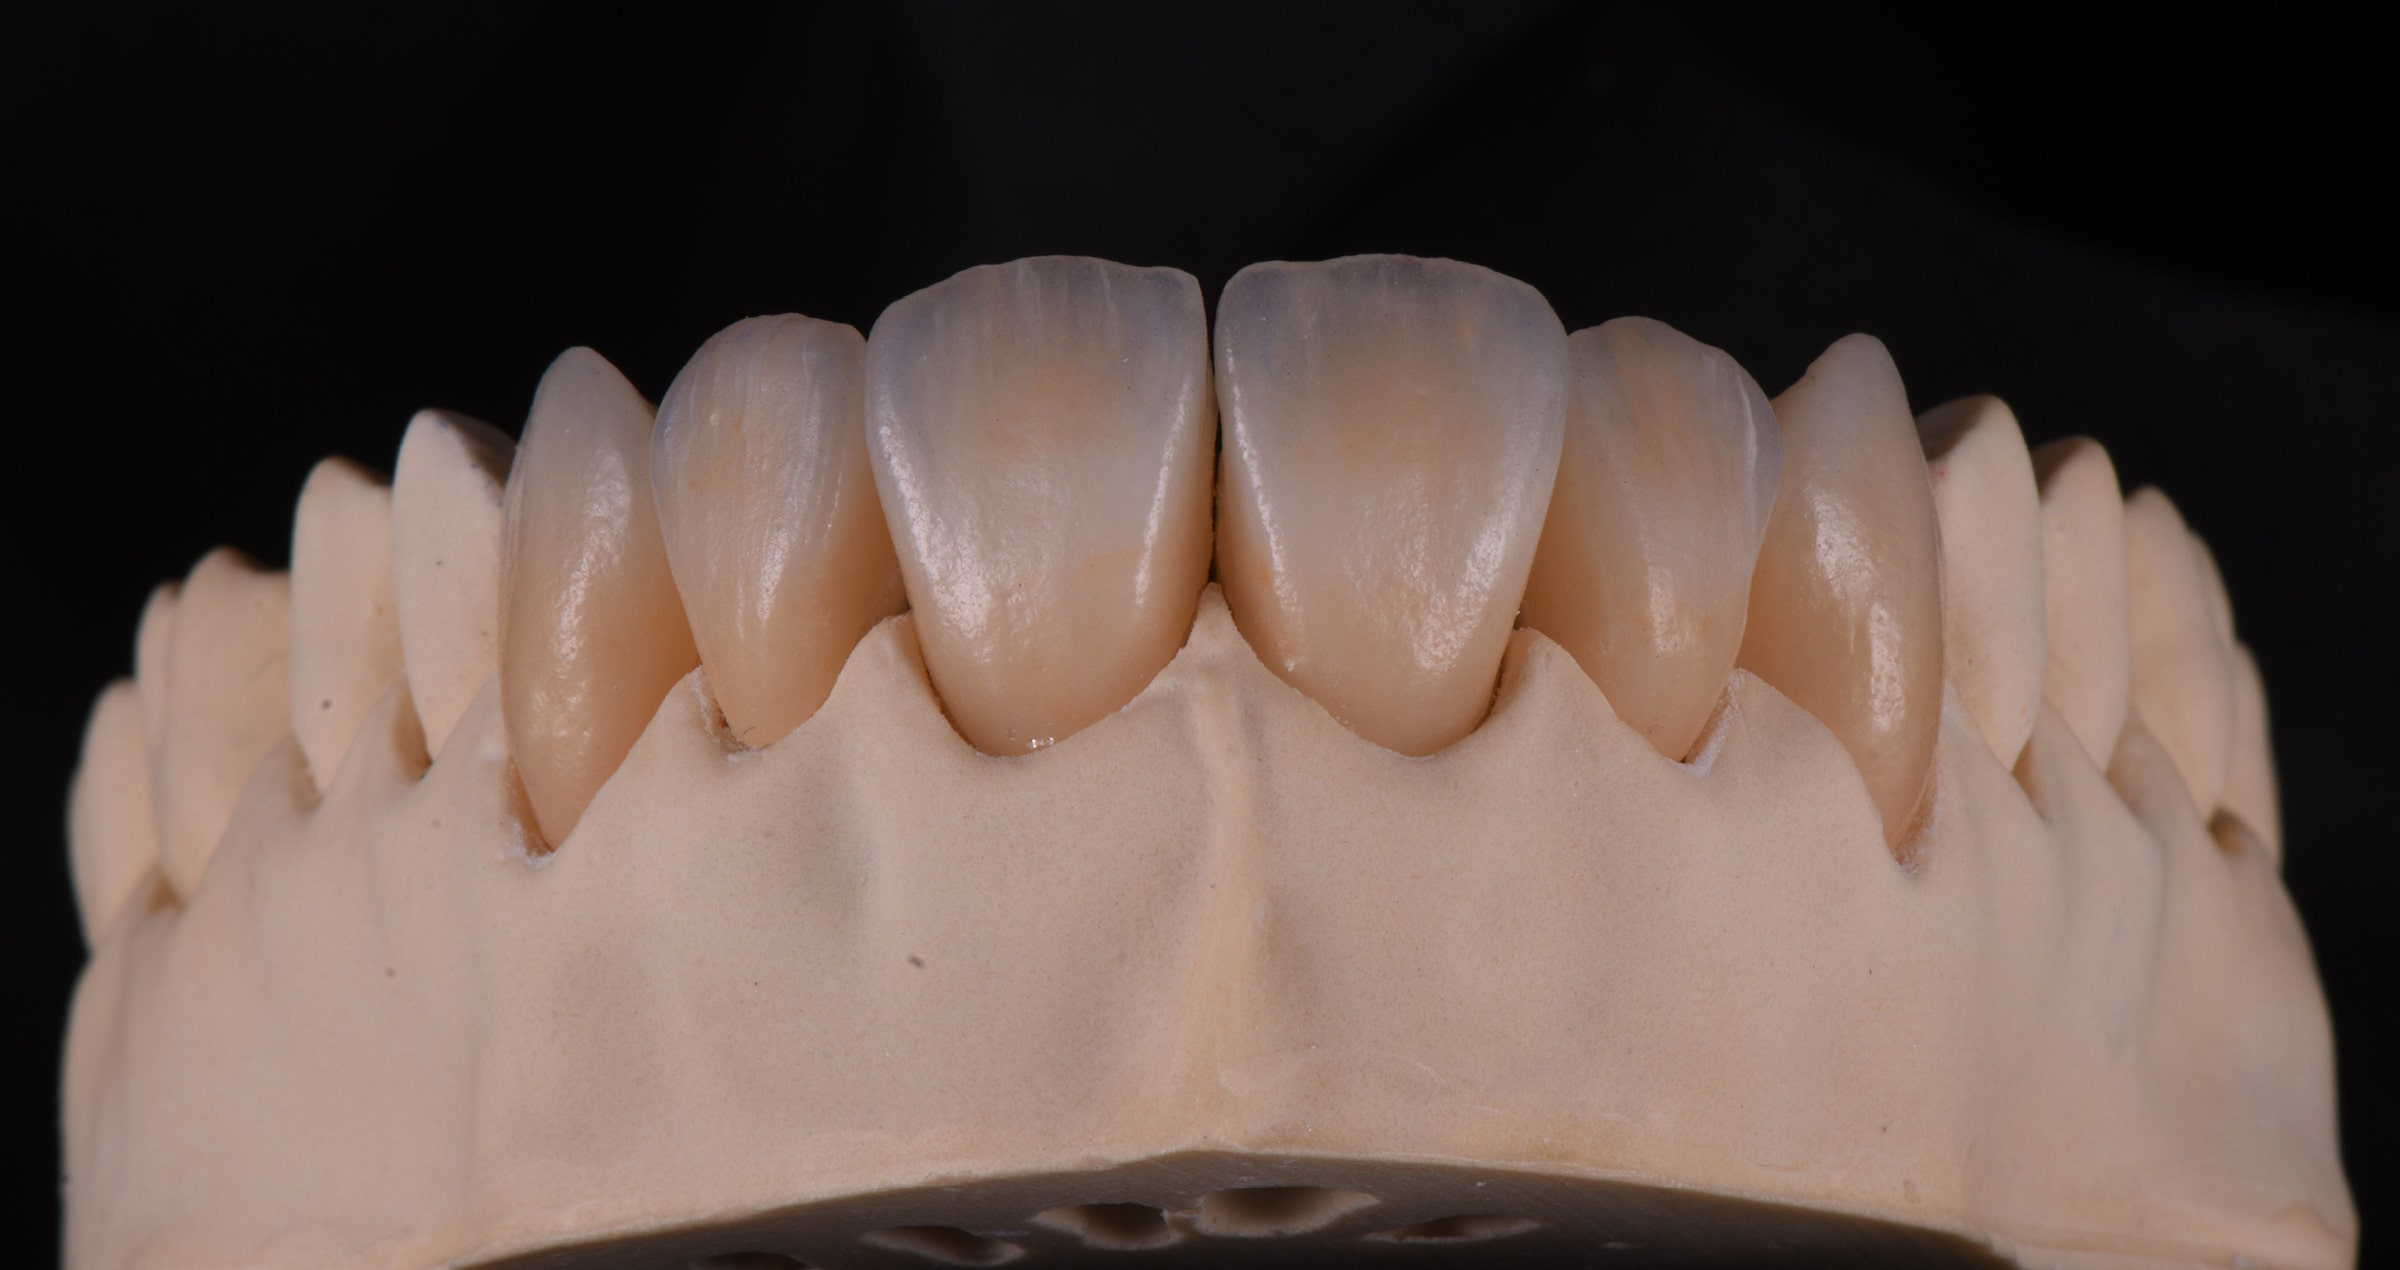
In order to imitate a more complex inner colour structure with mamelons, different levels of translucency and more individual effects, a slightly more complex micro-layering approach was selected. Again, the core was produced using Amber Press in the LT variant and the shade B1. After pressing and fitting on the model, we reduced the incisal third to create space for the transparent porcelain [Fig. 2a]. Subsequently, an extremely thin layer of CERABIEN™ MiLai Porcelain adding translucency to the enamel surface (TX) was applied in the incisal third of the veneers [Fig. 2b]. In this way, it is possible to create an optimally translucent basis for the application of the internal stains. The first bake was conducted and the surfaces were sandblasted as well as steam cleaned to create the conditions needed for internal staining [Figs. 2c and 2d]. The chroma map for and outcome of the internal stain application are shown in figures 2e and 2f. Afterwards, a final layer of CERABIEN™ MiLai Porcelain was applied [Fig. 2g]. All four incisors received a layer of LTx to add ultimate translucency and opalescence to the enamel, while LT1 was the material of choice in the cervical third of the canines, where LTx completed the layer in the other areas. As LT1 is slightly less translucent and opalescent, a natural effect is obtained in this way. The outcome obtained after glazing and mechanical polishing is shown in Figure 2h.


Fig. 2a. Lithium disilicate veneers reduced for the advanced layering procedure involving more porcelains and bakes.


Fig. 2b. Thin layer of TX applied to the incisal third of the restorations to boost the translucency in this area.


Fig. 2c. Appearance of the veneers after the first bake.


Fig. 2d. Ceramic surfaces after sandblasting and steam cleaning.


Fig. 2e. Chroma map for the application of the internal stains. Cervical 2 was used for the cervical third, Incisal Blue 2 for the proximal regions and Mamelon Orange 2 for the mamelons. As mentioned before, the selected internal stains were mixed with Bright.


Fig. 2f. Appearance of the veneers after the bake of the applied CERABIEN™ MiLai Internal Stains.


Fig. 2g. Final build-up to reach the desired shape of the veneers. LTx is the only material applied to the central and lateral incisors, while the canines are built up with LTx in the incisal and middle and LT1 in the cervical third.


Fig. 2h. Glazed and polished veneers on the model.

Images courtesy of Andreas Chatzimpatzakis.


CASE 3

ADVANCED APPROACH WITH GUM AREAS ON ZIRCONIA

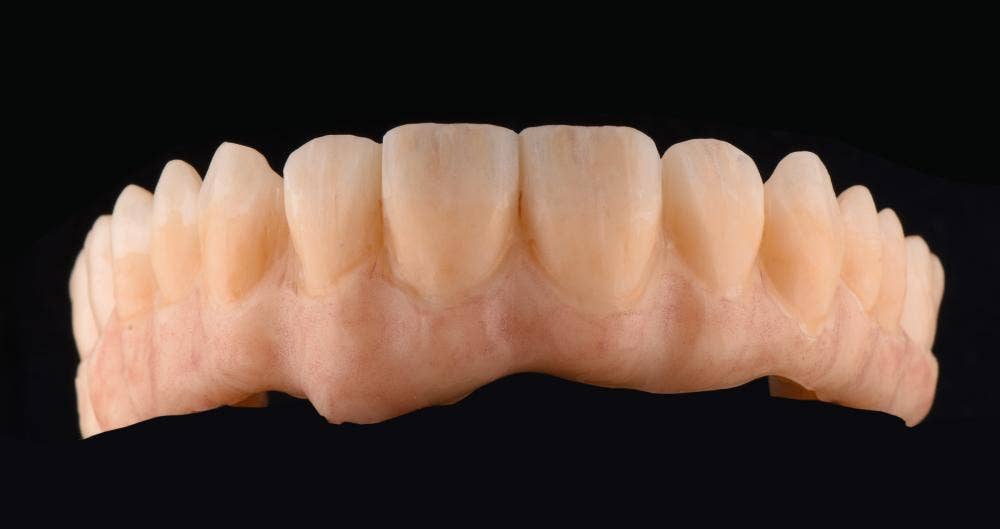
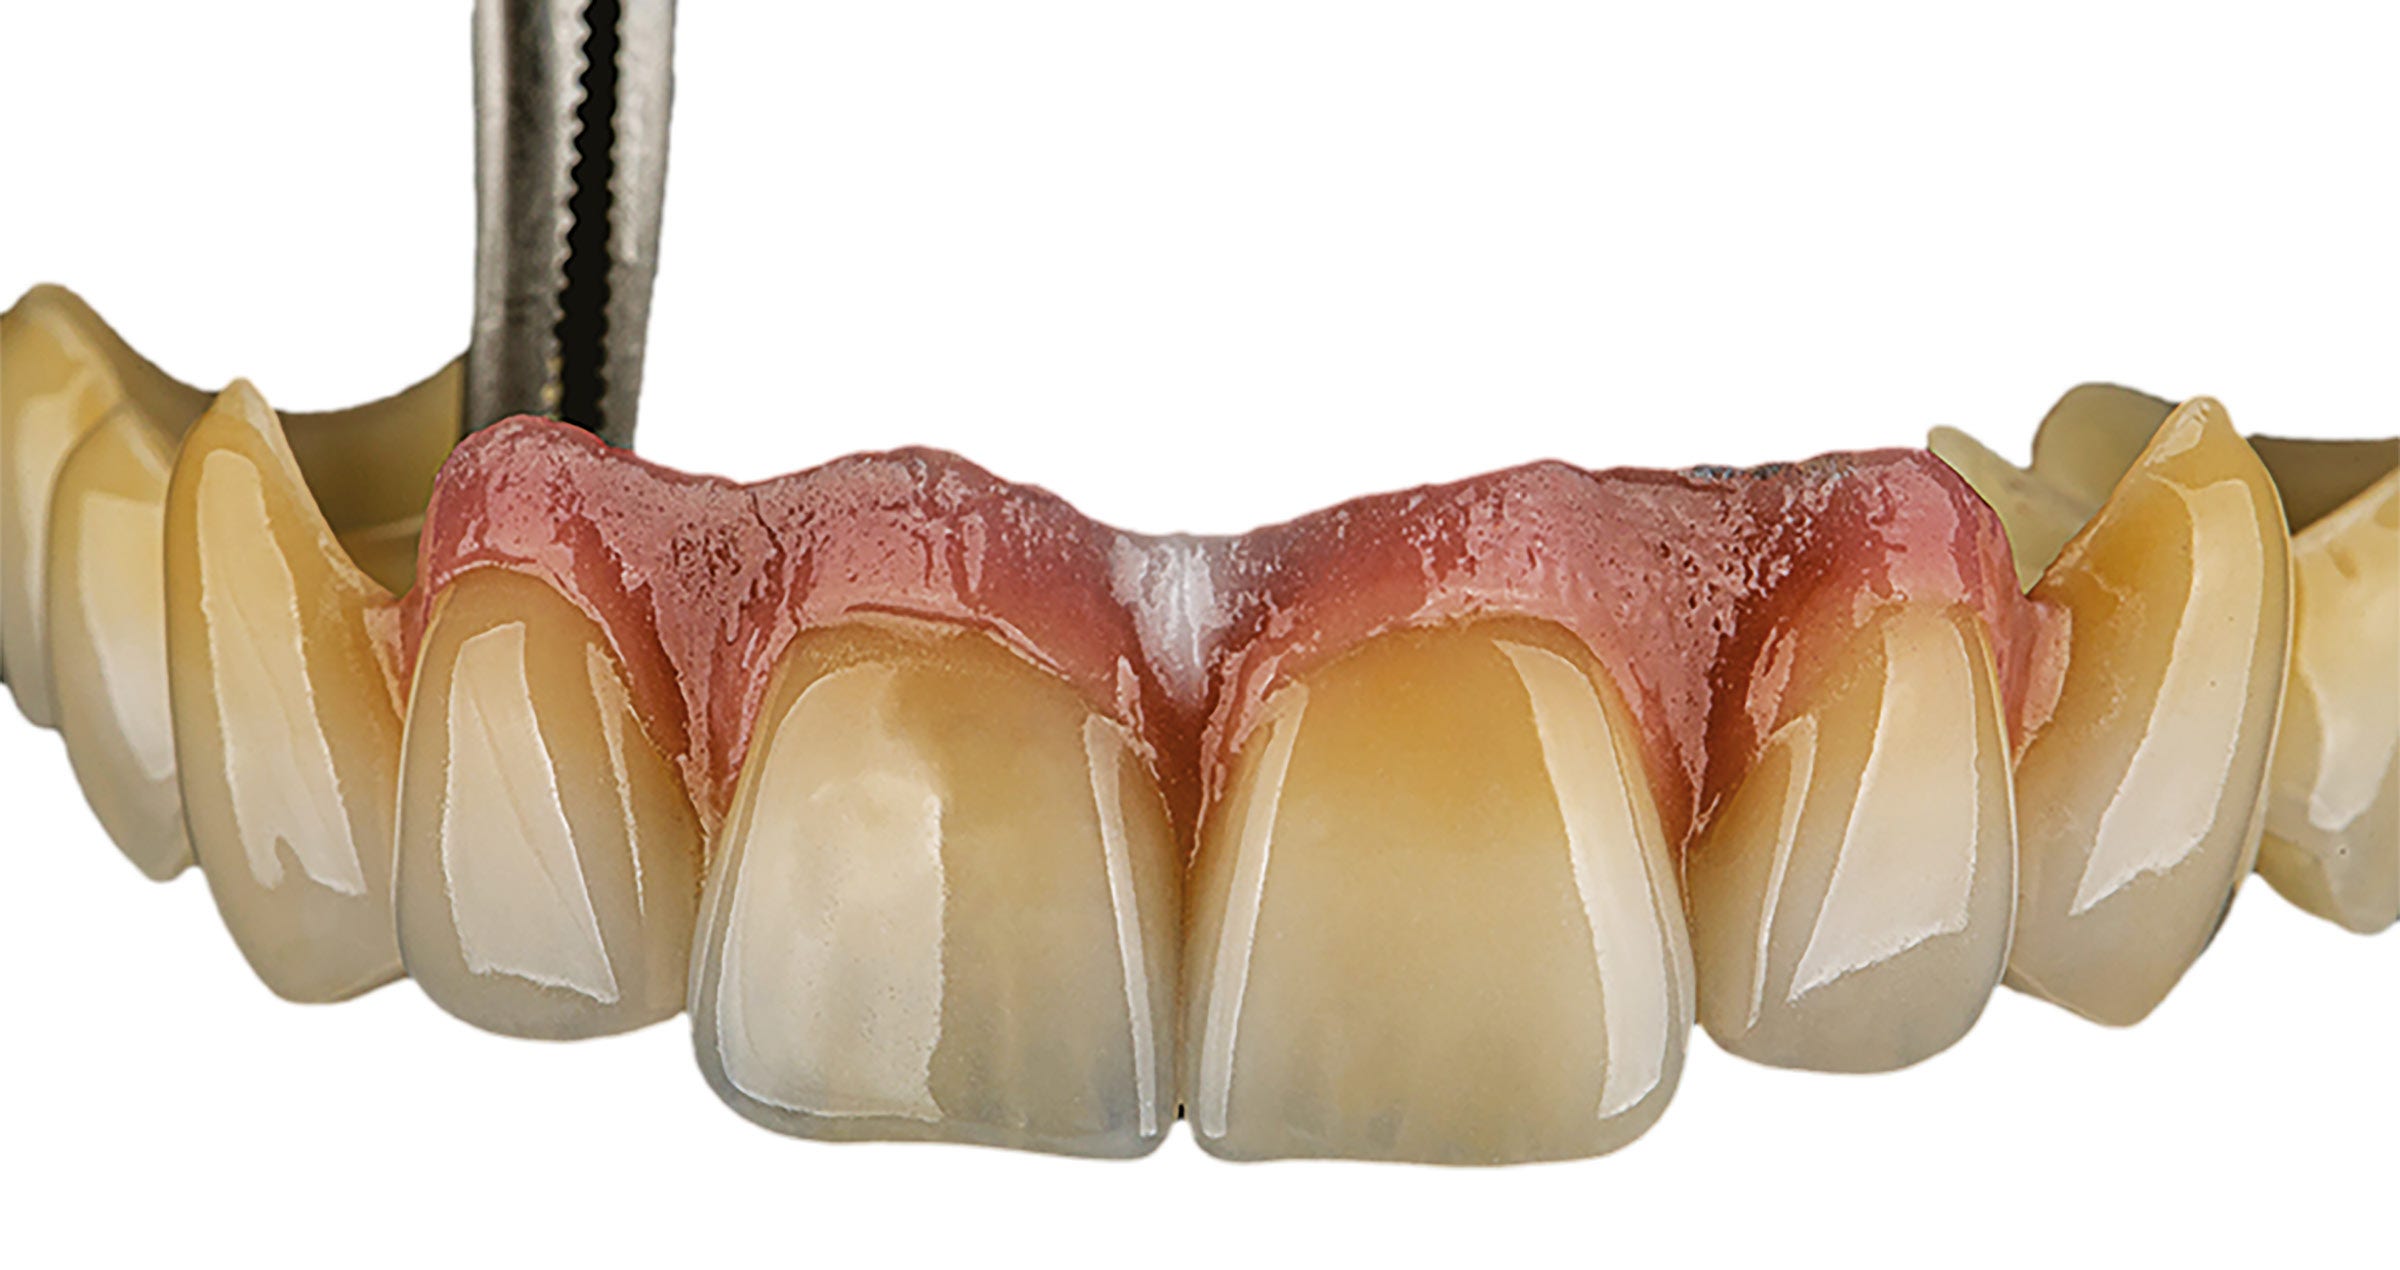
In this case, a highly complex ten-unit bridge with gum parts in the anterior region had to be produced. The selected framework material was KATANA™ Zirconia HTML Plus (Kuraray Noritake Dental Inc.), which offers a multi-layered colour structure, an optimized translucency and the high flexural strength required for long-span bridges. The restoration was milled in an anatomically reduced design and the surface texture was optimized with rotating instruments before sintering [Fig. 3a]. After the final sintering procedure, the restoration had a favourably high translucency in the incisal region and a natural shade structure [Figs. 3b and 3c]. In the first step of the micro-layering procedure, the application of the CERABIEN™ MiLai Internal Stains was planned and carried out [Figs. 3d and 3e]. Subsequently, different layers of CERABIEN™ MiLai Porcelain were applied. The images 3f to 3h reveal which shades were combined and illustrate the procedure, while the outcome before and after the last bake is shown in Figures 3i to 3k. In the next step, the gum areas were completed using the CERABIEN™ MiLai tissue porcelains Tissue 4, 5 and 6 in the order and locations described in Figures 3l to 3o. In the final layer, Tissue 1 was mixed with ELT1 to imitate the labial frenulum and with LTx to create a smooth transition to the natural gingiva [Figs. 3p and 3q]. The final restoration is shown in Figure 3r.


Fig. 3a. Milled restoration after surface texturing.


Fig. 3b. Shade and translucency of the sintered zirconia restoration.


Fig. 3c. Highly translucent bridge on the model.


Fig. 3d. Chroma map for the application of CERABIEN™ MiLai Internal Stains.


Fig. 3e. Applying a mixture of Bright, Salmon Pink and Tissue Pink to the gum area.


Fig. 3f. Application of CERABIEN™ MiLai E2 to add translucency to the structure.


Fig. 3g. Application of Tx and a mixture of Tx and CCV-2 to individualize the cervical and incisal areas while boosting the translucency of the enamel in the middle and incisal third.


Fig. 3h. Adding a final layer of LT1 for additional translucency and opalescence.


Fig. 3i. Appearance of the ten-unit bridge before the bake – labial view.


Fig. 3j. Appearance of the ten-unit bridge before the bake – palatal view.


Fig. 3k. Appearance of the ten-unit bridge after the bake.


Fig. 3l. Application of small amounts of Tissue 5 …


Fig. 3m. … covered with a layer of Tissue 6 alternating with Tissue 5.


Fig. 3n. Following another bake, Tissue 5 is applied in the proximal areas.


Fig. 3o. How to combine Tissue 6 and Tissue 4 in the next layer.


Fig. 3p. How to complete the tissue layer with Tissue 1, locally mixed with ELT1 or LTx.


Fig. 3q. Restoration before the final bake.


Fig. 3r. Final ten-unit bridge ready for placement.

Images courtesy of Ioulianos Moustakis.


ABOUT THE AUTHORS

DT IOULIANOS MOUSTAKIS
Germany


Dental Technician/Photographer
1985 - 1987 Studied at the School of Dental Technology (SBIE) in Athens / Greece
1997 - 1998 Master school in Berlin
2007 - Education as Maxillofacial prosthetic technician (IASPE)
2010 - Advanced education in Functional diagnosis temporomandibular joint
2011 - 2012 Curriculum implant prosthetics for dental technicians (DGZI)
2013 - 2014 Education as a graphic designer at the Media Design Hochschule (MDH) in Berlin
2015 - 2017 Education as a photographer at the Photocentrum of the Gilberto Bosques VHS Friedrichshain-Kreuzberg
2014 - 2016 - 2018 Further training at Noritake/Kuraray in Japan
2019 - International Instructor Noritake/Kuraray
2019 - Certified trainer of Teeth Morphology carving (Osaka Ceramic Training Center)
1998 - Implant Dental Studio - Athens/Greece
2010 - Zirkler & Moustakis Dental Technology - Falkensee/Germany
2020 - Giuliano Dentaldesign - Falkensee/Germany

Publications in Dental Journals
2014 - 5/2014 Dental Dialogue/Germany
2015 - 10/2015 The International Journal of Dental Technology/Japan
2018 - 1/2018 Cosmetic Dentistry/Germany
2018 - 4/2018 Zahntechnik Zeitung/Germany
2018 - 5/2018 Das Dental Labor/Germany
2018 - 5/2018 Dental Dialogue/Italy
2018 - 10/2018 Laborama/Greece
2019 - 1/2019 LabLine/Hungary
2019 - 3-4/2019 Dental Technologies/UK
2020 - 4/2020 LabLine/Hungary
2021 - 1+2 LabLine/Hungary
2021 - 5/2021 + 12/2021 Quintessenz Zahntechnik/Germany
2021 - 4/2021 QDRP France

Competitions
2013 – 6th place at the 8th KunstZahnWerk contest by Candulor
2017 – 5th place at the 10th KunstZahnWerk contest by Candulor
2017 – 1st place at the 10th KunstZahnWerk contest by Candulor as "Best Documentation“
2020 – 1st place at the 4th Panthera Master Cup by Panthera Dental

Memberships
NGSC Noritake Greek Study Club
DGZI German Society of Dental Implantology
IASPE International Association for Surgical Prosthetics and Epithetics
Key Opinion Leader (KOL) at company MPF Brush Company
Key Opinion Leader (KOL) at company Candulor
Key Opinion Leader (KOL) at company Kuraray/Noritake


MDT ANDREAS CHATZIMPATZAKIS
Greece


Andreas graduated from the Dental Technology Institute (TEI) of Athens in 1999. During his studies he followed a program at the Helsinki Polytechnic Department of Dental Technique, where he trained on implant superstructures and all ceramic prosthetic restorations.

From the year 2000, he is running the ACH Dental Laboratory in Athens, Greece, specialized on refractory veneers, zirconia and long span implant prosthesis.

ACH Dental Laboratory is Co-operating lab with the National and Kapodistrian University of Athens for the MSc degree in Dental Laboratory Materials.

From 2016 he is key opinion leader for the MPF Brush.co.

On 2017 he visits Japan where he trained from Hitoshi Aoshima, Naoto Yuasa and Kazunabu Yamanda and becomes International Trainer for Kuraray – Noritake company.

In 2018 he became Editor-in-chief for the dental technician magazine “LABORAMA” published by OMNIPRESS co.

On 2019 he studies carving, morphology and all ceramic restorations at the Osaka Ceramic Training Center by Shigeo Kataoka.

On 2019 he establishes the Dental Technicians’ Coaching Services and coaches dental technicians to improve their work.

Andreas has also conducted several lectures and hands on seminars in Greece and abroad and published articles in Greek and international magazines.

His lecture “An exciting journey … to be a dental technician” is about inspiring dental technicians to improve their work by observing and emulate natural teeth using the internal live stain technique.


Article first published in Labline Magazine Issue 45, Spring 2022 edition.

Mastering Ceramics: A Comprehensive Guide for Dental Ceramists

Discover a detailed walkthrough of an advanced shade reproduction technique with this comprehensive guide by DT Tomáš Forejtek. Tailored for professionals working with CERABIEN™ ZR ceramics (Kuraray Noritake Dental Inc.) and the eLAB protocol, this case study provides step-by-step insights into achieving exceptional results, from documentation to shade selection and framework design to final polish. Whether you are refining your craft or exploring new methods, this resource is a valuable addition to your toolkit.


Case report by Vasilis Vasiliou

THE ART OF RESTORING SMILES: MASTERING THE CHALLENGE OF A SINGLE CENTRAL INCISOR

Restoring a single maxillary central incisor is possibly the biggest challenge a dental technician can face in everyday work. Especially when a patient is young, it is extremely important to restore her or his smile to its original beauty. Any restoration that is perceivable as such might have a negative impact on their self-confidence and quality of life even in the long term.


A STORY OF JOY AND DESPERATION

Take Ioanna, a 14-year-old girl who presented in her dental office in a state of desperation. In the hours before, she had been floating on cloud nine: Her favourite band performed in Cyprus for the first time and she had managed to buy tickets for herself and her best friend. Thrilled, they had arrived at the concert, the band started playing and the crowd danced to the music. It felt like this was going to be the best day of her life. At the time the band played its most popular song, people were delirious, jumping up and down in ecstasy. Between all the exuberant dancing and laughing, however, Ioanna suddenly was hit by a strong push. She fell, her face hitting something hard – a seat in front of her. Pain froze time and it took a few seconds before she understood what had happened: Tasting blood in her mouth, she explored her teeth with her tongue and realized that one of her central incisors had fractured.


AFFECTING THE QUALITY OF LIFE

This is one of the many touching stories we listen to every day. A fall during a concert, a push at somebody’s birthday party, a car accident: There are many incidences that can ruin a young, beautiful smile. By paying attention to the involved patients and their stories, one will come to realize how strongly some of them are affected by all this. They cover their mouths when they laugh or hold back their smiles.


Any dental technician who is committed to restoring their lost smile in the best possible way is probably aware of the impact his or her work can have and the responsibility coming with it: A Beautiful result will restore not only their smile, but also their self-confidence, will let them start laughing happily, expressing themselves comfortably and simply enjoying social interaction again (Figs. 1 to 5). Compromised outcomes, on the other hand, might have the opposite effect. Being aware of this role should be every technician’s motivation to become better day by day. Evolve for these moments, when our work brings tears of joy to our patients.


Fig. 1. Layering sketch for the restoration of a fractured central incisor in three layers: Layer one.


Fig. 2. Layering sketch for the restoration of a fractured central incisor in three layers: Layer two.


Fig. 3. Layering sketch for the restoration of a fractured central incisor in three layers: Layer three. After the first bake, small details were integrated, followed by a second bake. Finally, the restoration was finished with CERABIEN™ ZR FC Paste Stain and Glaze.


Fig. 4. Treatment outcome able to restore not only the smile, but also the self-confidence of the young girl.


Fig. 5. Immediately after cementation of the restoration, the restoration is barely identifiable, only the soft tissue needs some time for recovery.


ASPECTS TO BE CONSIDERED

But how to proceed in restoring single central incisors in the best possible way? The success of this type of restoration is hidden in the shape, which is the most difficult part. Managing to create a natural morphology is more than half the battle. The other important part is colour. The key to reproducing colour is in understanding how the utilized porcelains work. It is all about light reflection, absorption, translucency and opalescence, value and characteristic details. The more you gain experience and understand the optical properties of teeth and ceramics, the better your outcomes will be. Support is offered by a camera, a macro lens and a twin flash, which are used to capture and analyse the intraoral situation. For an initial analysis and understanding of shape and colour, I like to see the patients in my dental laboratory. Feeling the colour helps to develop the most realistic picture of what needs to be created. The key to successful realisation of the plan just developed is the use of reliable, easy-to-handle materials – in my case KATANA™ Zirconia and CERABIEN™ ZR Porcelains (both Kuraray Noritake Dental Inc.).


POSSIBLE STEPS

The first thing to focus on when starting to produce an anterior restoration – like in the case presented in figures 6 to 14 – is the correct value of the tooth. As soon as the framework or base is produced in the right value, you need to place what you see. Does the adjacent tooth show mamelons, traces of blue and orange? Those characteristics simply need to be observed and copied. There is no need to create something fancy. The tricky part is to use the available space reasonably. When there is plenty of space for the porcelain, it may be challenging to keep the value of the framework and avoid a greyish appearance. Depending on the die colour, age of the patient, natural surface texture and space available, an appropriate layering approach and finishing technique may be selected.


Fig. 6. Replacement of an anterior crown: Prepared tooth with severe discolouration. The adjacent central incisor has a special shape and vivid inner colour structure.


Fig. 7. Framework made of KATANA™ Zirconia ML in the shade A3. The target shade being A3.5, a quite opaque material was selected in a slightly brighter shade to achieve the required masking effect.


Fig. 8. Single-bake layering procedure: Application of CERABIEN™ ZR Opacious Body, …


Fig. 9. … Cervical Body, …


Fig. 10. … Body and Transitional Body.


Fig. 11. Incisal cut-back …


Fig. 12. … and creation of the mamelon structure.


Fig. 13. Application of Aqua Blue 1 …


Fig. 14. … followed by T Blue …


Fig. 15. … and Luster Porcelains.


Fig. 16. Halo effect created with Body.


Fig. 17. Treatment outcome. (After a first bake followed by minor adjustments, a second bake, surface texturing and glazing with CERABIEN™ ZR FC Paste Stain Clear Glaze.)


CONCLUSION

Creating a single central takes us out of our comfort zone. By paying attention, observing the adjacent teeth carefully and using materials we really understand, it is possible to meet or exceed our patients’ expectations. While specific tools like cameras and experience with the utilized materials offer support in producing predictable outcomes, my main credo is “If you want things around you to change, you must first change yourself”. For continued improvement, it is thus necessary to focus on professional growth and advancement. With the right mentors who will teach us the secrets of stratification and inspire and motivate us to continue advancing, it becomes easier to restore the smiles and self-confidence of our patients every time they need us to.


Acknowledgements

Special thanks go to the dental practitioners who treated the patients presented above – Andreas Skyllouriotis DDS, MSD, Surgically-Trained Prosthodontist, and Theo Odysseos, DDS, Diplomate, American Board of Oral Implantology / Implant Dentistry.


Dental Technician:

VASILIS VASILIOU


Vasilis Vasiliou was born in Nicosia, Cyprus, and graduated from the Technical School for Dental Technicians in Athens in 2004. He has furthered his education by attending several advanced seminars led by mentors and experts in the field, such as Ilias Psarris and Nondas Vlachopoulos.


Throughout his career, Vasilis has made significant contributions to the dental community, including presenting at various conferences in Greece and publishing articles in Greek dental magazines. Since 2020, he has been a key opinion leader for MPF Brush Company and, since 2022, a HASS Ambassador. Vasilis has been an active member of the International Team for Implantology (ITI) since 2019.


Together with his father, Vasilis runs a successful dental laboratory in Nicosia, specializing in all-ceramic and implant restorations. His extensive experience and commitment to excellence have established him as a respected professional in his field.


Efficient production of a zirconia overdenture

Case by CDT Mathias Berger, France


Every patient is unique. Their specific backgrounds, functional needs and aesthetic demands need to be respected in any prosthodontic treatment plan. However, the importance of an individual treatment approach increases with the number of teeth to be replaced: After all, the impact of the restorations on facial aesthetics and on the patient’s quality of life is never greater than when all teeth are missing. Fortunately, adequate dental materials and techniques are available for a patient-centered, individual approach, no matter what challenges need to be overcome.


A patient with bruxism


In the present case, an elderly male patient with bruxism was in need of a new maxillary denture. Since the placement of five implants in the maxilla, he had no proprioception in this jaw. This lack of sensation had an impact on the overdenture to be produced: material and design needed to be carefully selected in a way that it would withstand uncontrolled chewing forces. As technical complications are easier to repair than biological complications, the overdenture should not be unbreakable – instead, the replacement of single units should be easily manageable.


Two-part denture design


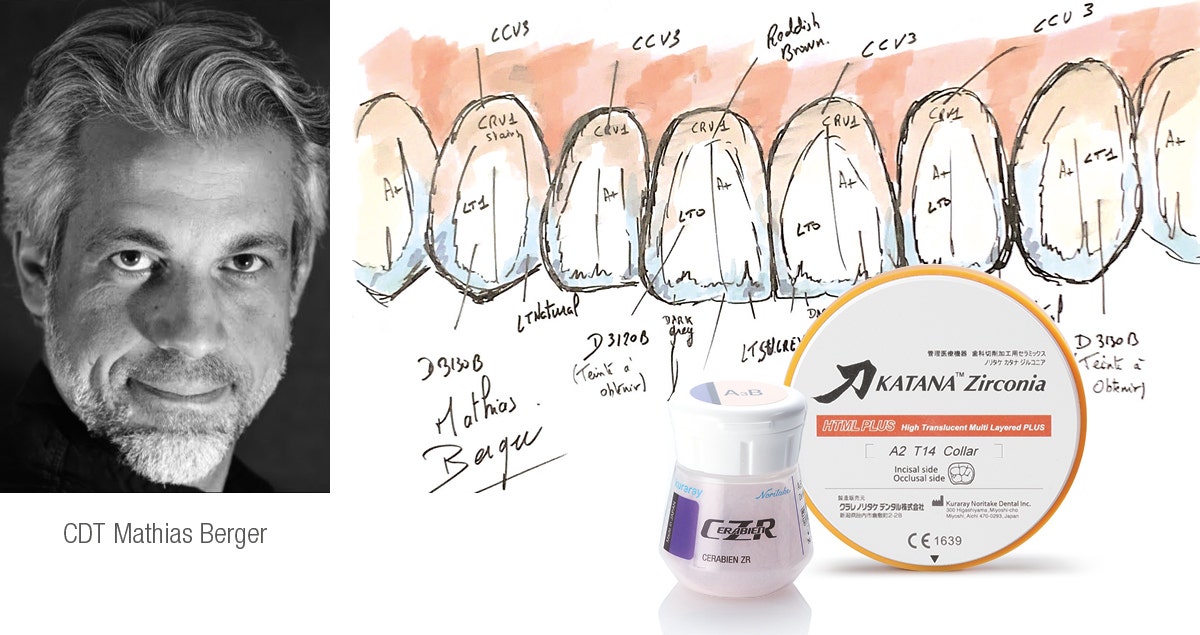
The solution was a two-part design with a milled bar consisting of the gum area and tooth abutments (fig. 1) combined with single crowns. The material of choice for the bar was KATANA™ Zirconia HTML Plus (Kuraray Noritake Dental Inc.) with a uniform flexural strength of 1,150 MPa throughout the disc, while the single crowns were milled from KATANA™ Zirconia YML that offers natural translucency and strength gradation. While a monolithic design was selected for the posterior crowns, the six crowns for the anterior region received a micro-cutback for aesthetic micro-layering with CERABIEN™ ZR Porcelain. The shade scheme for individualization of the anterior crowns is shown in fig. 2. In a nutshell, customization was performed with the Internal Stains Cervical 1, Grayish Blue, Dark Grey and A+. The finishing layer on the incisors was created mainly using LT0 materials with some CCV-3 on the cervical and LT Natural on the mesial and distal lobes. On the canines, LT1 was used instead of LT0. The posterior crowns were merely finished with liquid ceramics (CERABIEN™ ZR FC Paste Stain, Kuraray Noritake Dental Inc.).


Fig. 1. Sintered bar milled from KATANA™ Zirconia HTML Plus.


Fig. 2. Chroma map for micro-layering in the anterior region.


Fig. 3 shows the finished single crowns with their individual, age-appropriate shade effects on the sintered bar. After checking the fit of the crowns, the gum areas of the bar were individualized using CERABIEN™ ZR Tissue Porcelain (fig. 4). Subsequently, the crowns were luted to the zirconia abutments (fig. 5), leaving screw access holes in aesthetically uncritical positions (fig. 6). The final overdenture ready for try-in is shown in fig. 7. Due to an excellent fit on the implants (fig. 8), it was possible to immediately fix the overdenture with the screws, close the access holes with composite and discharge the patient. The final appearance is shown in fig. 9.


Fig. 3. Finished crowns on the sintered bar.


Fig. 4. Bar with individualized gum areas.


Fig. 5. Placement of the central incisor crowns on the bar.


Fig. 6. Occlusal screw access hole in the finished overdenture.


Fig. 7. Overdenture ready for try-in.


Fig. 8. Intraoral try-in of the aesthetic overdenture.


FINAL SITUATION


Fig. 9. Treatment outcome.


CONCLUSION


This patient case is a good example of how important it is to respect the patient’s background, age and specific demands when producing dental restorations. Thanks to the great variety of restorative materials with different mechanical and optical properties available, it is possible to create suitable prosthetics for virtually every patient. However, for this purpose, it is important to stay up to date regarding new products launched and techniques developed. This way, it is often even possible to create beautiful and durable solutions in a simplified and efficient procedure such as micro-layering on innovative zirconia with a high aesthetic potential.


Dentist:

CDT MATHIAS BERGER


Same-day dentistry: Replacement of two PFM crowns with zirconia restorations

Clinical case by Dr. Frank Heldenbergh


The advancements in zirconia in contemporary dentistry nowadays allow for a wider range of applications, including in the anterior sector, and for chairside production using dedicated CAD/CAM systems. Even without a cutback, KATANA™ Zirconia Block (STML), combined with CERABIEN™ ZR FC Paste Stain (both Kuraray Noritake Dental Inc.), offer an extremely satisfactory aesthetic solution.


In the present patient case, the materials were chosen to replace old PFM crowns on the maxillary central incisors. The planned treatment was in accordance with the patient's wishes, and carried out in a single appointment.


CASE DESCRIPTION

The patient asked for a replacement of the existing crowns on the two maxillary central incisors (teeth 11 and 21, FDI notation). The porcelain-fused-to-metal (PFM) restorations had been in place for about thirty years (Figure 1). She desired aesthetic improvements and slight repositioning of these two teeth.


TREATMENT PLAN

In agreement with the patient, it was decided to perform the entire procedure in one appointment: removal of the existing crowns, digital impressions, production, and bonding of new restorations. The periodontium was healthy with no bleeding. The only uncertainty was whether the existing crowns were cemented onto inlay-cores or if they were Richmond crowns. A preliminary silicone impression was taken as a precautious measure: in case something unexpected prevented the new crowns from being bonded during the session, it would be easily possible to produce temporary crowns.


Fig. 1. Initial clinical situation.


TREATMENT

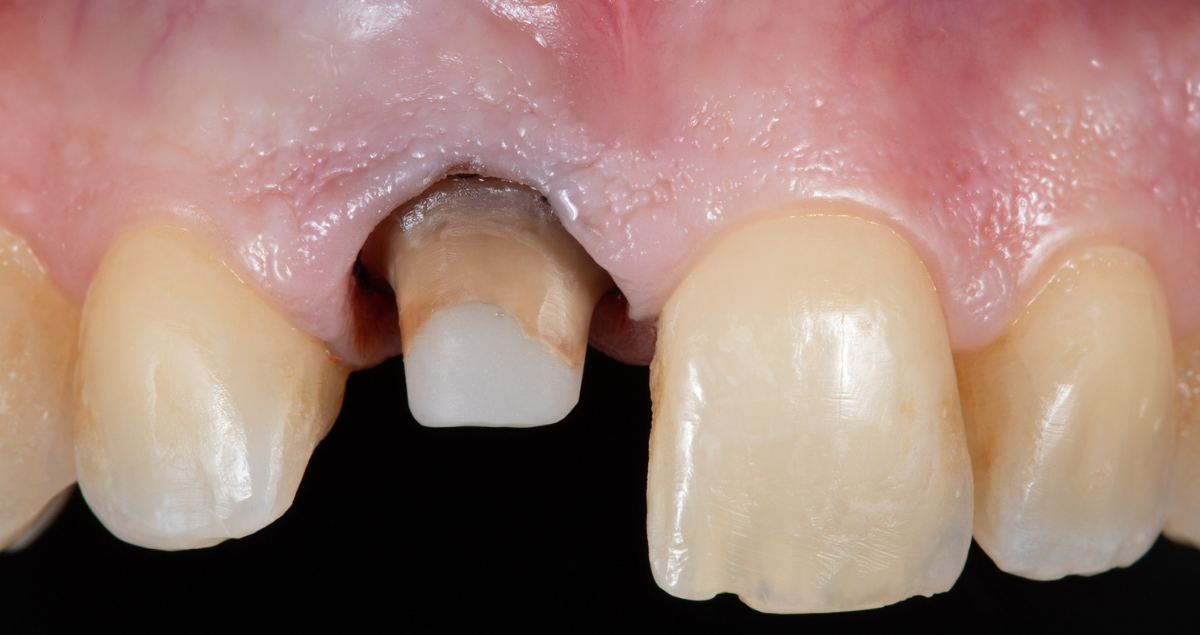
Using a diamond bur followed by a tungsten carbide bur, the existing crowns were removed, revealing that they indeed were Richmond crowns. Because the anatomy of the intra-radicular posts clearly contraindicates an attempt to remove these posts, it was decided to trim the crowns to transform them into inlay cores rather than risk further damage. The corono-peripheral preparations were reworked at the same time. One of the major challenges was related to the necessity of masking the metal of the transformed coronal-radicular reconstructions. Luckily, the space available was sufficient for the production of full zirconia crowns with a significant thickness (Figure 2). The target shade of the crowns was chosen in consultation with the patient (Figure 3).


Fig. 2. Situation after removal of the existing restorations.


Fig. 3. Shade determination using a shade tab: A2 was the appropriate shade.


Subsequently, impressions were taken using and intraoral scanner, the virtual models were checked and the crowns designed, considering the patient's request to have her two incisors slightly retracted (Figures 4 and 5).


Fig. 4. Virtual models of the patient’s teeth with the newly designed crowns, revealing the space available for a slight retraction.


Fig. 5. Designing of the two crowns.


The two crowns were milled from KATANA™ Zirconia Block 14Z A2 (Figure 6). A quick reminder: unlike lithium disilicate, zirconia prosthetic parts cannot be tried in immediately after milling, as they are around 20 percent larger than their final size after sintering. Final sintering was performed within about 18 minutes using the furnace SINTRA CS (ShenPaz Dental Ltd). After this process, the crowns may be tried on to check their fit, shape, shade and optical integration.


Fig. 6. Milled crowns in the CAD/CAM blocks.


For finishing of the restorations, different options are available. In this case, we decided not to limit ourselves to mechanical polishing of the prosthetic parts, as zirconia does not fluoresce like natural teeth. To add fluorescence as an optical feature, the surface was lightly stained and glazed with CERABIEN™ ZR FC Paste Stain (Figure 7).


Fig. 7. Crowns in the furnace after staining and glazing with liquid ceramics.


After firing, the two incisor crowns were tried in again using a try-in paste corresponding to the chosen resin cement system (PANAVIA™ V5, Kuraray Noritake Dental). In this way, the final appearance was simulated to validate the shade of the cement. The intaglio surfaces of the crowns were then sandblasted before applying CLEARFIL™ CERAMIC PRIMER PLUS as the restoration primer. The prepared teeth were treated with KATANA™ Cleaner (Kuraray Noritake Dental Inc.) to decontaminate the surface from proteins in saliva and possibly blood. Those clean surfaces are ideal for bonding. After thorough rinsing and drying, PANAVIA™ V5 Tooth Primer (containing MDP monomer for bonding with the hydroxyapatite and metal of the preparation) was applied according to the manufacturer’s instructions (Figure 8).


Fig. 8. Selected cementation system and try-in.


Subsequently, PANAVIA™ V5 Paste was applied into the first crown, which was then seated, followed by tack curing (brief photopolymerization for three to five seconds), excess removal and final light curing from all sides.


The procedure was then repeated for the second maxillary central incisor. The result instantly satisfied the patient, both in terms of aesthetics (adaptation, position of the new crowns, mimicry) and the comfort provided (Figures 9 and 10).


Fig. 9. Crowns immediately after placement.


Fig. 10. Aesthetically pleasing and comfortable result.


At a recall after four months, soft tissue conditions were ideal and the patient was happy with the outcome (Figures 11 to 13). The selected zirconia had nice optical properties, masking of the metal posts was successful and the natural surface texture contributed its share to a nice overall picture. The retracted position of the teeth was also perceived positively by the patient, while comfort and function were excellent.


DISCUSSION

Although lithium disilicate has so far been considered the material of choice for prosthetic work in the anterior region, zirconia is nowadays proving to be an extremely satisfactory alternative from every point of view: milling, strength, aesthetics, assembly (among other things, no hydrofluoric acid is required for bonding). KATANA™ Zirconia Blocks (STML) with a multi-layered colour structure in a single 4Y-TZP zirconia block, combined with CERABIEN™ ZR FC Paste Stain, offer a remarkable solution. This applies to treatments around the replacement of existing crowns as well as first-line treatments with less invasive preparations (verti-prep) than those required by other types of ceramics.


Fig. 11. The patient’s smile at a recall after four months.


Fig. 12. Great optical integration.


Fig. 13. Natural surface texture contributing to success Control pictures after four months taken by Emmanuel Charleux.


Dentist:

FRANK HELDENBERGH


Dr. Frank Heldenbergh graduated with a Doctor of Dental Surgery degree from the University of Reims in 1988.Driven by a passion for prosthetics, he pursued further specialization as a Prosthetic Resident at the UFR Odontology of Reims from 1990 to 1992. Dr. Heldenbergh’s dedication to advancing dental practices led him to join the Board of the Academy of Adhesive Dentistry in 1999. His commitment to this field has been unwavering, and he currently serves as the Vice President of A.D.D.A.-R.C.A.


Recognized for his expertise in ceramic veneers, inlays and onlays, Dr. Heldenbergh supervised practical work for the Paris Odontological Society from 2000 to 2018, shaping the skills of many aspiring dentists. His influence extended to the A.D.F. Congress, where he supervised practical work on ceramic veneers from 2000 to 2016. In 2017, he was the Head of Practical Work at A.D.F., a role that allowed him to further contribute to the advancement of dental education and practices. In 2018, he was the Head of Practical Work for ceramic veneers at the Paris Odontological Society.


Recognizing the importance of technology in modern dentistry, Dr. Heldenbergh pursued a University Degree in CAD/CAM from Toulouse in 2022. This addition to his qualifications highlights his dedication to staying at the forefront of dental innovation.

BEST.FIT: A hybrid technique for an efficient and aesthetic restoration of anterior teeth

Case by Dr. Enzo Attanasio

The introduction of new-generation composites, equipped with nanofillers and highly loaded, has opened doors to new techniques for managing direct and semi-direct restorations. In particular, over the last ten years, there has been a significant revolution in the world of flowable composites. Nowadays, these materials offer a filler percentage very similar to packable composites through precise interventions in resin matrix management. They come in various viscosities, offering numerous advantages both in terms of handling and clinical use, as well as beneficial mechanical and physical characteristics.


FLOWABLE INJECTION TECHNIQUE

This new era of flowable composites has seen the development of a technique known as the Flowable Injection Technique (also referred to as injection moulding). It enables dental practitioners to reproduce anatomical forms created by a dental technician in the laboratory through a diagnostic wax-up. The shapes planned on the model are transferred directly in the patient's mouth using transparent silicone matrices or indexes, into which the composite is injected through specific injection holes.


The main difference compared to traditional mock-ups is that the reproduced dental elements remain separate from each other. This technique provides predictable results identical to those developed on the technician's wax-up, requiring less chair time than direct veneering and offering a longevity similar to traditional composite restorations.


BENEFITS AND CHALLENGES

The major benefit of this technique is the faithful reproduction of morphological details that the technician creates on the diagnostic wax-up, which the clinician can reproduce with minimal effort. The restoration produced through the flowable injection technique, if all steps are followed correctly, requires minimal finishing by the clinican, who only needs to focus on polishing the composite.


However, one limitation is the difficulty in isolating the operative field, often requiring a split-dam technique or labial retractors, with all the associated adhesive challenges. The use of a rubber dam is only feasible if the peripheral dental tissues around the restoration are euchromatic, allowing the technician to create a wax-up with supragingival preparation margins.


Another compromise with the flowable injection technique is the management of the composite as a single mass. This makes it only possible to reproduce natural incisal translucencies typical of young patients by performing complex cutbacks and subsequent incisal painting. Without specific operator skills, the outcomes of this time-consuming manual procedure are unpredictable.


HYBRID TECHNIQUE: BEST.FIT

To leverage the advantages of both classical direct anterior restoration and flowable injection techniques and eliminate the limitations, a hybrid technique known as BEST.FIT (Buccal Enamel Shade Through Flow Injection Technique) has emerged. This technique allows the operator to manage the delicate phase of reproducing the buccal enamel layer of the anterior restoration through the flowable injection technique, keeping certain aspects in mind during the injection phase.


PROCEDURE

The transparent silicone key used for the creation of the buccal enamel layer is similar to the one used in the original flowable injection technique. The initial phase of restoration management follows all the classical steps of direct technique, requiring isolation with rubber dam. The palatal enamel layer is recreated with a highly translucent packable composite, and the palatal portion of the interproximal walls is produced using a suitable matrix system. Then, the core of the restoration is defined with opaque masses, creating mamelons and adding incisal effects. It's crucial to control the residual enamel thickness using a vestibular silicone index, aiming for about 0.3 mm of space. The buccal portion is finally reconstructed during the injection phase. The transparent silicone index created on the wax-up should be tested after each reconstruction phase to ensure passive insertion.


After creating the restoration core, the element to be injected is separated from the contiguous ones with thin PTFE tape. The transparent mask is then inserted, and fluid composite is injected through the injection holes to precisely reconstruct the buccal enamel thickness. The composite tip should be positioned at least halfway through the buccal surface, and the injection should be slow and controlled to avoid air bubbles in the material.


FINISHING

Following a 40-second polymerization vestibularly and occlusally, the transparent matrix is carefully removed, and excess interproximal composite above the PTFE tape as well as any remaining composite cylinder from the injection holes are removed. After completing all restorative elements, the rubber dam is dismantled, and composite excess is finished. After checking the occlusion, the composite is polished, usually requiring no further intervention.


CASE EXAMPLE

Fig. 1. Female patient with discoloured anterior restorations desiring a smile makeover.


Fig. 2. Close-up of her maxillary anterior teeth.


Fig. 3. Restorations in need of replacement: Lateral view from the right.


Fig. 4. Restorations in need of replacement: Lateral view from the left.


Fig. 5. Printed model based on a digital diagnostic wax-up based on a digital impression.


Fig. 6. Palatal silicone index produced for the conventional direct restoration steps.


Fig. 7. Transparent matrix with injection holes produced for the build-up of the buccal enamel layer using the flowable injection technique.


Fig. 8. Operative field isolated with rubber dam.


Fig. 9. Existing restorations removed and tooth surfaces roughened at the start of treatment.


Fig. 10. Palatal silicone index positioned intraorally for the build-up of the palatal wall.


Fig. 11. Checking of the space available in the vestibular area with a second silicone index.


Fig. 12. Etching with phosphoric acid etchant.


Fig. 13. Application of a universal adhesive (CLEARFIL™ Universal Bond Quick, Kuraray Noritake Dental Inc.).


Fig. 14. Palatal walls built up with CLEARFIL MAJESTY™ ES-2 Premium in the shade A1E with the aid of the palatal silicone index.


Fig. 15. Build-up of the interproximal walls with CLEARFIL MAJESTY™ ES-2 Premium in the shade A1D and establishing of the contact points using anatomical sectional matrices for the posterior area placed vertically.


Fig. 16. Dentin core built up with CLEARFIL MAJESTY™ ES-2 Premium in the shade A2D. CLEARFIL MAJESTY™ ES Flow Super Low in the shade XW was applied on the mamelons, while CHROMA ZONE™ COLOR STAIN Blue (Kuraray Noritake Dental Inc.) was used to reproduce incisal translucencies in the spaces not covered by the dentin core.


Fig. 17. Try-in of the transparent matrix for flowable injection.


Fig. 18. Isolation of the adjacent teeth with PTFE tape for a one-by-one injection.


Fig. 19. CLEARFIL MAJESTY™ ES FLOW Low in the shade A2 (Kuraray Noritake Dental Inc.) injected for the anatomical shaping of the maxillary right central incisor.


Fig. 20. Situation after flowable injection for all four anterior teeth, light curing through the matrix, final matrix removal and excess removal.


Fig. 21. Treatment outcome …


Fig. 22. … with visible mamelons, natural incisal translucencies …


Fig. 23. … and a lifelike anatomical shape …


Fig. 24. … of the restorations.


CONCLUSION

Each work phase must be executed with extreme care to lay the foundations for a passive linking of all subsequent steps without creating difficult management situations. The BEST.FIT technique is a convenient and useful method for dental practitioners to manage multiple direct anterior restorations simply and predictably, especially in situations requiring complex rehabilitations with large restorations.


Dentist:

ENZO ATTANASIO


Enzo Attanasio graduated in 2008 in Dentistry and Dental Prosthetics from the Magna Graecia University of Catanzaro. In 2009, he went on to specialize in the use of laser and new technologies in the treatment of oral and perioral tissues at the University of Florence. That year he also attended Prof. Arnaldo Castellucci’s course in Clinical Endodontics at the Teaching Center of Microendodontics in Florence where, in 2012, he went on to complete his training in Surgical Microendodontics. In 2017 he attended a course on Direct and indirect Adhesive Restorations at Prof. Riccardo Becciani’s Think Adhesive training center in Florence where he later become a tutor. Today, as a member of the Italian AIC and based in Lamezia Terme, Italy, Dr Attanasio has a special interest in Endodontics and Aesthetic Conservative.


Restoration of a single central incisor: Mastering the art of observation

Case by Andreas Chatzimpatzakis


Observe and copy: This is the key to nature-like dental restorations. There are many optical effects, colour transitions and morphological details in natural teeth that need to be taken in and understood – and replicating them is only possible for those who know exactly how their materials work. Once these skills are acquired, however, they enable a dental technician to produce their restorations as truly beautiful copies of nature. Even when restoring a single maxillary central incisor, the technique delivers outstanding – or inconspicuous - outcomes, as revealed by the following example.


Using high-quality, translucent and gradient-shaded zirconia frameworks and porcelains, the layering technique does not have to be highly complicated. Two bakes and a number of selected effect liquids, internal stains and porcelains are usually sufficient for outcomes that exceed expectations.


CASE EXAMPLE


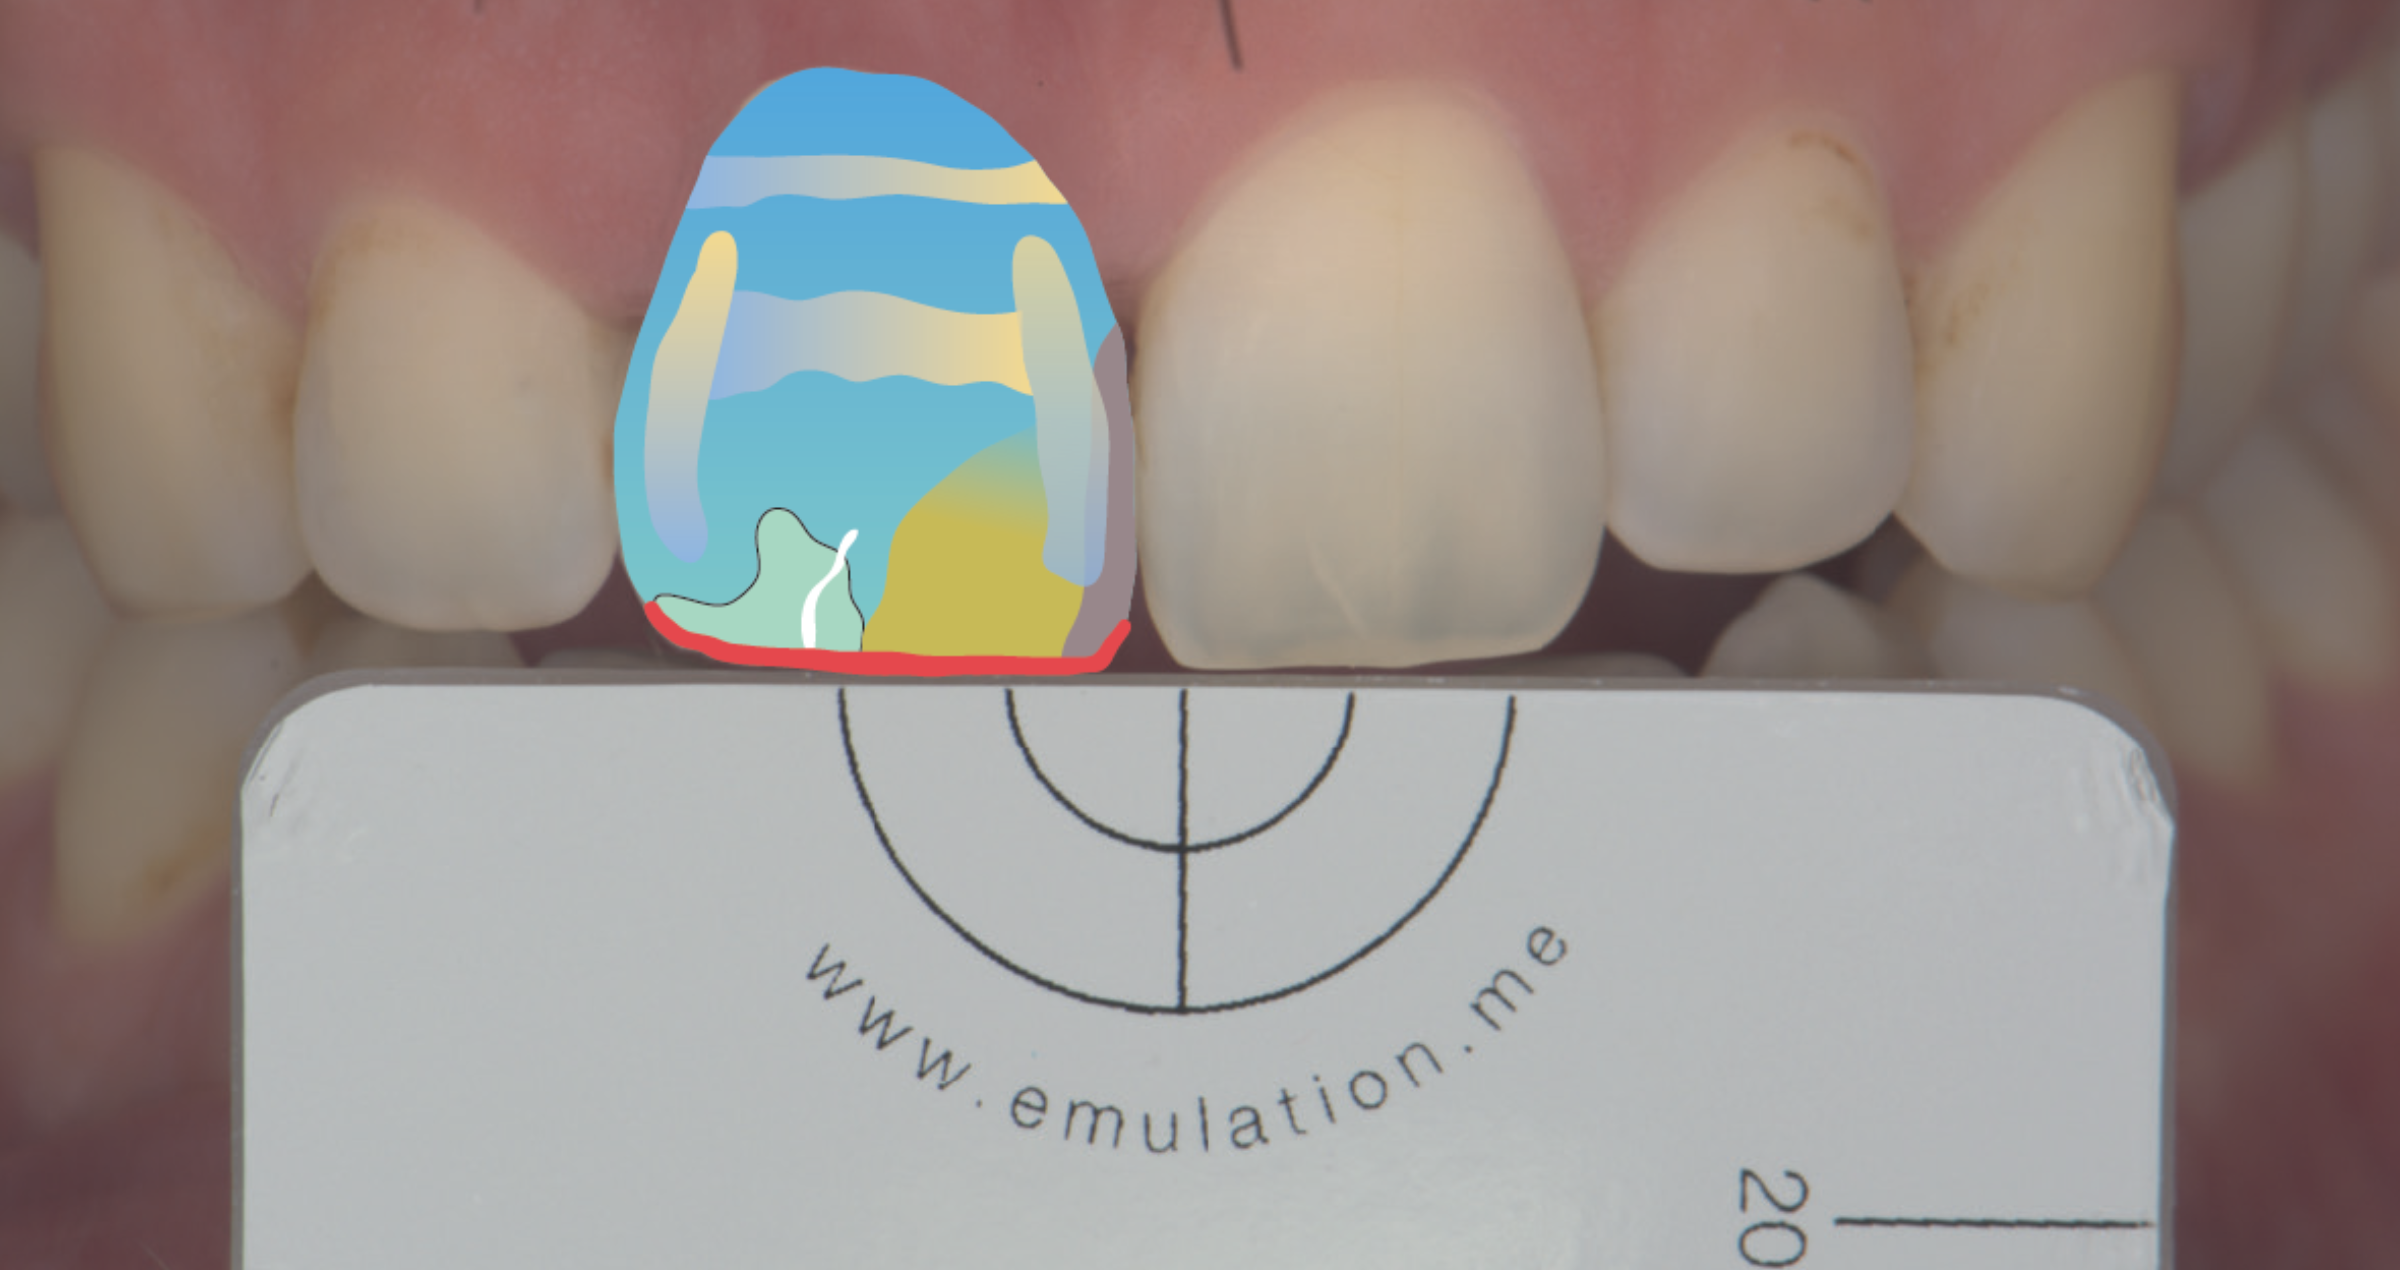
In the present case, a young male patient had a quite opaque crown on his maxillary right central incisor that needed to be replaced. During shade selection in the dental laboratory (Fig. 1), it was observed that the cervical third of the adjacent central incisor is lighter than the rest. Its shade in other areas corresponded to B4 on the VITA classical A1-D4® Shade Guide. Hence, it was decided to use a somewhat lighter material for the framework and darken the restoration especially in the middle and incisal areas with internal stains.


The concrete plan was to mill a coping made of KATANA™ Zirconia STML (Kuraray Noritake Dental Inc.) in the shade A3, characterize it with Esthetic Colorant (both Kuraray Noritake Dental Inc.) and sinter the piece (Figs 2 to 4). In the following layering procedure including just two bakes, a combination of internal stains and selected porcelains (CERABIEN™ ZR, Kuraray Noritake Dental Inc.) was applied as illustrated in Figures 5 to 12. Figures 13 to 17 display the result on the model, minor adjustments during try-in and the final treatment outcome.


Fig. 1. Shade selection. The cervical third of the adjacent central incisor is lighter than usual compared to the middle and incisal areas.


Fig. 2. Coping made of KATANA™ Zirconia STML in the shade A3.


Fig. 3. Intensification of some shade characteristics of the multi-layered blank using Esthetic Colorant in the shades Grey (middle) and Blue and Grey (incisal area).


Fig. 4. Coping after sintering.


Fig. 5. Colour map for internal staining, using CERABIEN™ ZR Internal Stains.


Fig. 6. Result of the use of Shade Base Stain Modifier Fluoro to increase the fluorescence and internal staining as planned.


Fig. 7. Application of Opacious Body OBA2, …


Fig. 8. … Translucent Tx …


Fig. 9.: … and Luster CCV-2.


Fig. 10. Crown after the first bake.


Fig. 11. Crown after the application of CERABIEN™ ZR Internal Stains: A+, Aqua Blue 2, White mixed with Cervical 2 (ratio: 30/70) for the cracks, and Cervical 2.


Fig. 12. Application of Luster LT1 to finalize the shape.


Fig. 13. Finished crown after the second bake on the model.


Fig. 14. Evaluation of the surface texture: Observing and copying the surface details is as important as the imitation of the shade characteristics.


Fig. 15. Minor texture adjustments during try-in.


Fig. 16. Final restoration in place after cementation with PANAVIA™ V5 (Kuraray Noritake Dental Inc.).


Fig. 17. Treatment outcome.


CONCLUSION


Mastering the art of observing natural teeth is the key to lifelike restorations. It allows a dental technician to develop a deep understanding of shade and morphology, which is – apart from knowing the selected materials very well – the only talent needed to reach a high level of excellence. Those who are observant and take in every detail with their eyes can be sure that their mind will understand and their hands will automatically follow.


Dental technician:

ANDREAS CHATZIMPATZAKIS


Andreas graduated from the Dental Technology Institute (TEI) of Athens in 1999. During his studies he followed a program at the Helsinki Polytechnic Department of Dental Technique, where he trained on implant superstructures and all ceramic prosthetic restorations. As of 2000, he is running the ACH Dental Laboratory in Athens, Greece, specialized on refractory veneers, zirconia and long span implant prosthesis. In 2017 Andreas visited Japan where he trained under the guidance of Hitoshi Aoshima, Naoto Yuasa and Kazunabu Yamanda and become International Trainer for Kuraray Noritake Dental Inc..


Anterior crowns on teeth and an implant

Case by Martin Laurik, MDT


There are so many different restorative materials out there and so many design and finishing concepts available that it often seems difficult to select the best option for a specific case. Using an allrounder like KATANA™ Zirconia YML can facilitate decision making: It is a great choice for single- to multi-unit restorations, works on teeth and implants alike, and can be adapted to individual needs by selecting a suitable design concept and adequate finishing technique. In this way, it is even possible to solve aesthetically challenging cases as the one illustrated below.


Initial situation and temporization


This patient was in need for treatment after the loss of her maxillary right central incisor and the placement of an implant in this region. As a replacement of the restorations on the other three maxillary incisors was necessary as well, it was decided to produce four crowns made of the same material – KATANA™ Zirconia YML. For aesthetic evaluation of the restorations’ length, angulations and shape in the mouth and a functional test drive, the crowns were digitally designed in full contour and milled from PMMA in the determined tooth shade A2 (Fig. 1).


Fig. 1. Full-contour PMMA crowns on the master cast.


Design, milling and effect dyeing of the zirconia crowns


Once the appearance and functional aspects of the temporary restorations were approved by the patient and the restorative team, the definitive crowns were produced. Their design was based on the full-contour design of the temporaries; however, a facial reduction of 0.6 mm was carried out by the software to create space for individualization with a small layer of veneering porcelain. The crowns were then milled from a KATANA™ Zirconia YML disc in the shade A1 – approximately one shade lighter than the determined tooth shade. To mask the uneven colour from the tooth stumps and the implant abutment, the intaglio of the crowns was treated with Esthetic Colorant in the shade Opaque. Some individual and intensified colour effects on the vestibular surface were also created with Esthetic Colorant.


Internal staining and porcelain layering


To slightly adjust the chroma and lightness, a first layer of CERABIEN™ ZR Internal Stains was added, followed by a wash bake. After the application of a first layer of CERABIEN™ ZR porcelains (Body, Enamel and Translucent) and baking (Fig. 2) – the central incisors received a layer of A1B, the lateral incisors a mixture of A1B and A2B (slightly darker to provide for a better match with the canines) with LT1, LT Natural completing the picture – additional internal staining was carried out (Fig. 3). The final layer of CERABIEN™ ZR luster porcelains (LT1, ELT2 used on the convex line angles to achieve an external reflection) was added and fixed in a fourth bake (Fig. 4).


After adjustments and very rough polishing, a self-glaze firing programme was selected (firing temperature 915 °C, holding time 5 seconds). On the highly polished incisal and palatal parts of the crowns and for contact point adjustment, CERABIEN™ ZR FC Paste Stain Glaze was applied and fixed with the same bake. The finished crowns on the model are shown in Figure 5, while Figure 6 displays the final treatment outcome.


Fig. 2. Crowns milled from KATANA™ Zirconia YML with a facial cutback of 0.6 mm after individualization with Esthetic Colorant, sintering, internal staining and the application of a first layer of porcelain.


Fig. 3. This picture shows the subtle internal stain adjustment to the ceramic mostly on the incisal part.


Fig. 4. Crowns prior to final shape adjustments and polishing.


Fig. 5. Finished crowns on the model.


FINAL SITUATION


Fig. 6. Treatment outcome.


Easy approach to beautiful restorations


The presented approach is a relatively easy way of producing highly aesthetic anterior restorations. Using an allrounder zirconia combined with a few selected effect liquids, internal stains and luster porcelains, it is possible to achieve a great optical integration even in a situation where teeth and implants need to be restored. The natural shape and surface texture of the restorations plays an important role in this context, as does the base material – a naturally shaded, highly translucent zirconia.


Dentist:

MARTIN LAURIK, MDT


Martin started working as a dental technician in 2014. In the time since, he never stopped training and learning from renowned colleagues. Continuing education courses focused on dental ceramics and occlusion in the functional concept of Slavicek. Fascinated by the beauty of natural teeth, developing an understanding of their complexity and learning how to mimic nature’s design as closely as possible has always been his primary goal, while he is well aware that there is still a lot to be learned and explored on the road to excellence.


Custom abutment implant cementation technique

With PANAVIA™ SA Cement Universal and KATANA™ Zirconia


By using PANAVIA™ SA Cement Universal and its proprietary dual-monomer technology, you can now simplify the bonding of restoration to implant abutments without the use of separate primers or silane. Independent research has confirmed this new dual-monomer technology does not sacrifice adhesion or durability on glass-based ceramics or zirconia. The technique, in this case study, is for custom fabricated abutment & KATANA™ Zirconia YML crown, however, the basic technique on the treatment of the abutment and restoration may be used with any implant restoration combination as long as the proper surface treatments for type of material is followed.


INITIAL FIT OF ABUTMENT & RESTORATION

Basic technique on the treatment of the abutment and restoration.


Fig. 1. Check Initial Fit of Abutment & Restoration: abutment & crown margins should be checked to ensure proper fit.


Fig. 2. Protect base of implant with putty or light-cure block-out resin. The base of the implant should be covered so that it is not air abraded accidentally.


Fig. 3. Abrade titanium abutment with 50 μm alumina oxide powder.


Fig. 4. Clean abutment with KATANA™ Cleaner: Apply KATANA™ Cleaner by rubbing each area for 10 seconds.


KATANA™ Cleaner is a universal cleaner that is indicated to clean metal, zirconia & glass-based restorations. It is also an intra oral cleaner that may be used on dentin and enamel.


TREATMENT OF KATANA™ Zirconia RESTORATION WORKFLOW

Bonding to zirconia has been proven to be durable in research going back to the 1990’s with the original MDP adhesive monomer in the PANAVIA™ resin cements. The three requirements to bonding zirconia are:

  1. Air abrade zirconia with 50 μm alumina oxide powder.
  2. Clean zirconia
  3. Apply an MDP-Based Primer or resin cement. PANAVIA™ SA Cement Universal contains the original MDP that was developed & patented in 1981 by Kuraray Dental.


Fig. 1. Air abrade KATANA™ Zirconia at 14-58 psi.


Fig. 2. Dispense & mix PANAVIA™ SA Cement Universal (it is available in automix or handmix formulations).


Fig. 3. Apply PANAVIA™ SA Cement Universal to the abutment or inside the crown.


Fig. 4. Seat restoration on abutment.


Fig. 5. Remove excess resin with a dry micro-applicator or brush.


Fig. 6. You may light-cure the margins after cleaning up all excess resin. If you fully cure excess resin, It can be difficult to remove. If difficult to remove, change curing time or distance with your light.


Fig. 7. Leave restoration on abutment to self-cure fully for approximately 10 minutes at room temperature.


Fig. 8. Final check of custom abutment KATANA™ Zirconia YML crown on model.


Dentist:

JEAN CHIHA


Technician Jean Chiha CDT, Santa Ana, CA USA

Mr. Chiha is the owner of North Star Dental Laboratory and Milling Center, Santa Ana, CA, and has served as President of the Dental Lab Owners Association of California since 2013. He is a 1985 graduate of Institut Dento Technic, a private dental technology school in France. Mr. Chiha lectures internationally on dental communication and case planning. Jean lectures around the world on a variety of topics and has carved out a niche with his extensive knowledge of zirconia. Affectionately referred to as “Mr. Katana” due to his involvement in the creation of the material.

Ti-Base implant cementation technique

With PANAVIA™ SA Cement Universal


By using PANAVIA™ SA Cement Universal and its proprietary dual-monomer technology, you can now simplify the bonding of any restoration to implant abutments without the use of separate primers or silane. Independent research has confirmed this new dual-monomer technology does not sacrifice adhesion or durability on glass-based ceramics or zirconia. The technique, in this case study, is for Ti-Base Implants, however, the basic technique on the treatment of the abutment and restoration may be used with any implant restoration combination.


TREATMENT OF TITANIUM ABUTMENT


Fig. 1. After attaching the abutment to the implant analog.


Fig. 2. Protect the base of the abutment with block out resin & light-cure.


Fig. 3. Air abrade the Titanium Abutment with 30-50 μm Alumina Powder @ 32 PSI.


Fig. 4. Clean abutment with KATANA™ Cleaner (10’s Rubbing, Rinse & Dry).


KATANA™ Cleaner is a universal cleaner that is indicated to clean metal, zirconia & glass-based restorations. It is also an intra oral cleaner that may be used on dentin and enamel.


REFERENCE INDEX POINTS TO ENSURE ACCURATE SEATING


Fig. 1. Mark Index position on implant analog.


Fig. 2. Mark index position (notch) on crown.


TREATMENT OF RESTORATION & BONDING TO THE ABUTMENT


Fig. 1. If Lithium Disilicate, HF acid etch Internal Surfaces, with 5% HF etch for 20’seconds then rinse & dry. If Zirconia, air abrade, at 14-58 PSI.


Fig. 2. Inject PANAVIA™ SA Cement Universal (White Shade) onto treated & cleaned abutment.


Fig. 3. Align index points & seat crown onto abutment.


Fig. 4. Place crown & implant into clamps & lightly tighten.


Fig. 5. Tack-Cure Clean-Up: Light-Cure excess cement for 2-5 seconds (time depends on light output & distance held).


Fig. 6. Remove excess cement & block-out resin with an explorer. PANAVIA™ SA Cement Universal has extremely easy clean-up.


Fig. 7. Wipe off remaining resin with gauze.


Fig. 8. Remove index mark with alcohol & gauze.


Fig. 9. Clean & polish restoration prior to seating. Surfaces coming in contact with soft-tissue should be polished.


Dentist:

GREG CAMPBELL


Dentist Greg Campbell DDS, Long Beach, CA USA

Greg Campbell, DDS is recognized internationally as an expert on integrating CAD/CAM dentistry into offices and is frequently sought out by industry leaders to lecture about Digital Dentistry. Dr. Campbell has a great understanding of Digital Technology and trains other dentists how to use this technology and is a certified Advanced CEREC Trainer. He is a former Beta tester for Sirona Dental and has authored two books on CAD/CAM dentistry. Dr. Campbell has created multiple polishing kits used for ceramics and has been trained on advanced adhesion materials, research & techniques and utilizing them clinically for over 8 years. Dr Campbell was an Alpha and Beta Tester for KATANA™ STML.


Dr. Campbell graduated from the University of Southern California School of Dentistry and completed advanced training in Cosmetic Dentistry at UCLA and maintains a private practice in Long Beach California.